Setting up the transmitter
Connect the transmitter to audio/video equipment.
| TV set |
To connect to LINE OUT | |
jack | VCR |
| Radio |
To the audio in jack | Computer |
The audio/video component
NOTE: If your audio/video component have right&left sound track stereo plug system, you can use the audio connect line and the audio conversion line to connect it.
To the audio in jack
in transmitter
To the audio in jack of the audio conversion line
 To the right/left sound track in the audio/video component
NOTE: The transmitter at a frequency that may cause interference to nearby TVs, Cordless Telephone or other wireless systems. In such case, place the transmitter away from the wireless system.
Connect the supplied AC power adapter to the transmitter.
The wall AC Adapter outlet
9V 300mA AC Adapter
To DC IN jack
Polarity of the plug
NOTE: Use only the supplied AC power adapter. Do not use any other AC power adapter. Connect the AC power adapter to a continuous power supply. Place the transmitter close the AC outlet so that you can plug the AC power adapter easily.
WARNING: Charging compartment only and explosion if charging the dry battery 
Operating the system
Before listening
To prevent your ears from being damaged, first lower the volume of headphones.
Turn on the audio/video equipment connected to the transmitter.
Setting the volume control of the audio source equipment as high as possible but not so high that the audio signal becomes distorted.
Remove the headphones from the transmitter and
press the  button to turn on the power of transmitter.
The transmitter's IN USE indicator will light in green.
Press the power button
Turn on the power of headphone and put on the headphones.
The power ON/OFF switch is located in the right headphone.
The power ON/OFFswitch
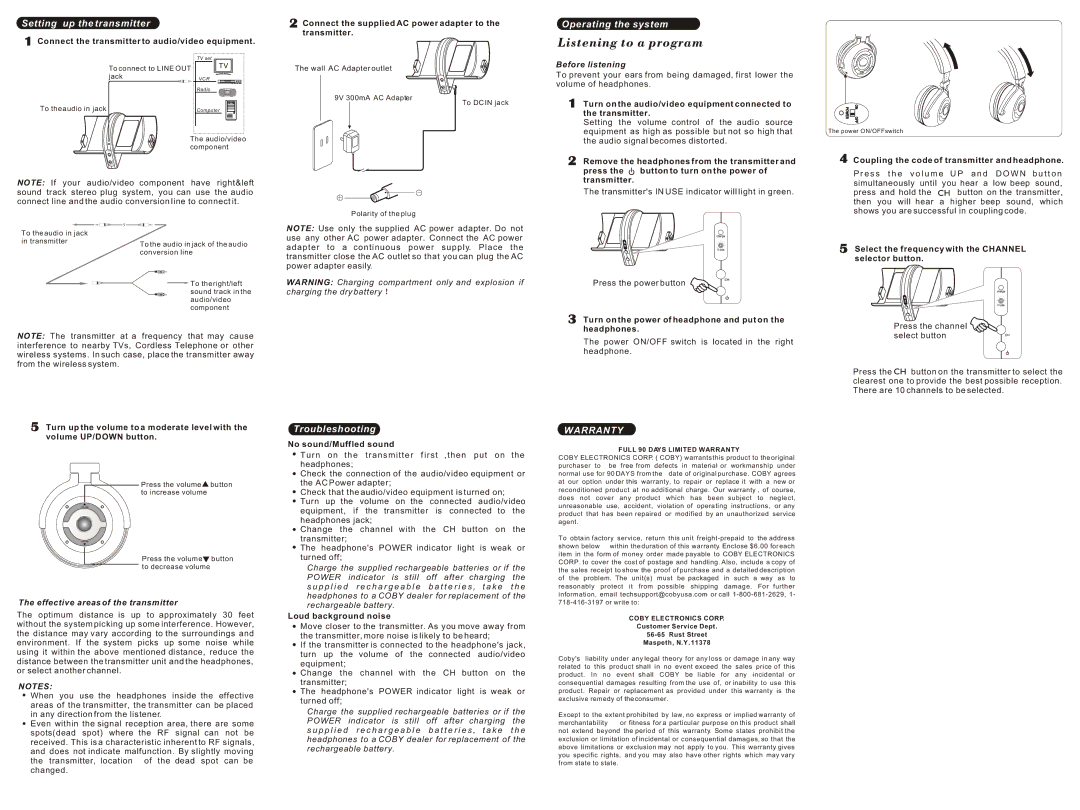
Coupling the code of transmitter and headphone.
P r e s s t h e v o l u m e U P a n d | D O W N b u t t o n |
simultaneously until you hear a | low beep sound, |
press and hold the  button on the transmitter, then you will hear a higher beep sound, which shows you are successful in coupling code.
Select the frequency with the CHANNEL selector button.
Press the channel select button
Press the  button on the transmitter to select the clearest one to provide the best possible reception. There are 10 channels to be selected.
Turn up the volume to a moderate level with the volume UP/DOWN button.
Press the volume  button to increase volume
Press the volume button to decrease volume
The effective areas of the transmitter
The optimum distance is up to approximately 30 feet without the system picking up some interference. However, the distance may vary according to the surroundings and environment. If the system picks up some noise while using it within the above mentioned distance, reduce the distance between the transmitter unit and the headphones, or select another channel.
NOTES:
When you use the headphones inside the effective areas of the transmitter, the transmitter can be placed in any direction from the listener.
Even within the signal reception area, there are some spots(dead spot) where the RF signal can not be received. This is a characteristic inherent to RF signals, and does not indicate malfunction. By slightly moving the transmitter, location of the dead spot can be changed.
Troubleshooting
No sound/Muffled sound
Turn on the transmitter first ,then put on the headphones;
Check the connection of the audio/video equipment or the AC Power adapter;
Check that the audio/video equipment is turned on; Turn up the volume on the connected audio/video equipment, if the transmitter is connected to the headphones jack;
Change the channel with the CH button on the transmitter;
The headphone's POWER indicator light is weak or turned off;
Charge the supplied rechargeable batteries or if the POWER indicator is still off after charging the s u p p l i e d r e c h a r g e a b l e b a t t e r i e s , t a k e t h e headphones to a COBY dealer for replacement of the rechargeable battery.
Loud background noise
Move closer to the transmitter. As you move away from the transmitter, more noise is likely to be heard;
If the transmitter is connected to the headphone's jack, turn up the volume of the connected audio/video equipment;
Change the channel with the CH button on the transmitter;
The headphone's POWER indicator light is weak or turned off;
Charge the supplied rechargeable batteries or if the POWER indicator is still off after charging the s u p p l i e d r e c h a r g e a b l e b a t t e r i e s , t a k e t h e headphones to a COBY dealer for replacement of the rechargeable battery.
WARRANTY
FULL 90 DAYS LIMITED WARRANTY
COBY ELECTRONICS CORP. ( COBY) warrants this product to the original purchaser to be free from defects in material or workmanship under normal use for 90 DAYS from the date of original purchase. COBY agrees at our option under this warranty, to repair or replace it with a new or reconditioned product at no additional charge. Our warranty , of course, does not cover any product which has been subject to neglect, unreasonable use, accident, violation of operating instructions, or any product that has been repaired or modified by an unauthorized service agent.
To obtain factory service, return this unit freight-prepaid to the address shown below within the duration of this warranty. Enclose $6.00 for each item in the form of money order made payable to COBY ELECTRONICS CORP. to cover the cost of postage and handling. Also, include a copy of the sales receipt to show the proof of purchase and a detailed description of the problem. The unit(s) must be packaged in such a way as to reasonably protect it from possible shipping damage. For further information, email techsupport@cobyusa.com or call 1-800-681-2629, 1-
718-416-3197 or write to :
COBY ELECTRONICS CORP.
Customer Service Dept.
56-65 Rust Street
Maspeth, N.Y. 11378
Coby's liability under any legal theory for any loss or damage in any way related to this product shall in no event exceed the sales price of this product. In no event shall COBY be liable for any incidental or consequential damages resulting from the use of, or inability to use this product. Repair or replacement as provided under this warranty is the exclusive remedy of the consumer.
Except to the extent prohibited by law, no express or implied warranty of
merchantability or fitness for a particular purpose on this product shall not extend beyond the period of this warranty. Some states prohibit the exclusion or limitation of incidental or consequential damages, so that the above limitations or exclusion may not apply to you. This warranty gives you specific rights, and you may also have other rights which may vary from state to state.