KOHNATM TENT 18’ X 12’ MODEL 2000001188
STITCH LINE
Before you begin
Read all instructions before set up.
•Select a level campsite clear of rocks, branches, and other hard or sharp objects, to install your tent.
![]() WARNING: Keep clear of overhead power lines.
WARNING: Keep clear of overhead power lines.
•Do not set up your tent under trees.
•For best results in windy conditions, position end of tent into the wind.
•Enlist the help of at least one other person to assist you when it is time to assemble the tent.
Parts and Components
Description | Part Number |
Living Quarters, Main Poles, Black (2) | 5010000384 |
Living Quarters, Side Poles, Thin, Gray (2) | 5010000383 |
Screen Room Poles, Gray (2) | 5010000382 |
Rainfly | 5010000385 |
|
|
To Set Up Tent’s Living Quarters
1.Unfold tent and spread out on a clean, level surface with the door facing the desired direction. (Fig. 1)
2. Assemble main tent poles by interlocking both longer, black
3. Insert black main poles through sleeves, in top of the Living Quarters area of tent, forming an “X” as shown. (Fig. 1)
Main Tent Poles | Fig. 1 |
|
Sleeves ![]()
Door
Living Quarters | Screen Room |
4.Insert one end of each black main pole into pins in front corners of tent. (Fig. 2 & 2A)
5.Go to opposite end of each pole and gradually apply pressure to the pole forming an arch. Insert the pin into the pole end at the tent corners. (Fig. 2 & 2A)
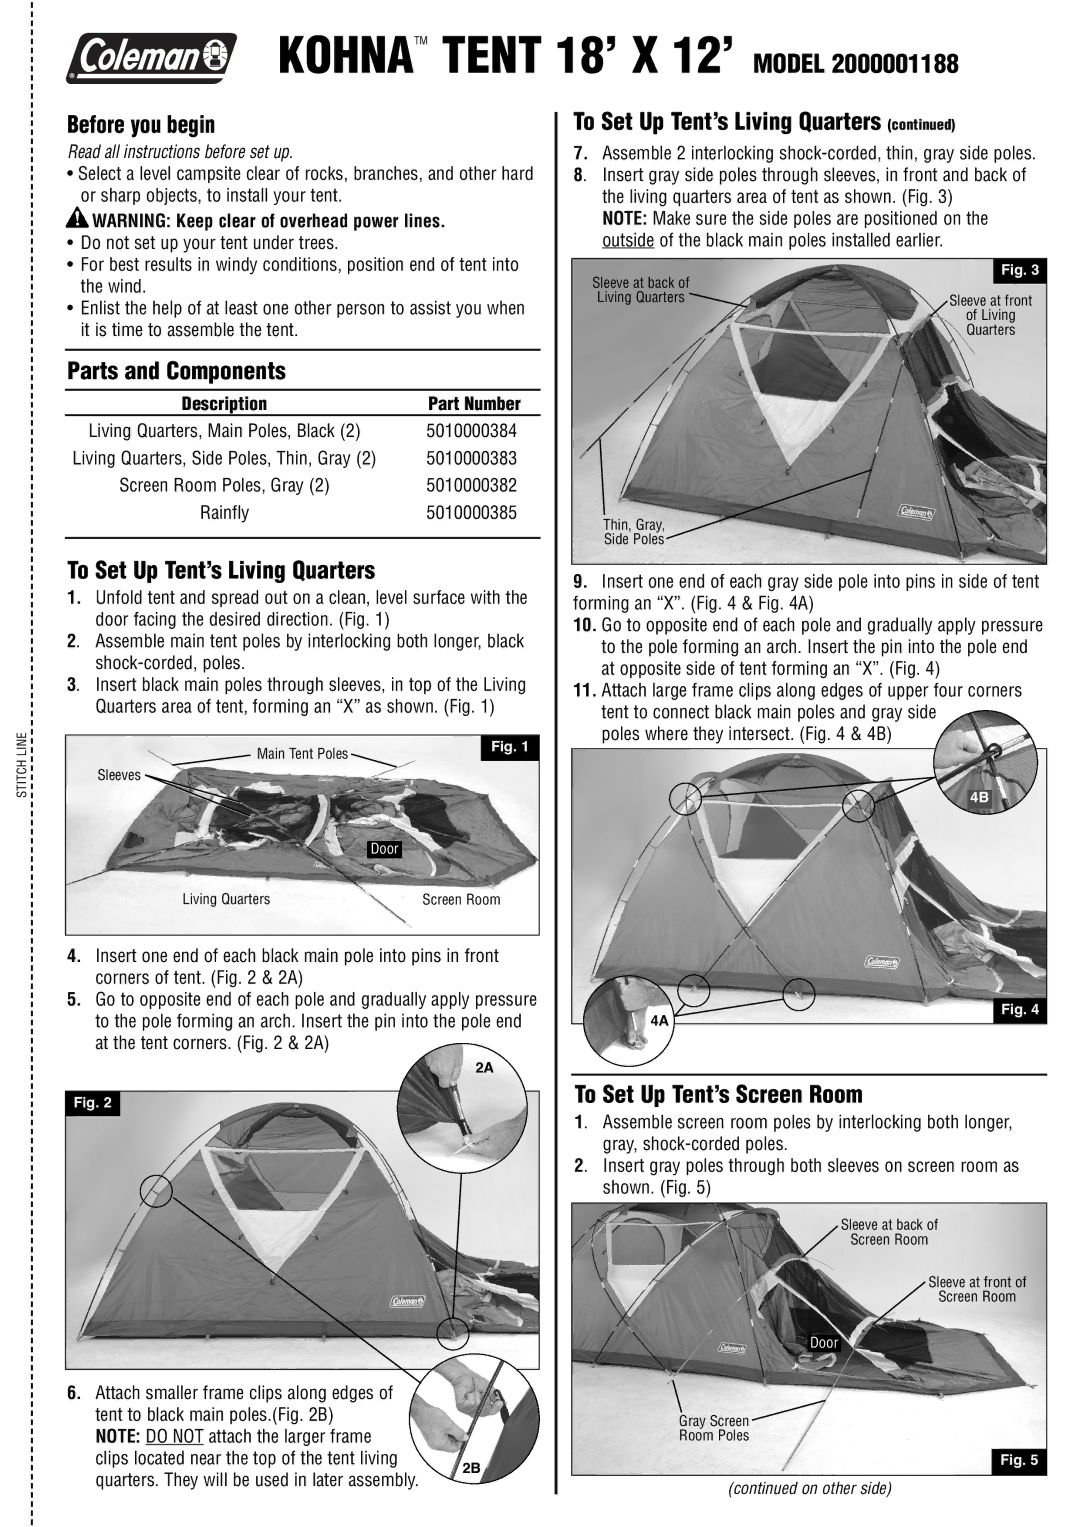
To Set Up Tent’s Living Quarters (continued)
7.Assemble 2 interlocking shock-corded, thin, gray side poles.
8.Insert gray side poles through sleeves, in front and back of the living quarters area of tent as shown. (Fig. 3)
NOTE: Make sure the side poles are positioned on the outside of the black main poles installed earlier.
Fig. 3
Sleeve at back of
Living Quarters ![]() Sleeve at front of Living Quarters
Sleeve at front of Living Quarters
Thin, Gray,
Side Poles
9.Insert one end of each gray side pole into pins in side of tent forming an “X”. (Fig. 4 & Fig. 4A)
10.Go to opposite end of each pole and gradually apply pressure to the pole forming an arch. Insert the pin into the pole end at opposite side of tent forming an “X”. (Fig. 4)
11.Attach large frame clips along edges of upper four corners tent to connect black main poles and gray side
poles where they intersect. (Fig. 4 & 4B)
4B
Fig. 4
4A
Fig. 2
6. Attach smaller frame clips along edges of tent to black main poles.(Fig. 2B)
NOTE: DO NOT attach the larger frame clips located near the top of the tent living
2A
2B
To Set Up Tent’s Screen Room
1. Assemble screen room poles by interlocking both longer, gray,
2. Insert gray poles through both sleeves on screen room as shown. (Fig. 5)
Sleeve at back of
Screen Room
Sleeve at front of
Screen Room
Door
Gray Screen ![]()
Room Poles
Fig. 5
quarters. They will be used in later assembly.
(continued on other side)