TO INSTALL OR REPLACE BATTERIES

Carefully read all instructions before use and save for future reference.

Your new light operates on 3 “AAA” cell batteries. For longest life, use alkaline batteries.

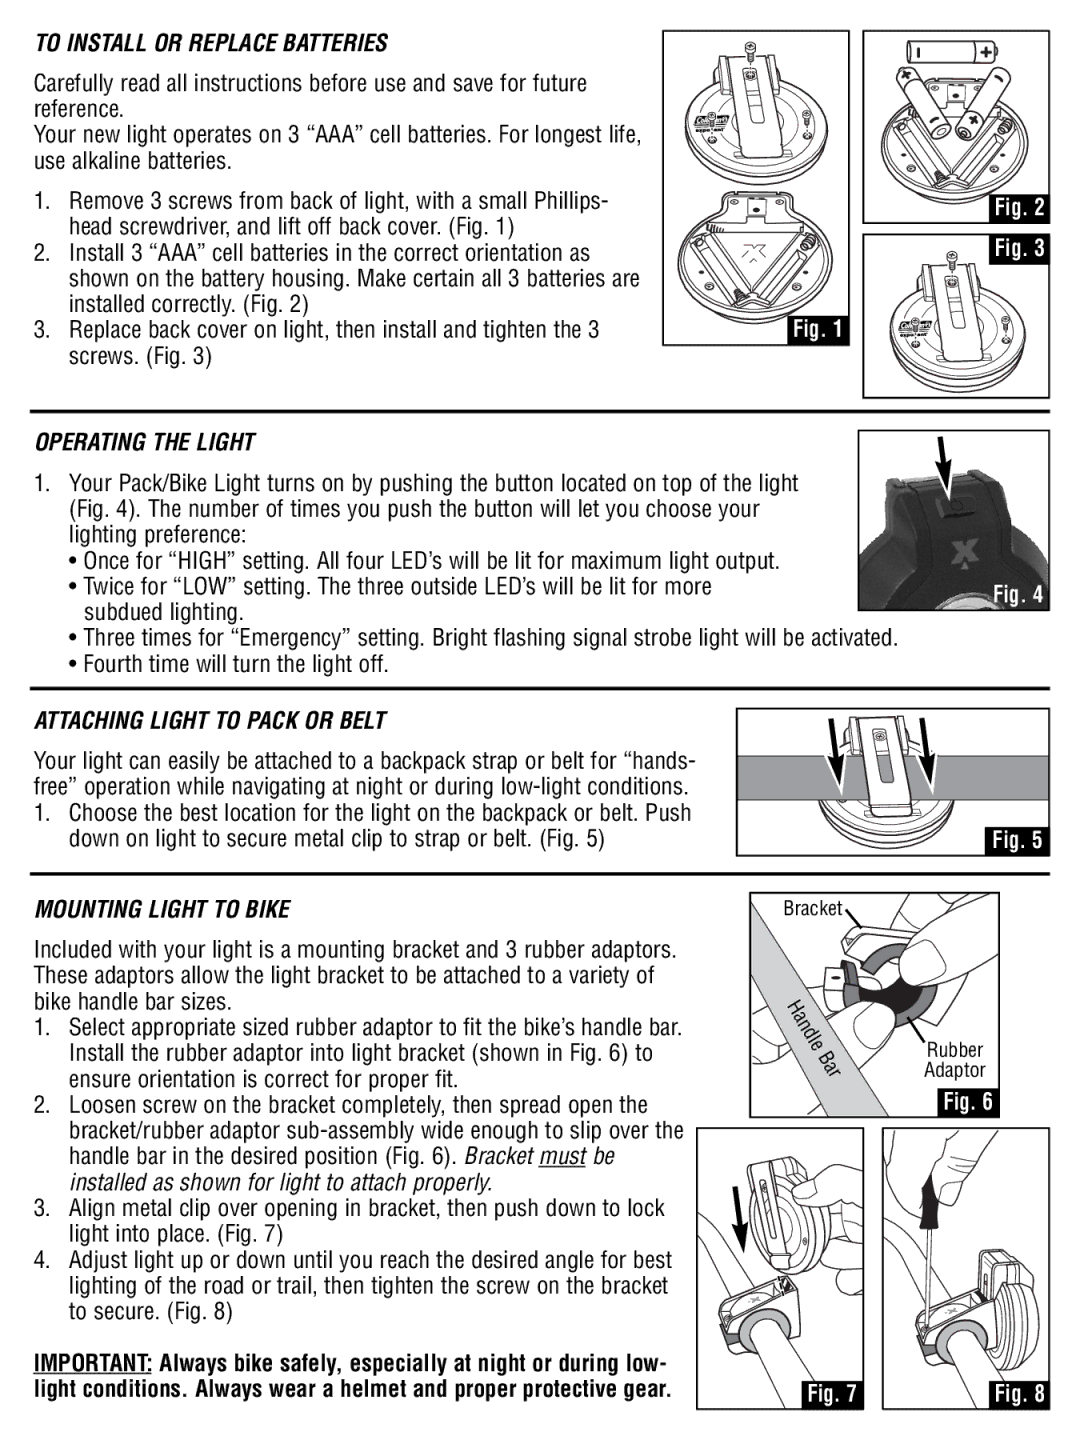
1.Remove 3 screws from back of light, with a small Phillips- head screwdriver, and lift off back cover. (Fig. 1)

2.Install 3 “AAA” cell batteries in the correct orientation as shown on the battery housing. Make certain all 3 batteries are installed correctly. (Fig. 2)

3.Replace back cover on light, then install and tighten the 3 screws. (Fig. 3)

Fig. 1

Fig. 2

Fig. 3

OPERATING THE LIGHT

1.Your Pack/Bike Light turns on by pushing the button located on top of the light (Fig. 4). The number of times you push the button will let you choose your lighting preference:

• Once for “HIGH” setting. All four LED’s will be lit for maximum light output.

• Twice for “LOW” setting. The three outside LED’s will be lit for more

Fig. 4

subdued lighting.


Three times for “Emergency” setting. Bright flashing signal strobe light will be activated.

Fourth time will turn the light off.

ATTACHING LIGHT TO PACK OR BELT

Your light can easily be attached to a backpack strap or belt for “hands- free” operation while navigating at night or during low-light conditions.

1.Choose the best location for the light on the backpack or belt. Push down on light to secure metal clip to strap or belt. (Fig. 5)

Fig. 5

MOUNTING LIGHT TO BIKE

Included with your light is a mounting bracket and 3 rubber adaptors. These adaptors allow the light bracket to be attached to a variety of bike handle bar sizes.

1.

Select appropriate sized rubber adaptor to fit the bike’s handle bar.


Install the rubber adaptor into light bracket (shown in Fig. 6) to


ensure orientation is correct for proper fit.

2.

Loosen screw on the bracket completely, then spread open the

Bracket

Rubber

Adaptor

Fig. 6


bracket/rubber adaptor sub-assembly wide enough to slip over the


handle bar in the desired position (Fig. 6). Bracket must be


installed as shown for light to attach properly.

3.

Align metal clip over opening in bracket, then push down to lock


light into place. (Fig. 7)

4.

Adjust light up or down until you reach the desired angle for best


lighting of the road or trail, then tighten the screw on the bracket


to secure. (Fig. 8)

IMPORTANT: Always bike safely, especially at night or during low- light conditions. Always wear a helmet and proper protective gear.

Fig. 7

Fig. 8

Page 2
Image 2
Coleman 3AAA LED warranty To Install or Replace Batteries, Operating the Light, Attaching Light to Pack or Belt

3AAA LED specifications

The Coleman 3AAA LED is a compact and versatile flashlight designed to meet the demands of outdoor enthusiasts and everyday users alike. Renowned for its power and efficiency, this flashlight showcases a range of features that make it an indispensable tool in various situations, from camping trips to household emergencies.

One of the standout features of the Coleman 3AAA LED is its impressive luminosity. Equipped with high-performance LEDs, this flashlight delivers a bright, focused beam that can illuminate your surroundings effectively. With a maximum output of around 150 lumens, it provides ample light for tasks such as setting up a tent at night or searching for items in the dark. The beam distance is particularly notable, reaching up to 150 feet, which allows users to see far into the distance without straining their eyes.

Another significant attribute of the Coleman 3AAA LED is its user-friendly design. The flashlight is powered by three AAA batteries, ensuring quick and hassle-free replacements. This design feature allows the flashlight to be lightweight, making it convenient to carry on hikes or camping trips. Additionally, the easy-to-access battery compartment means that users can change batteries without tools or complicated setups.

Durability is a hallmark of the Coleman brand, and the 3AAA LED flashlight is no exception. Constructed from rugged materials, this flashlight is built to withstand the rigors of outdoor use. It is resistant to impacts and features a weather-resistant casing that can endure splashes, making it suitable for use in light rain or damp conditions.

The flashlight also incorporates various light modes, allowing users to customize their lighting experience. With options like high, low, and strobe modes, it adapts effortlessly to different scenarios, whether you need sustained brightness or a flashing signal for emergencies. This versatility adds significant value to the device, making it suitable for a range of activities such as hiking, fishing, or even during roadside emergencies.

In conclusion, the Coleman 3AAA LED flashlight combines high performance, durability, and excellent versatility, making it an essential accessory for anyone needing reliable illumination. Whether you're exploring the great outdoors or simply navigating your home at night, this flashlight is designed to shine brightly in every situation. Its robust features and dependable technology ensure that you are never left in the dark.