3

Setup and

Adjustments

WARNING

Disconnect and ground the spark plug wire as instruct- ed in the separate engine manual.

IMPORTANT This unit is shipped

WITHOUT GASOLINE or OIL. After assem-

NOTE: This owner’s manual covers various models of lawnmowers. The units illustrated may vary slightly from your unit. Follow only those instruc- tions which pertain to your model lawnmower.

On models with 2”

wide rear wheels only.

Figure 1

A

B

Handle Bracket

Figure 2

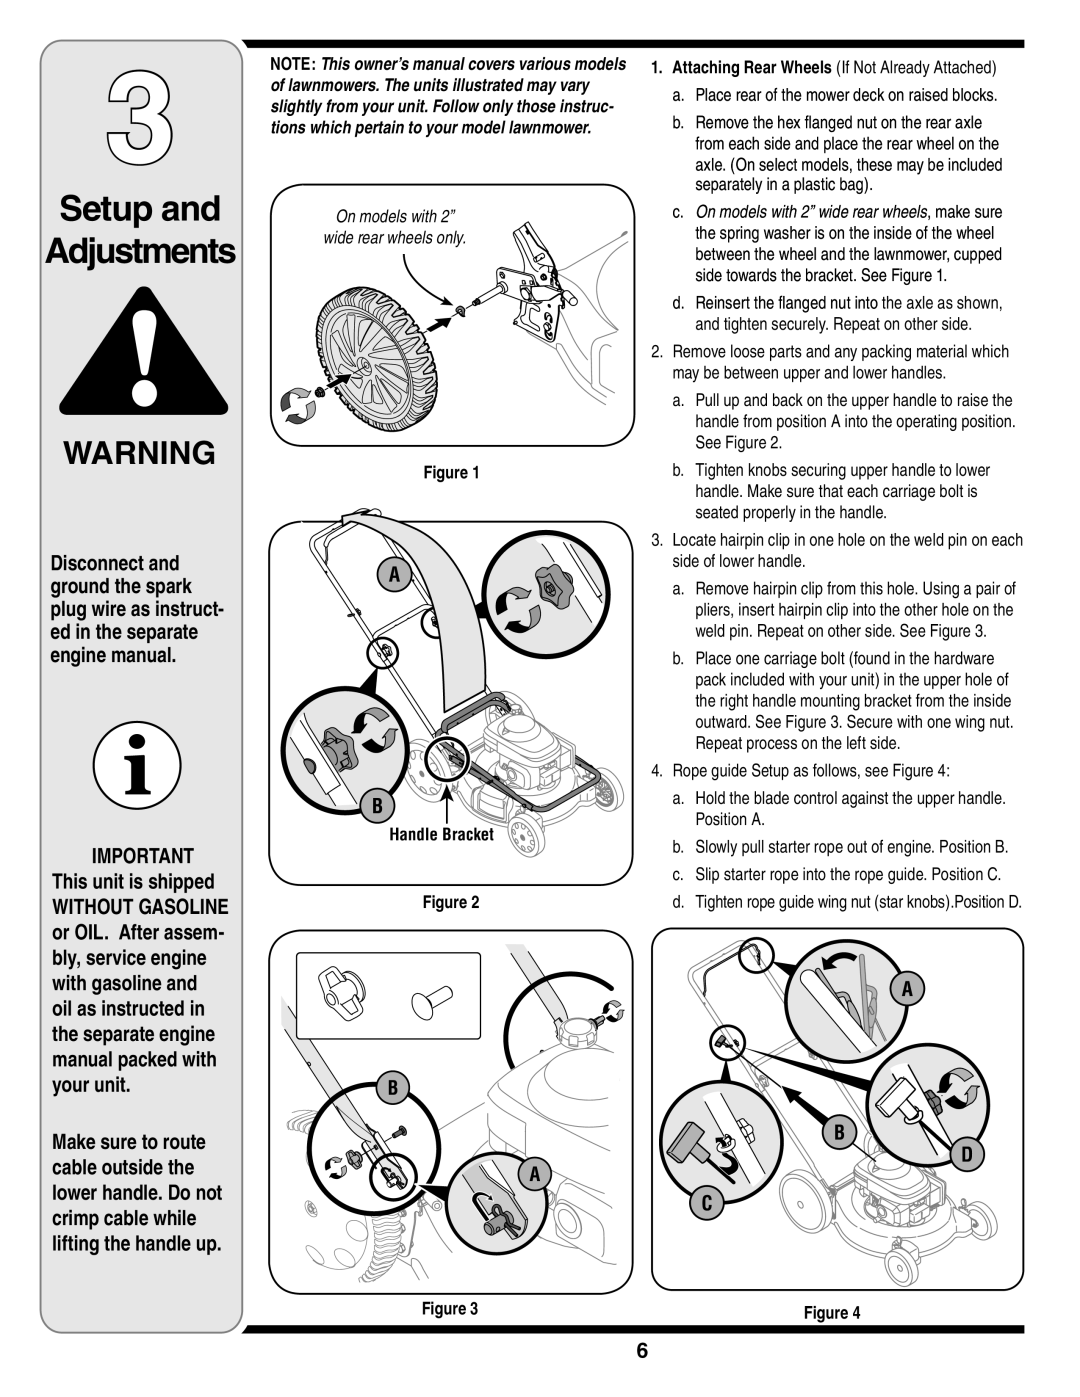
1.Attaching Rear Wheels (If Not Already Attached)

a.Place rear of the mower deck on raised blocks.

b.Remove the hex flanged nut on the rear axle from each side and place the rear wheel on the

axle. (On select models, these may be included separately in a plastic bag).

c.On models with 2” wide rear wheels, make sure the spring washer is on the inside of the wheel between the wheel and the lawnmower, cupped side towards the bracket. See Figure 1.

d.Reinsert the flanged nut into the axle as shown, and tighten securely. Repeat on other side.

2.Remove loose parts and any packing material which may be between upper and lower handles.

a.Pull up and back on the upper handle to raise the handle from position A into the operating position. See Figure 2.

b.Tighten knobs securing upper handle to lower handle. Make sure that each carriage bolt is seated properly in the handle.

3.Locate hairpin clip in one hole on the weld pin on each side of lower handle.

a.Remove hairpin clip from this hole. Using a pair of pliers, insert hairpin clip into the other hole on the weld pin. Repeat on other side. See Figure 3.

b.Place one carriage bolt (found in the hardware pack included with your unit) in the upper hole of the right handle mounting bracket from the inside outward. See Figure 3. Secure with one wing nut. Repeat process on the left side.

4.Rope guide Setup as follows, see Figure 4:

a.Hold the blade control against the upper handle. Position A.

b.Slowly pull starter rope out of engine. Position B.

c.Slip starter rope into the rope guide. Position C.

d.Tighten rope guide wing nut (star knobs).Position D.

bly, service engine with gasoline and oil as instructed in the separate engine manual packed with your unit.

Make sure to route cable outside the lower handle. Do not crimp cable while lifting the handle up.

A

B

B

D

A

C

Figure 3

Figure 4

Page 6
Image 6
Columbian Home Products 540 warranty Setup Adjustments, Handle Bracket

540 specifications

Columbian Home Products has established itself as a trusted name in cookware, with its 540 series embodying quality, functionality, and modern design. The Columbian Home Products 540 is a versatile piece of cookware engineered to meet the daily demands of home cooks and professional chefs alike.

One of the primary features of the 540 model is its durable construction. Made from heavy-gauge steel, this cookware ensures even heat distribution, which minimizes hot spots and promotes uniform cooking. This characteristic is essential for achieving perfect results in a variety of culinary tasks, from sautéing vegetables to simmering sauces.

The interior of the cookware is coated with a non-stick finish that not only allows for easy food release but also simplifies cleanup. This non-stick surface is also designed for longevity, making it resistant to wear and tear from everyday cooking. Users can enjoy the benefits of reduced oil usage, promoting a healthier cooking style while ensuring that food retains its vibrant flavors.

The 540 model also features ergonomic handles that are heat-resistant, offering a comfortable grip during cooking. These handles are riveted for added strength and stability, providing a secure hold even when the cookware is full. Additionally, they are designed to stay cool on the stovetop, enhancing safety and usability.

In terms of versatility, the Columbian Home Products 540 is compatible with various heat sources, including gas, electric, and ceramic cooktops. This adaptability makes it an excellent choice for any kitchen setup. Furthermore, it is oven-safe, allowing users to transfer dishes directly from stovetop to oven without the need for additional cookware.

The design of the 540 model is not just functional but also aesthetically pleasing. With its sleek and modern appearance, it can transition seamlessly from kitchen to table, enhancing the dining experience.

In summary, the Columbian Home Products 540 offers a combination of quality materials, user-friendly features, and versatile cooking options. This makes it an invaluable addition to any kitchen, ensuring that it meets the needs of both amateur and experienced cooks. Whether preparing a simple meal or a gourmet dish, the 540 series stands out as a reliable partner in culinary adventures.