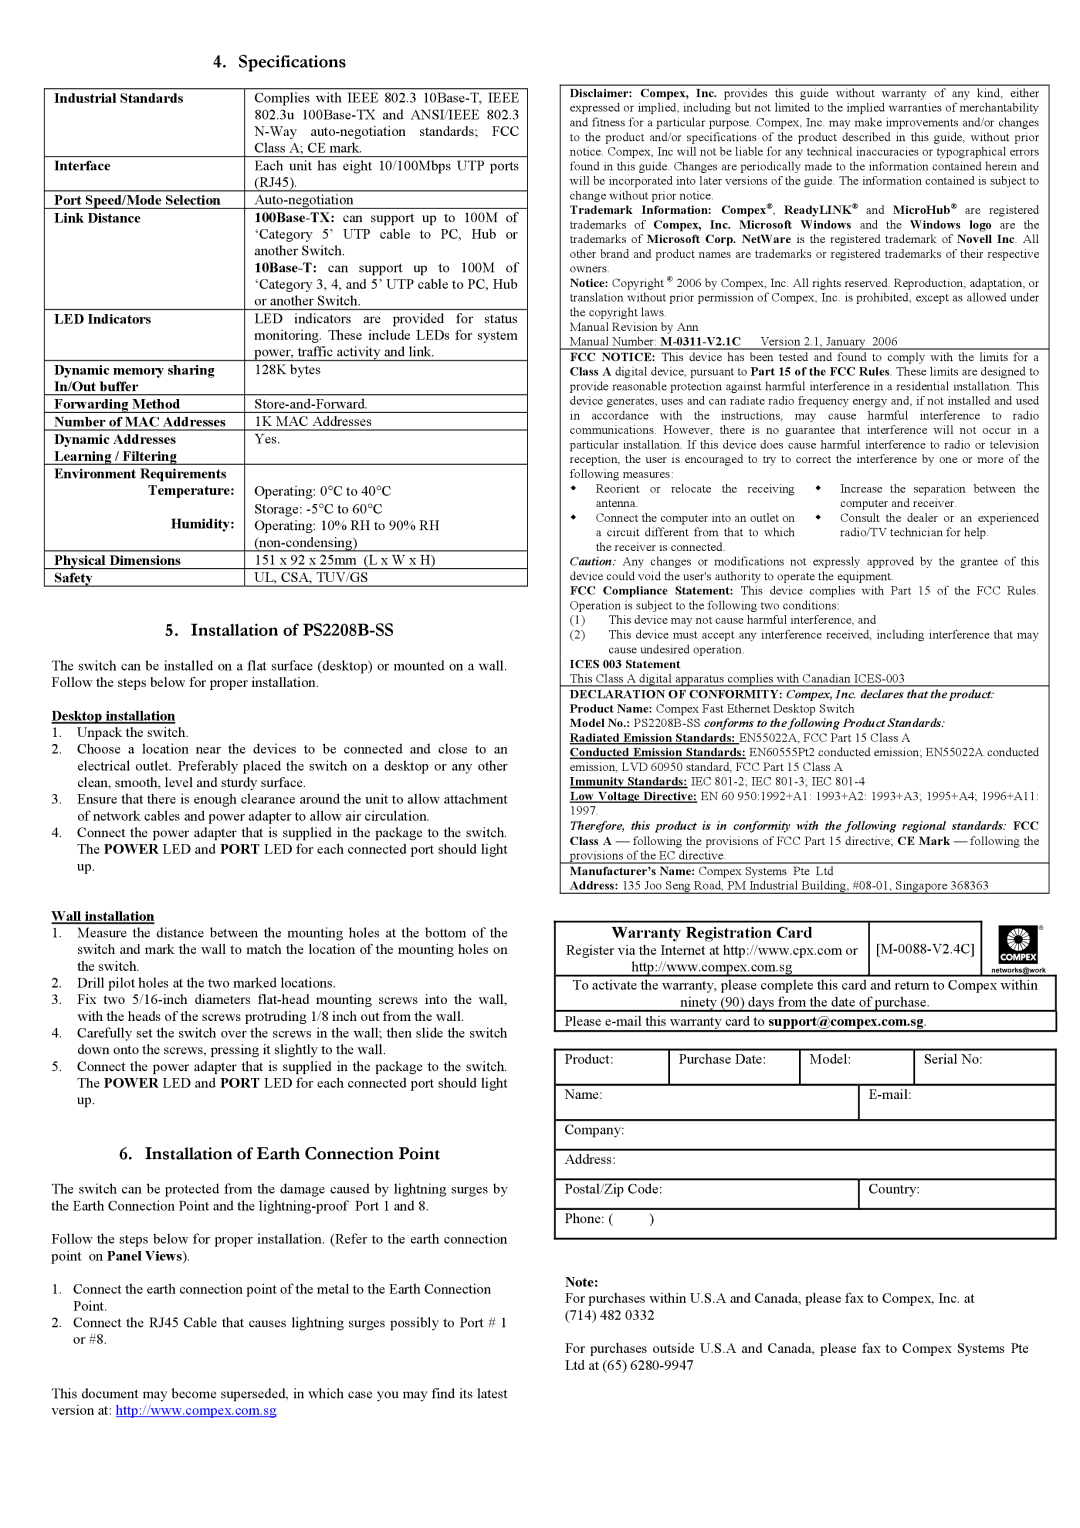
4. | Specifications | |
|
|
|
Industrial Standards |
| Complies with IEEE 802.3 |
|
| 802.3u |
|
| |
|
| Class A; CE mark. |
Interface |
| Each unit has eight 10/100Mbps UTP ports |
|
| (RJ45). |
Port Speed/Mode Selection |
| |
Link Distance |
| |
|
| ‘Category 5’ UTP cable to PC, Hub or |
|
| another Switch. |
|
| |
|
| ‘Category 3, 4, and 5’ UTP cable to PC, Hub |
|
| or another Switch. |
LED Indicators |
| LED indicators are provided for status |
|
| monitoring. These include LEDs for system |
|
| power, traffic activity and link. |
Dynamic memory sharing |
| 128K bytes |
In/Out buffer |
|
|
Forwarding Method |
| |
Number of MAC Addresses |
| 1K MAC Addresses |
Dynamic Addresses |
| Yes. |
Learning / Filtering |
|
|
Environment Requirements |
|
|
Temperature: |
| Operating: 0°C to 40°C |
Humidity: |
| Storage: |
| Operating: 10% RH to 90% RH | |
|
| |
Physical Dimensions |
| 151 x 92 x 25mm (L x W x H) |
Safety |
| UL, CSA, TUV/GS |
5. Installation of PS2208B-SS
The switch can be installed on a flat surface (desktop) or mounted on a wall. Follow the steps below for proper installation.
Desktop installation
1.Unpack the switch.
2.Choose a location near the devices to be connected and close to an electrical outlet. Preferably placed the switch on a desktop or any other clean, smooth, level and sturdy surface.
3.Ensure that there is enough clearance around the unit to allow attachment of network cables and power adapter to allow air circulation.
4.Connect the power adapter that is supplied in the package to the switch. The POWER LED and PORT LED for each connected port should light up.
Disclaimer: Compex, Inc. provides this guide without warranty of any kind, either expressed or implied, including but not limited to the implied warranties of merchantability and fitness for a particular purpose. Compex, Inc. may make improvements and/or changes to the product and/or specifications of the product described in this guide, without prior notice. Compex, Inc will not be liable for any technical inaccuracies or typographical errors found in this guide. Changes are periodically made to the information contained herein and will be incorporated into later versions of the guide. The information contained is subject to change without prior notice.
Trademark Information: Compex®, ReadyLINK® and MicroHub® are registered trademarks of Compex, Inc. Microsoft Windows and the Windows logo are the trademarks of Microsoft Corp. NetWare is the registered trademark of Novell Inc. All other brand and product names are trademarks or registered trademarks of their respective owners.
Notice: Copyright © 2006 by Compex, Inc. All rights reserved. Reproduction, adaptation, or translation without prior permission of Compex, Inc. is prohibited, except as allowed under the copyright laws.
Manual Revision by Ann
Manual Number:
FCC NOTICE: This device has been tested and found to comply with the limits for a Class A digital device, pursuant to Part 15 of the FCC Rules. These limits are designed to provide reasonable protection against harmful interference in a residential installation. This device generates, uses and can radiate radio frequency energy and, if not installed and used in accordance with the instructions, may cause harmful interference to radio communications. However, there is no guarantee that interference will not occur in a particular installation. If this device does cause harmful interference to radio or television reception, the user is encouraged to try to correct the interference by one or more of the following measures:
!Reorient or relocate the receiving ! Increase the separation between the
| antenna. | computer and receiver. |
! | Connect the computer into an outlet on | ! Consult the dealer or an experienced |
| a circuit different from that to which | radio/TV technician for help. |
the receiver is connected.
Caution: Any changes or modifications not expressly approved by the grantee of this device could void the user's authority to operate the equipment.
FCC Compliance Statement: This device complies with Part 15 of the FCC Rules. Operation is subject to the following two conditions:
(1)This device may not cause harmful interference, and
(2)This device must accept any interference received, including interference that may cause undesired operation.
ICES 003 Statement
This Class A digital apparatus complies with Canadian
DECLARATION OF CONFORMITY: Compex, Inc. declares that the product:
Product Name: Compex Fast Ethernet Desktop Switch
Model No.:
Radiated Emission Standards: EN55022A, FCC Part 15 Class A
Conducted Emission Standards: EN60555Pt2 conducted emission; EN55022A conducted emission, LVD 60950 standard, FCC Part 15 Class A
Immunity Standards: IEC
Low Voltage Directive: EN 60 950:1992+A1: 1993+A2: 1993+A3; 1995+A4; 1996+A11: 1997.
Therefore, this product is in conformity with the following regional standards: FCC Class A ⎯ following the provisions of FCC Part 15 directive; CE Mark ⎯ following the provisions of the EC directive.
Manufacturer’s Name: Compex Systems Pte Ltd
Address: 135 Joo Seng Road, PM Industrial Building,
Wall installation
1.Measure the distance between the mounting holes at the bottom of the switch and mark the wall to match the location of the mounting holes on the switch.
2.Drill pilot holes at the two marked locations.
3.Fix two
4.Carefully set the switch over the screws in the wall; then slide the switch down onto the screws, pressing it slightly to the wall.
5.Connect the power adapter that is supplied in the package to the switch. The POWER LED and PORT LED for each connected port should light up.
6. Installation of Earth Connection Point
The switch can be protected from the damage caused by lightning surges by the Earth Connection Point and the
Follow the steps below for proper installation. (Refer to the earth connection point on Panel Views).
1.Connect the earth connection point of the metal to the Earth Connection Point.
2.Connect the RJ45 Cable that causes lightning surges possibly to Port # 1 or #8.
This document may become superseded, in which case you may find its latest version at: http://www.compex.com.sg
Warranty Registration Card
Register via the Internet at http://www.cpx.com or
To activate the warranty, please complete this card and return to Compex within
ninety (90) days from the date of purchase.
Please
Product: |
| Purchase Date: | Model: |
| Serial No: |
|
|
|
|
|
|
Name: |
|
|
|
| |
|
|
|
|
|
|
Company: |
|
|
|
|
|
|
|
|
|
|
|
Address: |
|
|
|
|
|
|
|
| |||
Postal/Zip Code: |
| Country: | |||
|
|
|
|
|
|
Phone: ( | ) |
|
|
|
|
|
|
|
|
|
|
Note:
For purchases within U.S.A and Canada, please fax to Compex, Inc. at (714) 482 0332
For purchases outside U.S.A and Canada, please fax to Compex Systems Pte Ltd at (65)