Page
FCC Notice
FCC Compliance Statement
Iii
Compex, Inc
About This Document
Introduction
Enabling and Disabling Router
Security Configuration
Appendix B Troubleshooting
Introduction
Introducing the Router
Key features
Getting to know your Router
WMM
Security Features
WPA Wi-Fi Protected Access Standard & 802.1x Authentication
Additional Features
Static IP, Dynamic IP, PPPoE, PPTP, and L2TP WAN types
When to use which router
Panel Views
Page
Green Connection
This LED is reserved for diagnostic purposes
Panel Description
Steady
Unit, attach the power adapter to the main
Interface Reserved for future update
If using power adapter to supply power to
Electrical supply and connect the power plug
Reset Push Button
Button
Hardware Setup
These two antennas Must not be swapped
Page
Installing uConfig
Accessing the Web interface
How to uConfig to the Web Interface exclusive
Overview of alternatives
Running uConfig
Ensure that the router is selected under the Products List
How to Browse to the Web Interface
Browsing to the web interface
Setting Up a Wlan
Operation Modes
Page
Point-to-Point Point-to-MultiPoint
Connectivity with RootAP-supported
Transparent Client Mode
Communications with the AP
Wlan Setup a/b/g
To Set Up a Wireless LAN
Click on Wlan Setupa/b/g from the Configuration menu
Operation Mode
Wlan name Essid
Ssid when Closed system is enabled
Wireless mode
802.11a not supported by Wlan Setup for b/g
802.11b only
Point-to-Point & Point-to-MultiPoint Setup
RootAP Step
RootAP Step
Transparent Client Step
Enter the Remote AP MAC
How to Make Your Wlan More Secure
WEP
WPA2 Personal
Selecting a security mode
How to Setup WEP
Page
Page
How to Setup
802.1x
WPA Enterprise
Tkip AES Auto
WPA Personal
Tkip AES Auto
Editing Advanced Settings
Advanced Wlan Settings
G from the Configuration menu
Page
Antenna Control
Antenna Control
Editing Long Distance Parameters
Long Distance Parameters
Click Long Distance Parameters
Page
WMM
Click WMM Settings
Setting WMM
Multimedia WMM
WMM Parameters for advanced users
AIFs Arbitrary Inter Frame Space
Statistics
Click on Wlan Setup a/b/g from the Configuration menu
Statistics
Select Statistics
Virtual AP Multiple Ssid
Virtual AP
Select Virtual AP
Preferred APs
Preferred APs Only available in Client Mode
Select Preferred APs
Antenna Alignment
Antenna Alignment
Select Antenna Alignment
Configuration
Setting Up the Router in Your LAN
Router if this access point is the one connecting to
It is preset to
It is preset as
If your network uses multiple gateways / access points
Click LAN Setup from the Configuration menu
LAN Setup
Amend the relevant fields in the LAN Setup
Advanced Dhcp Server Options Click Show Active Dhcp leases
To view the active Dhcp leases
Hardware Address MAC of the Dhcp client
Advanced Dhcp Options
Advanced Dhcp Server Options Click Dhcp Server Reservations
Page
Bandwidth Control for WAN
Configuration menu
Bandwidth Control for WAN
Click Bandwidth Control from
Bandwidth Control for LAN
Bandwidth Control for LAN
Page
STP Setup
Click STP Setup from the Configuration menu
Priority
Snmp Setup
Click Snmp Setup from the System Tools menu
Snmp Trap
Click Snmp Setup from the Configuration menu
Enter the Trap Destination IP Address or Name
Enable Router
Setting Up Router
Enabling and Disabling Router
Disable Router
Setting Up Access Point
Click WAN Setup from the Configuration menu
Router Setup
Broadband Internet
Changing the WAN Type
At the Static IP WAN Setup
Select Static IP Address from Select WAN
Type At Dynamic IP WAN Setup
Select Dynamic IP Address as WAN
This field is relevant only if On-Demandis enabled
This refers to your broadband account password
If enabled, the router will automatically connect to
It will only reconnect when a LAN client makes an Internet
Select PPP over Ethernet from the Select WAN
At the PPPoE WAN Setup
Type menu
Type
Enter Network Mask
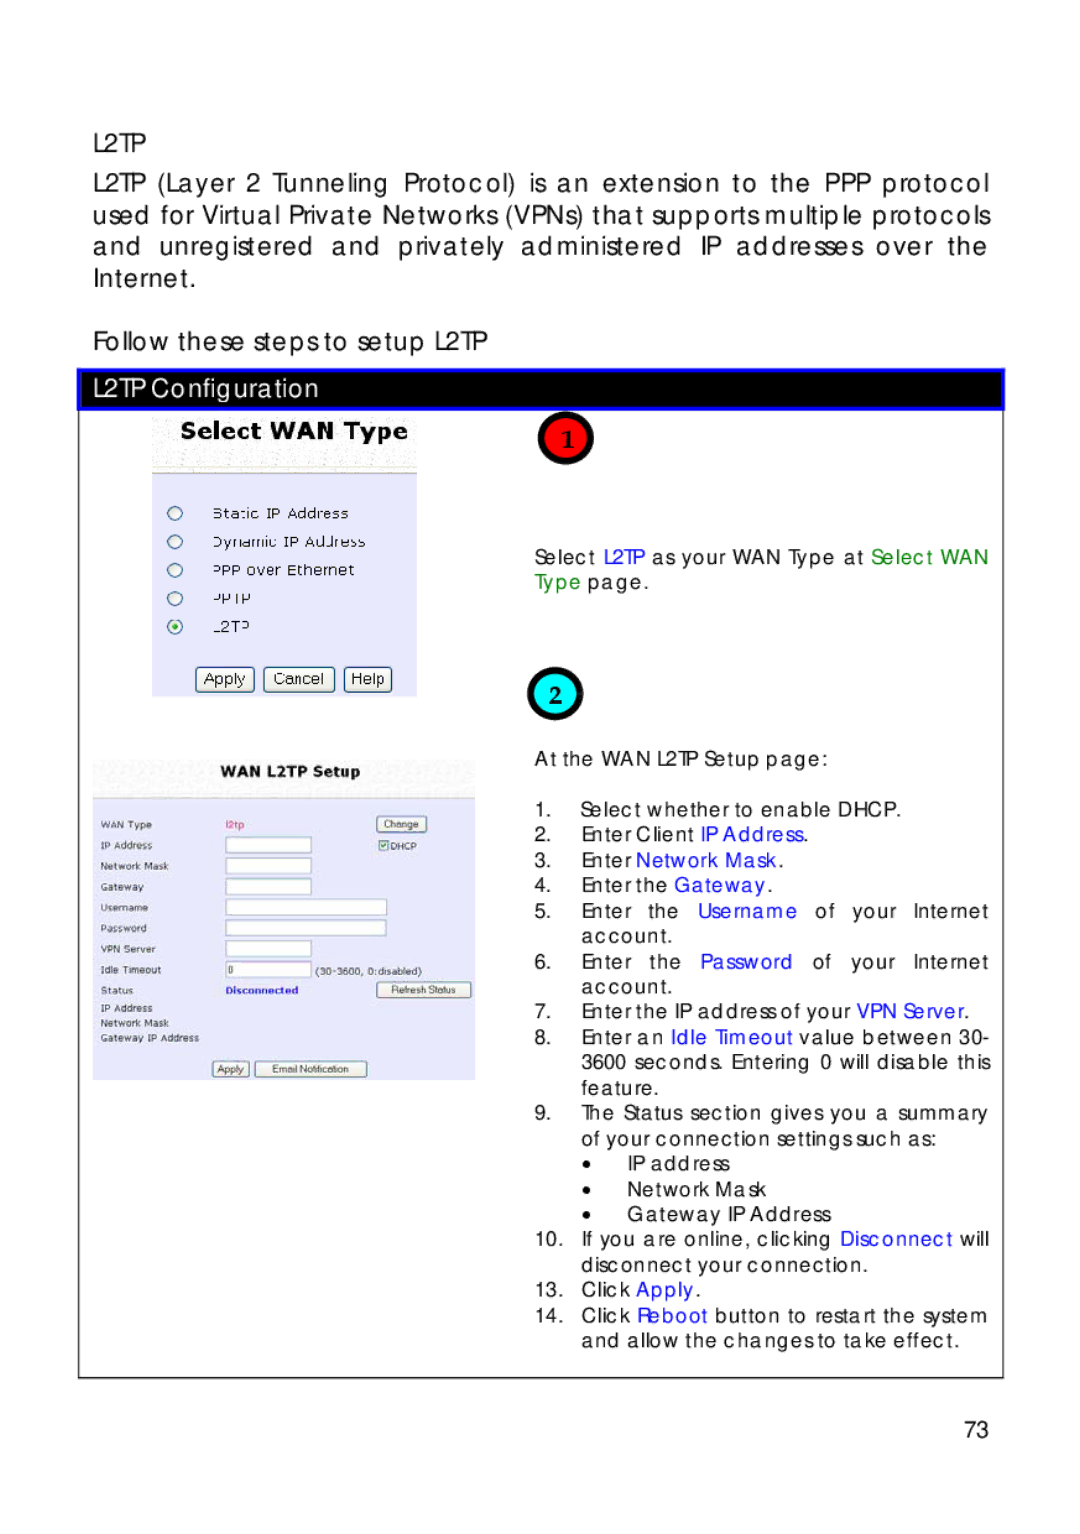
L2TP
After applying WAN PPPoE Setup, WAN Pptp Setup, or L2TP
Click Email Notification
Page
Using NAT
Click NAT from the Configuration menu
Page
DMZ
Private IP Address field enter
Page
Port Forwarding
Click Port Forwarding
Enter the Private IP Address
Page
Application
IP Forwarding
Ensure NAT Status is set to enable At Advanced NAT Options
Click IP Forwarding
Page
Routing
Static Routing
Click Routing from the Configuration menu
Enter the Gateway IP Address
Route GUI
Telnet/SSH Setup
Click Telnet/SSH Setup from
Device Access Management menu
Telnet CLI
SSH CLI Secure Shell Host Command Line Interface
Page
User Management
Click User Management from
Web Management Setup
Make selection from the Device Access Management menu
Page
Remote Management
Remote Management
Universal Plug and Play UPnP
UPnP
Click UPnP Configuration from the Configuration menu
Universal Plug and Play UPnP is disabled by default
Select the appropriate UPnP Status
Parallel Broadband Exclusive
100
Parallel Broadband
Click Parallel Broadband from the Configuration menu
Parallel Broadband is disabled by default
101
Static Address Translation
102
103
DNS Redirection
Click DNS Redirection from the Home User Features menu
Set DNS Redirection status to enable
DNS Redirection
Click Dynamic DNS Setup from the Configuration menu
Dynamic DNS Setup
Dynamic DNS Setup
On Enable/Disable Dynamic DNS
Provider Name
106
Choice
Register Now
107
Select Backup Mail Exchanger to enable this service
108
To select DtDNS as Ddns Service Provider
109
Security Configuration
110
Firewall Configuration
Firewall Configuration
111
112
113
114
Check TTL
115
Similarly, determine the Destination IP Address
Similarly, determine the Destination Port
116
Enter TTL value
Firewall Logs
Click Firewall Logs from the Security Configuration menu
Firewall Logs
117
Packet Filtering
118
119
Click Packet Filtering from the Security Configuration menu
Packet Filtering
Clicking Change select Packet Filter Type
120
Any day
121
Filtering Configuration table updates
Any time
URL Filtering
Click URL Filtering from the Security Configuration menu
URL Filtering
122
123
Multicast Filtering
Click Multicast from the Security Configuration menu
Multicast Filtering
124
Ping Utility
Using the System Tools Menu
Web Interface Utilities
125
126
127
Click System Identity from the System Tools menu
System Identity
128
Enter System Location
Click System Clock Setup from the System Tools menu
System Clock Setup
129
Click Firmware Upgrade from the System Tools menu
Firmware Upgrade
130
Click Backup or Reset Settings from the System Tools menu
Save or Reset Settings
131
Click Clear and Reset
Restore the Machine’s configuration path and file name
132
Click Reboot AP from the System Tools menu
Reboot System
133
Enter the new password in New Password and Confirm Password
Change Password
Click Change Password from the System Tools menu
134
135
Logout
Click Logout from the System Tools menu
136
Using the Help Menu
Get Technical Support
Click Get Technical Support from the Help menu
137
About System
Click About System from the Help menu
For NP18 1A, 2B
Printer Server Setup
Adding a Shared Printer Via LPR in Windows XP
138
139
Automatically detect and install my Plug and Play printer
Check the radio button next to Create a new port
140
Standard TCP/IP Port Monitor window
141
142
143
Adding a Shared Printer Via LPR in Windows
144
145
Check the radio button next to the Create a new port
146
147
148
149
Status of Printer Server
Adding a Shared Printer Via LPR in Windows 98/ME
150
Double-clickAdd Printer
151
Add Printer Wizard shown on the left appears
152
153
154
Then the Acits LPR Remote Printing screen pops up
155
Removing the Shared Printer from the Router
156
USB Storage Disk Sharing
To enable FTP Server
To enable Windows File Server
157
158
159
160
This screen will display the list of FTP user accounts
161
162
163
Accessing Your USB Hard Disk Via FTP Server
164
165
Accessing Your USB Hard Disk Via Windows File Server
Computers
166
Using Windows File Server to Map to Network Drive
Map Network Drive…
167
Webcam Setup and View
168
Configuring the Webcam Setup
169
170
Under the Home User Features command menu, click on Webcam
171
Capture Button
Viewing the Webcam
172
Left/Up/Center/Down/Right Button
173
Appendix a Configuring your PC for network Access
Adding TCP/IP protocol in Windows 98/98SE/ME/2000
Click on Control Panel
174
175
Configuring Dynamic IP address allocation
Dynamic IP address allocation in Windows 98/98SE/ME/2000
Click on Control Panel Double-click on the Network icon
Enable the Obtain an IP address automatically radio button
176
Static IP address allocation in Windows 98/98SE/ME/2000
Configuring Static IP address allocation
177
Enable the Specify an IP address radio button
178
179
Configuring Wireless Network Settings for Windows XP
Microsoft Windows XP
Network Connection
Solutions to Common Problems
Appendix B Troubleshooting
180
Am unable to surf the Internet
181
For Netscape 4.7 or later versions
182
183
Appendix C CLI Commands
184
185
186
187
188
List of commonly used terms
Appendix D Glossary of Terms
189
190
Dsss
191
Ieee
192
Pptp
193
WEP Wlan
Appendix E Technical Specifications
194
Physical and Environment
195