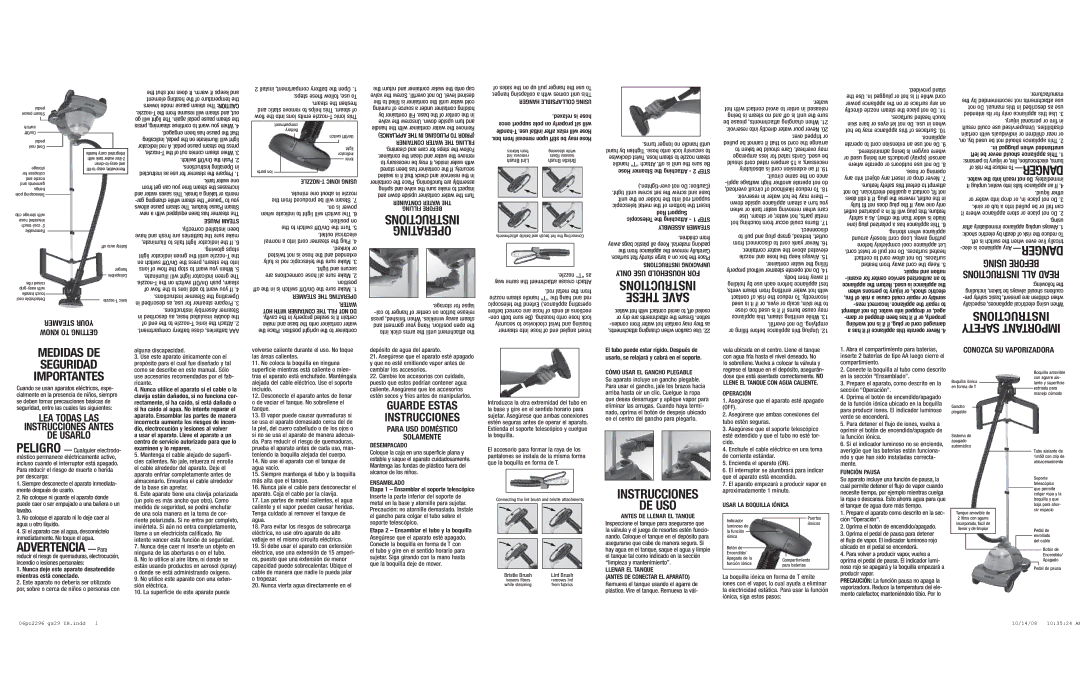
pedal pause Steam
switch On/Off
pedal reel Cord
storage for collapses and nozzle and garments hangs pole Telescoping
clip storage with hose insulated
ribs raised
handle carry integrated with tank water
off auto Safety
hanger Collapsible
the shut not does It .warm it keeps and element heating the of temperature the lowers mode pause steam The
.correctly installed been have and fresh are batteries the sure make illuminate, to fails light indicator the If .6 .glowing stops light indicator green the until
2 install compartment, battery the Open .1 steps: these follow use, To .steam the freshen and static remove to helps This .steam of flow the into ions emits
compartment Battery
switch On/Off
light indicator Ionic
ports Ion
.minute one about in nozzle the from produced be will Steam .7 .on is power when indicate to light will switch The .6 .position on the to switch On/Off the Turn .5 .outlet electrical normal a into cord steamer the Plug .4 .kinked or twisted not is hose the and extended fully is rod telescopic the sure Make .3 .tight and secure are connections hose all sure Make .2 .position off the in is switch On/Off the sure Make .1 STEAMER THE OPERATING
.WATER HOT WITH CONTAINER THE FILL NOT DO .cavity the in properly seated is it certain
the return and container water the onto cap valve the Screw .overfill not Do .level desired the to filled is container the until water cold running of source a under container holding by container Fill .base the of center the in valve the Unscrew .down upside turn and handle the with container water the Remove APPLIANCE) THE IN PLUGGING TO (PRIOR CONTAINER WATER THE FILLING .cleaning and care for steps the Follow .container the clean and water the remove to necessary be may it inside, water with stored been has container the If .securely seated is it that check and reservoir the in container the Place .functioning are assembly spring and valve the sure make to inspect and down upside container water the Turn
CONTAINER WATER THE
FILLING BEFORE
INSTRUCTIONS
OPERATING
.storage for lapse
of sides the on up pull hanger the use To | ||||
.hanger collapsing a with comes unit This | ||||
| HANGER COLLAPSIBLE USING | |||
|
|
| .relaxed is hose | |
| once support pole on properly sit will | |||
.box from removal upon stiff be may Hose | ||||
| fabrics from |
| steaming while | |
| lint removes |
| fibers loosens | |
| Brush Lint |
| Brush Bristle | |
|
|
|
|
|
|
|
|
|
|
|
|
|
|
|
attachments bristle and brush lint the Connecting
.nozzle "T" as way same the attachment crease Attach
.rod metal the from nozzle steam handle "T" the hang and rod telescopic the Extend ).appliance operating before correct are hose of ends at nections
.turns longer no handle until hand by Tighten .hose onto lock securely to clockwise Twist .hose steam to nozzle steam handle "T" Attach .off is unit the sure Be Hose Steamer the Attaching - 2 STEP
ASSEMBLY STEAMER
.children from away bags plastic all Keep .material packing the from appliance the remove Carefully .surface flat sturdy large a on box the Place INSTRUCTIONS UNPACKING
ONLY USE HOUSEHOLD FOR
INSTRUCTIONS
THESE SAVE
.water hot with contact avoid to off, cooled or dry are attachments the Ensure .sation
.water hot with contact avoid to order in released being is steam no and off is unit the sure be please attachments, changing When .21 .reservoir into directly water pour Never .20 .over tripped or pulled be cannot it that so cord the arrange to taken be should Care .overheat may amperage less for rated Cords .used be should cord rated ampere 15 a necessary, absolutely is cord extension an If .19 .circuit same the on ance
.provided stand the Use .in plugged or hot is it while cord power appliance the on or surface any on directly nozzle steam the place not Do .11 .surfaces heated touch skin bare or eyes let not Do .use in when hot be may appliance this of Surfaces .10 .appliance operate to cord extension an use not Do .9 .administered being is oxygen where or used being are products (spray) aerosol where operate or outdoors use not Do .8 .hose or opening any into object any insert or drop Never .7 .feature safety this defeat to attempt not Do .electrician qualified a contact fit, not does still it If .plug the reverse outlet, the in fully fit not does plug the If .way one only outlet polarized a in fit will plug this feature, safety a As .other) the than wider is blade (one plug polarized a has appliance This .6 .storing when appliance around loosely cord Loop .away putting before completely cool appliance Let .cord twist or pull not Do .surfaces heated contact to cord allow not Do .surfaces heated from away cord the Keep .5 .repair and nation
.manufacturer the by recommended not attachments use not Do .manual this in described as use intended its for only appliance this Use .3 .injury personal or fire in result could use Unsupervised .disabilities certain with individuals or children near or on, by, used be not should appliance This .2 .in plugged when unattended left be never should appliance This .1 persons: to injury or fire, electrocution, burns, of risk the reduce To
INSTRUCTIONS
STEAMER YOUR KNOW TO GETTING
of end the to
make and base the onto container water the Place .position upright the to container
and garment your Hang .position open the into click arms the until attachment the
securely to clockwise twist and housing steamer into hose of end angled Insert
.overfill not Do .emptying or filling before appliance this Unplug .12
working not is it if plug, or cord damaged a has it if appliance this operate Never .4
SAFETY IMPORTANT
MEDIDAS DE SEGURIDAD
alguna discapacidad.
3. Use este aparato únicamente con el |
propósito para el cual fue diseñado y tal |
como se describe en este manual. Sólo |
volverse caliente durante el uso. No toque las áreas calientes.
11. No coloca la boquilla en ninguna |
superficie mientras está caliente o mien- |
depósito de agua del aparato.
21. Asegúrese que el aparato esté apagado |
y que no esté emitiendo vapor antes de |
cambiar los accesorios. |
El tubo puede estar rígido. Después de usarlo, se relajará y cabrá en el soporte.
vula ubicada en el centro. Llene el tanque con agua fría hasta el nivel deseado. No lo sobrellene. Vuelva a colocar la válvula y regrese el tanque en el depósito, asegurán-
1. Abra el compartimiento para baterías, |
inserte 2 baterías de tipo AA luego cierre el |
compartimiento. |
2. Conecte la boquilla al tubo como descrito |
CONOZCA SU VAPORIZADORA
IMPORTANTES
Cuando se usan aparatos eléctricos, espe- cialmente en la presencia de niños, siempre se deben tomar precauciones básicas de seguridad, entre las cuales las siguientes:
LEA TODAS LAS
INSTRUCCIONES ANTES
DE USARLO
PELIGRO — Cualquier electrodo- méstico permanece eléctricamente activo, incluso cuando el interruptor está apagado. Para reducir el riesgo de muerte o herida por descarga:
1.Siempre desconecte el aparato inmediata- mente después de usarlo.
2.No coloque ni guarde el aparato donde puede caer o ser empujado a una bañera o un lavabo.
3.No coloque el aparato ni lo deje caer al agua u otro líquido.
4.Si el aparato cae al agua, desconéctelo inmediatamente. No toque el agua.
ADVERTENCIA — Para
reducir el riesgo de quemaduras, electrocución, incendio o lesiones personales:
1.Nunca deje este aparato desatendido mientras está conectado.
2.Este aparato no debería ser utilizado por, sobre o cerca de niños o personas con
use accesorios recomendados por el fab- |
ricante. |
4. Nunca utilice el aparato si el cable o la |
clavija están dañados, si no funciona cor- |
rectamente, si ha caído, si está dañado o |
si ha caído al agua. No intente reparar el |
aparato. Ensamblar las partes de manera |
incorrecta aumenta los riesgos de incen- |
dio, electrocución y lesiones al volver |
a usar el aparato. Lleve el aparato a un |
centro de servicio autorizado para que lo |
examinen y lo reparen. |
5. Mantenga el cable alejado de superfi- |
cies calientes. No jale, retuerza ni enrolle |
el cable alrededor del aparato. Deje el |
aparato enfriar completamente antes de |
almacenarlo. Envuelva el cable alrededor |
de la base sin apretar. |
6. Este aparato tiene una clavija polarizada |
(un polo es más ancho que otro). Como |
medida de seguridad, se podrá enchufar |
de una sola manera en la toma de cor- |
riente polarizada. Si no entra por completo, |
inviértela. Si aún no entra completamente, |
llame a un electricista calificado. No |
intente vencer esta función de seguridad. |
7. Nunca deje caer ni inserte un objeto en |
ninguna de las aberturas o en el tubo. |
8. No lo utilice al aire libre, ni donde se |
están usando productos en aerosol (spray) |
o donde se está administrando oxígeno. |
9. No utilice este aparato con una exten- |
sión eléctrica. |
10. La superficie de este aparato puede |
tras el aparato está enchufado. Manténgala | |
alejada del cable eléctrico. Use el soporte | |
incluido. | |
12. | Desconecte el aparato antes de llenar |
o de vaciar el tanque. No sobrellene el | |
tanque. | |
13. | El vapor puede causar quemaduras si |
se usa el aparato demasiado cerca del de | |
la piel, del cuero cabelludo o de los ojos o | |
si no se usa el aparato de manera adecua- | |
da. Para reducir el riesgo de quemaduras, | |
prueba el aparato antes de cada uso, man- | |
teniendo la boquilla alejada del cuerpo. | |
14. | No use el aparato con el tanque de |
agua vacío. | |
15. | Siempre mantenga el tubo y la boquilla |
más alta que el tanque. | |
16. | Nunca jale el cable para desconectar el |
aparato. Coja el cable por la clavija. | |
17. | Las partes de metal calientes, el agua |
caliente y el vapor pueden causar heridas. | |
Tenga cuidado al remover el tanque de | |
agua. | |
18. | Para evitar los riesgos de sobrecarga |
eléctrica, no use otro aparato de alto | |
vatiaje en el mismo circuito eléctrico. | |
19. | Si debe usar el aparato con extensión |
eléctrica, use una extensión de 15 amperi- | |
os, puesto que una extensión de menor | |
capacidad puede sobrecalentar. Ubique el | |
cable de manera que nadie lo pueda jalar | |
o tropezar. | |
20. | Nunca vierta agua directamente en el |
22. Cambie los accesorios con cuidado, |
puesto que estos podrían contener agua |
caliente. Asegúrese que los accesorios |
estén secos y fríos antes de manipularlos. |
GUARDE ESTAS
INSTRUCCIONES
PARA USO DOMÉSTICO
SOLAMENTE
DESEMPACADO
Coloque la caja en una superficie plana y estable y saque el aparato cuidadosamente. Mantenga las fundas de plástico fuera del alcance de los niños.
ENSAMBLADO
Etapa 1 – Ensamblar el soporte telescópico
Inserte la parte inferior del soporte de metal en la base y atornille para sujetar. Precaución: no atornille demasiado. Instale el gancho para colgar el tubo sobre el soporte telescópico.
Etapa 2 – Ensamblar el tubo y la boquilla
Asegúrese que el aparato esté apagado. Conecte la boquilla en forma de T con el tubo y gire en el sentido horario para sujetar. Siga girando con la mano hasta que la boquilla deje de mover.
Introduzca la otra extremidad del tubo en la base y gire en el sentido horario para sujetar. Asegúrese que ambas conexiones estén seguras antes de operar el aparato. Extienda el soporte telescópico y cuelgue la boquilla.
El accesorio para formar la raya de los pantalones se instala de la misma forma que la boquilla en forma de T.
Connecting the lint brush and bristle attachments
Bristle Brush | Lint Brush |
loosens fibers | removes lint |
while steaming | from fabrics |
CÓMO USAR EL GANCHO PLEGABLE
Su aparato incluye un gancho plegable. Para usar el gancho, jale los brazos hacia arriba hasta oír un clic. Cuelgue la ropa que desea desarrugar y aplique vapor para eliminar las arrugas. Cuando haya termi- nado, oprima el botón de despejo ubicado en el centro del gancho para plegarlo.
INSTRUCCIONES
DE USO
ANTES DE LLENAR EL TANQUE
Inspeccione el tanque para asegurarse que la válvula y el juego de resortes estén funcio- nando. Coloque el tanque en el depósito para asegurarse que cabe de manera segura. Si hay agua en el tanque, saque el agua y limpie el tanque tal como indicado en la sección “limpieza y mantenimiento”.
LLENAR EL TANQUE
(ANTES DE CONECTAR EL APARATO)
Remueva el tanque usando el agarre de plástico. Vire el tanque. Remueva la vál-
dose que está asentado correctamente. NO LLENE EL TANQUE CON AGUA CALIENTE.
OPERACIÓN
1.Asegúrese que el aparato esté apagado (OFF).
2.Asegúrese que ambas conexiones del tubo estén seguras.
3.Asegúrese que el soporte telescópico esté extendido y que el tubo no esté tor- cido.
4.Enchufe el cable eléctrico en una toma de corriente estándar.
5.Encienda el aparato (ON).
6.El interruptor se alumbrará para indicar que el aparato está encendido.
7.El aparato empezará a producir vapor en aproximadamente 1 minuto.
USAR LA BOQUILLA IÓNICA
Indicador | Puertos | |
iónicos | ||
luminoso de | ||
| ||
la función |
| |
iónica |
| |
Botón de |
| |
Encendido/ |
| |
Apagado de la | Compartimiento | |
función iónica | ||
para baterías | ||
|
La boquilla iónica en forma de T emite iones con el vapor, lo cual ayuda a eliminar la electricidad estática. Para usar la función iónica, siga estos pasos:
en la sección “Ensamblado”. |
3. Prepare el aparato, como descrito en la |
sección “Operación”. |
4. Oprima el botón de encendido/apagado |
de la función iónica ubicado en la boquilla |
para producir iones. El indicador luminoso |
verde se encenderá. |
5. Para detener el flujo de iones, vuelva a |
oprimir el botón de encendido/apagado de |
la función iónica. |
6. Si el indicador luminoso no se enciende, |
averigüe que las baterías están funciona- |
ndo y que han sido instaladas correcta- |
mente. |
FUNCIÓN PAUSA
Su aparato incluye una función de pausa, la cual permite detener el flujo de vapor cuando necesite tiempo, por ejemplo mientras cuelga la ropa o descansa. Esto ahorra agua para que el tanque de agua dure más tiempo.
1.Prepare el aparato como descrito en la sec- ción “Operación”.
2.Oprima el botón de encendido/apagado.
3.Oprima el pedal de pausa para detener
el flujo de vapor. El indicador luminoso rojo ubicado en el pedal se encenderá.
4.Para volver a producir vapor, vuelva a oprima el pedal de pausa. El indicador lumi- noso rojo se apagará y la boquilla empezará a producir vapor.
PRECAUCIÓN: La función pausa no apaga la vaporizadora. Reduce la temperatura del ele- mento calefactor, manteniéndolo tibio. Por lo
Boquilla iónica en forma de T
Gancho plegable
Sistema de apagado automático
Tanque amovible de 2 litros con agarre incorporado, fácil de llenar y de limpiar
Boquilla amovible con agarre ais- lante y superficie estriada para manejo cómodo
Tubo aislante de 1m50 con clip de almacenamiento
Soporte telescópico que permite colgar ropa y la boquilla y que baja para ahor- rar espacio
Pedal de enrollado del cable
Botón de
Encendido/
Apagado
Pedal de pausa
06pc2296 gs29 IB.indd 1 | 10/14/08 | 10:35:24 AM |