patillas las y nuca la bigote, el barba, la para Cuchilla
trasera Vista
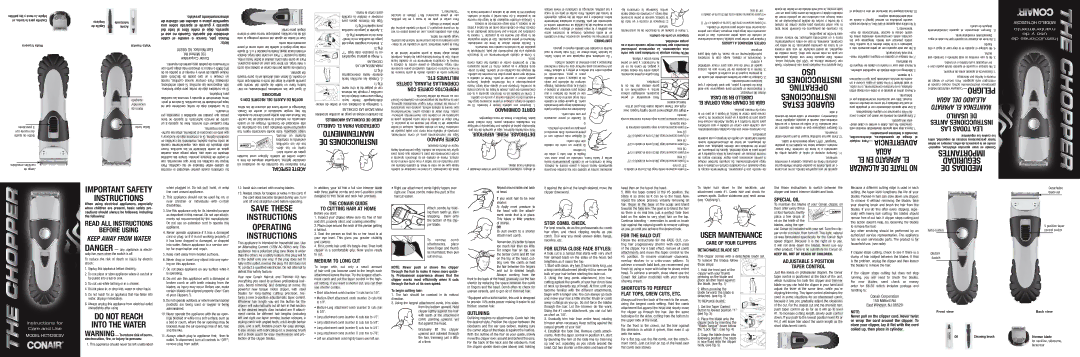
posiciones 5 con recorte del ajuste de Botón
amovibles cuchillas de Juego
limpieza | lubricante |
de Cepillo | Aceite |
frontal Vista
apagado encendido/ de Botón
turbo Botón
.previsto almacenamiento de cilindro del adentro o plana superficie una sobre aparato el guarde y aparato del lado al libre cable el deje aparato, el use no Cuando .aparato del alrededor cable el enrolle o tuerce jale, Nunca Nota:
08520 NJ Windsor, East
.Rd Milford 150
Corporation Conair
.repuesto de partes para pedido de formulario el con junto abajo, más dirección la a más) o $10,00US de es pedido el si manejo y envío de gastos incluye (esto $6,50US de postal giro un o cheque un mande cuchillas, nuevas comprar Para .cámbielas embotadas, estén Si .cuchillas las inspeccione ndo,
.limpiarlas para cuchillas las remueva y aparato el desenchufe lema,
.usuario el por reparadas o ajustadas ser puedan que piezas tiene no aparato El .autorizado servicio de centro un a aparato su lleve servicio, otro cualquier Para
.limpiarlas para las
| .cortar para ángulo | |||
mismo el usan nunca que puesto cuchillas, las de útil | ||||
vida la prolonga recorte del ajuste de botón el Usar | ||||
| .corto más accesorio | |||
peine el como corto tan cabello el dejará largo más | ||||
ajuste El .5 o 4 posición la hasta abajo, hacia botón el | ||||
deslice largo, más corte un Para .1 posición la hasta | ||||
arriba, hacia botón el deslice corto, más corte un Para | ||||
.accesorio peine un usar que tener sin largo, más o | ||||
corto más cabello el cortar permite ajuste de botón El | ||||
|
|
| .aparato del | |
trasera parte la en ubicado está botón El .cabello el | ||||
corta que medida a corte del largo lo ajustar permite | ||||
que recorte del ajuste de botón | un | tiene | tadora | |
OPSICIONES |
|
|
| |
5 CON RECORTE DEL AJUSTE DE BOTÓN | ||||
niños los de alcance del fuera aceite el Mantenga | ||||
.Conair de aceite al substituto ningún hay No | ||||
.aparato su lubricar para aceite otro use Nunca .las | ||||
aceite el es Porque .Conair® de velocidad alta | ||||
de cortadoras las para diseñado específicamente | ||||
fue ligero lubricante aceite Este .apáguela luego | ||||
| minuto, | un durante | ||
| ||||
| cortadora la encienda | |||
| cuchillas, | las | de tes | |
|
| los en | cante | |
| ||||
cuantas unas Aplique .cabello de cortes cuatro | ||||
o tres de después lubríquelas óptima, condición | ||||
en cortadora su de cuchillas las mantener Para | ||||
ESPECIAL ACEITE | ||||
.barba la cortar para | |
cuchilla la instalar e remover | |
para pasos mismos los Siga | |
5).(Fig sujetarlo para | |
cuchillas de juego el Apriete .3 | |
4).(Fig cortadora la de dura | |
del negra lengüeta la Inserte .2 | |
| 3).(Fig |
“1” baja más posición la en | |
reguladora palanca la Ponga .1 | |
| CUCHILLAS |
LAS INSTALAR PARA | |
| 2).(Fig |
desencajarlas | hasta delante |
hacia cuchillas las Empuje .2 | |
| 1).(Fig |
mano otra la de pulgar el con | |
mismas las empuje y cuchillas | |
las de debajo mano una Ponga | |
.suyo frente | dido/apagado |
CUCHILLAS LAS SACAR PARA | |
.amovibles cuchillas de juego un incluye cortadora Su | |
AMOVIBLES CUCHILLAS DE JUEGO | |
CABELLO EL PARA CORTADORA | |
MANTENIMIENTO | |
DE INSTRUCCIONES | |
.“Contorneo”) sección la (Véase 1.No accesorio peine el use patillas, las en y nuca la en pelo el cortar Para
.dibujo) el (véase peine del encima cabello el corte y accesorio, peine un de vez en plano peine un use plana, coronilla una Para
.lados los iguale luego cabello, del natural crecimiento del la a contraria ción
.cabeza la de lateral superior parte la hasta abajo desde cortando lados, los para técnica misma la Use .arriba hacia cabello el en lentamente cortadora la mueva y cabeza la contra peine el Sostenga .largo más accesorio peine el usando coronilla, la hacia nuca la de trasera parte la desde cabello el corte Siempre
.ETC MILITARES CORTES PLANAS, CORONILLAS CON CORTES PERFECTOS
.favorita afeitar de crema su con Conair de caliente en enjabonado de máquina la use óptimos, resultados lograr Para .afeitar de crema y rasuradora una usando entera, cabeza la rasure que recomendamos calva, cabeza la dejar Para .zados
.deseado efecto el lograr hasta combinando Siga .cabello de recortes los quitar para corta que medida a pelo del crecimiento del la a opuesta dirección la en cabello el Peine .cabeza la de encima corto muy y lados los en rasurado casi ser debería cabello El .línea la note se no que hasta cabello el combinar es ideal Lo .combinado de línea
la hacia combine y cabeza la de base la en Empiece .cortado el repita y corta) más (la 5 posición la en recorte del largo lo de regulador botón el Coloque .5 .cabeza la de encima largo más y cabeza, la de atrás y lados los en corto más cabello el Deje .cabeza la de alrededor todo fuera por y arriba por cortadora la mueva 1, posición la en recorte del largo lo de regulador botón el Con .accesorio peine el Remueva .combinado de línea la ubicar donde Decida .4 .necesario sea cuando cortadora la de posición la cambiando pelo, del crecimiento del la a opuesta dirección la en uniformemente, cabello el Corte .3 .3mm como corto tan cabello el cortar permitirá le 1.No accesorio peine El .ritmo propio su a trabajar dora
.disparejos nuca de líneas o flequillos lados, tener evitará Esto .peine mientras resultados los verifique y frecuencia con cabello el peine fesionales:
.abajo hacia muévala y deseado nivel al piel la contra colóquela dibujo), el
(véase revés al cortadora la sostenga patillas, las y | |||
nuca la en pelo el cortar Para .cabello del forma la | |||
siguiendo orejas, las de atrás por y alrededor sobre, | |||
lentamente cortadora la Mueva .pelo del nacimiento | |||
el contra encuentre se cuchilla la de esquina la que | |||
asegúrese y dibujo) el (véase oreja la y patillas las | |||
entre cortadora la Coloque .deseado estilo el en | |||
cabello el Peine .accesorios requiere no contorneo El | |||
|
|
| CONTORNEO |
| .grueso o espeso cabello del cortado el facilita | ||
cual lo fuerza más 15% un ofrece Turbo función La | |||
.Turbo botón un con equipada está cortadora Su * | |||
| .cortado cabello el eliminar para y disparejos | ||
mechones haya no que verificar para frecuencia con | |||
Peine .cabeza la y peine el o dedos sus entre espacio | |||
el | reduciendo poco, | a | poco |
cabello el corte y cabeza la de | |||
atrás por adelante de siempre | |||
Trabaje .deseado largo lo a corte | |||
y cabello el levantar para dedos | |||
sus o barbero de peine el use | |||
cabeza, la de encima largo más | |||
cabello el dejar quiere Si .corto | |||
demasiado que largo demasiado | |||
pelo el dejar mejor es Acuérdese: | |||
| .corto más uno por | ||
accesorio peine el Cambie B) | |||
|
|
| O |
.práctica de poco un principio | |||
al necesita Esto .accesorio peine | |||
el con presión más Aplique A) | |||
| corto: más aún | ||
cabello de corte un | quiere Si | ||
| .cabeza la | ||
de | atrás y lado otro | al | Repita |
.vez cada poco un cortando fuera, hacia y arriba | |||
hacia gradualmente cabello el en cortadora la Pase | |||
.cabeza la contra plano | y arriba hacia apuntando | ||
peine del dientes los con cabello el contra eramente | |||
hacia abajo de cortando y largo, más | |||||
accesorio peine el usando cabeza, la | |||||
de lado un a recorte el Empiece .2 | |||||
|
|
| natural | ||
crecimiento su de dirección la en cabello el Peine .1 | |||||
|
| cabello: de corte el Empezar | |||
|
|
|
|
| .velocidad propia |
su a corta cuando mejor funciona que demuestra | |||||
profesional experiencia La .rápidamente más | |||||
corte que para cortadora la empuje Nunca NOTA: | |||||
|
| ||||
| .afuera y arriba hacia |
| |||
peine el jale y ilustración, la |
| ||||
en ve se como tal pulgar, y |
| ||||
índice dedos los entre cójalo |
| ||||
accesorio, peine el quitar Para |
| ||||
|
| .cortadora |
| ||
|
|
| |||
la de | filo | del inferior | parte |
| |
la en | engánchelo y | arriba |
| ||
cabeza sosténgalo accesorio, |
| ||||
peine | el | ensamblar | Para |
|
|
|
|
|
|
| .easier haircut |
the of part this make combs These .ear right | |||||
over tapers lightly comb attachment ear Right • | |||||
|
|
|
|
| derecha |
oreja la contornea derecha oreja la para accesorio peine El • | |||||
|
|
|
|
| izquierda oreja |
la contornea izquierda oreja la para accesorio peine El • | |||||
|
|
|
|
| mm) (22 |
7/8" a cabello el corta 7).(No largo accesorio peine El • | |||||
|
|
|
|
| mm) (19 |
3/4" a cabello el corta 6).(No largo accesorio peine El • | |||||
|
|
|
|
| mm) (16 |
5/8" a cabello el corta 5).(No largo accesorio peine El • | |||||
|
|
|
|
| mm) (13 |
1/2" a cabello el corta 4).(No largo accesorio peine El • | |||||
|
|
|
|
| mm) (9 3/8" |
a cabello el corta 3).(No | |||||
mm) (6 1/4" a cabello el corta 2).(No
mm) (3 1/8" a cabello el corta 1).(No corto accesorio peine El •
.cabello el acortar para cortos más accesorios peines use luego empezar, para largo más accesorio peine el Use .accesorio peine cada de cortado al acostumbrase hasta cabello, poco cortar por Empiece LARGOS A MEDIANOS CORTES
.empezar para listo está Ya .mano su en confortablemente cortadora la coja luego cabello, el Desenrede .4 .control y visibilidad mayor para ojos sus de nivel al quede cabeza su que forma tal de persona la a Siente .3 .cabello el cortar a va le quien a persona la de cuello del alrededor barbero de capa la Coloque .2 .correctamente funcione que y lubricado esté que polvo, y cabello de libre esté que asegurarse para aparato el Inspeccione .1 empezar: de Antes CASA SU EN CABELLO EL CORTAR PARA CONAIR DE GUÍA
.precisa manera de nuca la en pelo el y bigote el barba, la cortar para ciones
.protectora cubierta una y limpieza de cepillo un lubricante, aceite suave, almacenamiento de bolso un peluquero, de capa una ladeadas, dientes con modelado de peine un peluquero, de tijeras derecha), oreja la para peine un y izquierda oreja la para peine un (incluso recorte de largos distintos lograr para accesorios peines 9 incluye también conjunto Su .automáticamente largo este a cabello el cortará cortadora la y deseado largo lo escoja Simplemente .posiciones 5 con recorte de
ajuste de botón un de dotada está cual la preciso, tado
.seguridad de función esta vencer intente No .calificado electricista un a llame completamente, entra no aún Si .inviértela completo, por entra no Si .polarizada corriente de toma la en manera sola una de enchufar podrá se seguridad, de medida Como .otro) que ancho más es polo (un polarizada clavija una tiene aparato Este .mente
USO DE INSTRUCCIONES OPERATING INSTRUCCIONES ESTAS GUARDE .usar a volverlo de antes cable el enderece y diatamente
.moviendo están cuando piel la toquen cuchillas las que Evite .12
.cable el desenchufe luego (OFF), “Apagado” posición la en ajustes los todos coloque nectarlo,
.similares elementos y cabellos pelusas, de libres aberturas las Mantenga .obstruir puedan se donde sofá, un o cama una como blanda, superficie una en aparato
el coloque o aire de aberturas las bloquee Nunca .10 | |
| .oxígeno administrando está |
se donde o (spray) aerosol en productos usando | |
están se donde ni libre, aire al aparato este utilice No .9 | |
| .tenimiento”) |
de antes alineadas correctamente estén cuchillas | |
las que Asegúrese .herida una provocar podría | |
Esto .cuchilla la a dientes faltan le si o lastimado | |
o roto accesorio peine un con aparato este use No .8 | |
| .funcionando está tras |
| .aberturas las |
de ninguna en objeto un inserte ni caer deje Nunca .6 | |
.calientes superficies de alejado cable el Mantenga .5 | |
| .reparen lo y |
examinen lo que para autorizado servicio de centro | |
un a Llévelo .agua al caído ha si o dañado está si | |
caído, ha si correctamente, funciona no si dañados, | |
están clavija la o cable el si aparato el utilice Nunca .4 | |
| .fabricante |
el por recomendados accesorios use Sólo .manual | |
este en describe se como tal y diseñado fue cual el | |
para propósito el con únicamente aparato este Use .3 | |
.discapacidad alguna con personas o niños de | |
cerca o sobre por, usado ser debería no aparato Este .2 | |
| .aparato del edor |
está mientras desatendido aparato este deje Nunca .1 | |
personales: lesiones o incendio | |
electrocución, quemaduras, de riesgo el | |
reducir Para — | ADVERTENCIA |
| |
| AGUA |
EL EN APARATO EL | |
ALCANZAR DE TRATE NO | |
.usarlo de después inmediatamente aparato el desconecte Siempre .6
.inmediatamente Desenchúfelo .agua al caído ha que aparato un alcanzar de trate No .5
.líquido otro u agua al caer deje lo ni aparato el coloque No .4
.ducha una tomando o bañando está se mientras use lo No .3
.lavabo un o bañera una a empujado ser o caer pueda donde aparato el guarde ni coloque No .2
.limpiarlo de antes aparato el Desconecte .1
descarga: por herida o muerte de riesgo el reducir Para .apagado está interruptor el cuando incluso activo, eléctricamente permanece electrodoméstico Cualquier — PELIGRO AGUA DEL ALEJADO APARATO EL MANTENGA
USARLO DE ANTES INSTRUCCIONES LAS TODAS LEA
siguientes: las cuales las entre seguridad, de básicas precauciones tomar deben se siempre niños, de presencia la en mente
®
ModelHCT420CSVO
mantenimiento de y uso de Instrucciones
Instructions for Care and Use
Model HCT420CSV
®
IMPORTANT SAFETY
INSTRUCTIONS
When using electrical appliances, especially when children are present, basic safety pre- cautions should always be followed, including the following:
READ ALL INSTRUCTIONS
BEFORE USING
KEEP AWAY FROM WATER
DANGER — any appliance is electri- cally live, even when the switch is off.
To reduce the risk of death or injury by electric shock:
1.Unplug this appliance before cleaning.
2.Do not place or store appliance where it can fall or be pulled into a tub or sink.
3.Do not use while bathing or in a shower.
4.Do not place in, or drop into, water or other liquid.
5.Do not reach for an appliance that has fallen into water. Unplug immediately.
6.Always unplug this appliance from electrical outlet immediately after using.
DO NOT REACH
INTO THE WATER
WARNING— To reduce risk of burns, electrocution, fire, or injury to persons:
1. This appliance should never be left unattended
when plugged in. Do not pull, twist, or wrap line cord around appliance.
2.This appliance should not be used by, on, or near children or individuals with certain disabilities.
3.Use this appliance only for its intended purpose as described in this manual. Do not use attach- ments not recommended by the manufacturer. Do not use an extension cord to operate this appliance.
4.Never operate appliance if it has a damaged cord or plug, or if it is not working properly, if it has been dropped or damaged, or dropped into water. Return appliance to a service cen- ter for examination and repair.
5.Keep cord away from heated surfaces.
6.Never drop or insert any object into any open- ing on this appliance.
7.Do not place appliance on any surface while it is operating.
8.Do not use this appliance with a damaged or broken comb or with teeth missing from the blades, as injury may occur. Before use, make certain blades are aligned properly. (See “Care of your Clippers.”)
9.Do not operate outdoors or where aerosol (spray) products are being used or oxygen is being administered.
10.Never operate the appliance with the air open- ings blocked or while on a soft surface, such as a bed or couch, where the air openings may be blocked. Keep the air openings free of lint, hair, and the like.
11.Always attach plug to appliance first, then to outlet. To disconnect, turn all controls to “OFF”; remove plug from outlet.
12.Avoid skin contact with moving blades.
13.Always check for tangles or kinks in the cord. If the cord does become tangled during use, turn unit off and straighten cord before operating.
SAVE THESE
INSTRUCTIONS
OPERATING
INSTRUCTIONS
This appliance is intended for household use. Use on Alternating Current (120V AC 60Hz) only. This appliance has a polarized plug (one blade is wider than the other). As a safety feature, this plug will fit in the outlet only one way. If the plug does not fit fully in the outlet, reverse the plug. If it still does not fit, contact a qualified electrician. Do not attempt to defeat this safety feature.
Your new Conair Haircut and Trimmer Kit has everything you need to achieve professional hair- cuts, beard trimming and detailing at home. Its powerful new torque motor clipper, with steel blades for
In addition, your kit has a full size trimmer blade with three jawline combs and one
THE CONAIR GUIDE
TO CUTTING HAIR AT HOME
Before you start:
1.Inspect your clipper. Make sure it’s free of hair and dirt, properly oiled, and running smoothly.
2.Place cape around the neck of the person getting a haircut.
3.Seat the person so that his or her head is at your eye level. This gives you greater visibility and control.
4.First, comb hair until it’s
MEDIUM TO LONG CUT
To begin with, cut only a small amount of hair until you become used to the length each attachment leaves the hair. Try the longest attach- ment comb and put the taper control in the high- est setting. If you want a shorter cut, you can then use shorter combs.
•Short attachment comb (number 1) cuts hair to 1/8".
•
•
•Long attachment comb (number 4) cuts hair to 1/2".
•Long attachment comb (number 5) cuts hair to 5/8".
•Long attachment comb (number 6) cuts hair to 3/4".
•Long attachment comb (number 7) cuts hair to 7/8".
•Left ear attachment comb lightly tapers over left ear.
•Right ear attachment comb lightly tapers over right ear. These combs make this part of the haircut easier.
Attach combs by hold- ing them teeth up, then snapping them onto the bottom of the clip- per blade.
To remove comb attachments, place index finger and thumb as illustrated; then pull out and up.
NOTE: Never push or shove the clipper through the hair to make it move more quick- ly. Professional experience shows that the clipper works most efficiently when it cuts through the hair at its own speed.
To begin cutting hair:
1.The hair should be combed in its natural direction.
2.Using the largest attachment comb, trim sides from the bottom upward. Hold
clipper lightly against the hair with teeth of the attachment comb pointing upward, yet flat against the head.
Gradually lift the clipper upward and outward through the hair, trimming just a little at a time.
Repeat around sides and back of head.
If you want hair to be even shorter:
A) Apply more pressure to the head with the attach- ment comb that is in place. This takes a little practice, of course.
OR
B) Just switch to a shorter
attachment comb.
Remember, it’s better to leave too much hair than too little.
For longer hair on top, use
the barber comb and lift hair
on the top of the head, cut-
ting over the comb, or hold the hair between the fingers and cut to desired length. Always working from the
front to the back of the head, gradually cut the hair shorter by reducing the space between the comb or fingers and the head. Comb often to check for uneven strands, and to get rid of trimmed hair.
*Equipped with a turbo switch, this unit is designed to provide 15% extra power making it easier to cut thicker, coarser hair.
OUTLINING
Outlining requires no attachments. Comb hair into the desired style. Position the clipper between the sideburns and the ear (see below), making sure the corner edge of the blade is against the hairline. With the outline of the hair as your guide, slowly move the clipper over, around and behind the ears. For the back of the neck and the sideburns, hold the clipper upside down (see above) and, holding
it against the skin at the length desired, move the clipper downward.
STOP. COMB. CHECK.
For best results, do as the professionals do: comb hair often, and check clipping results as you comb. This way you avoid uneven sides, bangs, neckline, etc.
FOR ULTRA CLOSE FADE STYLES:
A fade cut is a haircut that starts with very short hair (almost bald) on the sides of the head, but lengthens as it nears the top.
1.Start with clean, dry hair. If hair is fairly long, use a long comb attachment (ideally #4) to remove the bulk of your hair before starting the fade cut.
2.Using the long comb attachment, trim hair, cutting against the growth of your hair (from base of neck up towards top of head). At first, until you become familiar with the different attachments, begin with a longer one. You can always go back and make your hair a little shorter. Brush or comb away cuttings as you go. Do not force the blades through the hair. Let the trimmer do the work. Using the #1 comb attachment, you can cut hair as short as 1/8".
3.Gradually trim hair from entire head, rotating trimmer when necessary. Keep cutting against the natural growth of your hair.
4.Establish the fade line. Remove comb attach- ments. With the taper control in position #1, start by blending the hair at the fade line by trimming up and out, repeating as you rotate around the head. Cut hair shorter on the sides and base of the
head than on the top of the head.
5.With the taper control in the #5 position, the blade is as close as it can be to the head. Now repeat the above process, virtually removing all hair. Begin at the base of the scalp and blend towards the fade line. The goal is to blend the hair so there is no real line, just a perfect fade from bald on the sides to very short hair on the top. Continue blending – remember to comb or brush hair against the natural growth to remove cuttings as you go until you achieve the desired look.
FOR THE BALD CUT
Follow the instructions for the FADE CUT, cut- ting hair progressively shorter with each pass of the clipper. For a bald effect, remove all comb attachments and move the taper control to the #5 position. To receive maximum closeness, overlap strokes in a
SHORTCUTS TO PERFECT FLAT TOPS, CREW CUTS, ETC.
Always cut from the back of the neck to the crown, using the longest comb setting. Hold the comb attachment flat against the head and slowly move the clipper up through the hair. Use the same technique for the sides, cutting from the bottom to the upper side of the head.
For the front to the crown, cut the hair against the direction in which it grows, then even it up with the sides.
For a flat top, use the flat comb, not the attach- ment comb. Just cut hair on top of the head over flat comb (see above).
To taper hair down to the neckline, use attachment comb #1. Comb hair and check for uneven spots. Outline sideburns and neck areas (see “Outlining”).
USER MAINTENANCE
CARE OF YOUR CLIPPERS
DetachaBle blade set
This clipper comes with a detachable blade set. To remove the blades follow ![]() these steps:
these steps:![]()
![]()
![]()
![]()
![]()
1. Hold the front part of the clipper with your thumb pressing on the blade and place another hand against
the blade. (see fig. 1)
2. When pressing the blade forward, the blade is detached. (see fig. 2)
TO REPLACE BLADE:
1. Set the Taper Control Button to lowest position "1” (see fig. 3)
2. Place the blade onto the clipper body by inserting the "Blade Tongue” down below
the “Lock Tap”. (see fig. 4)
3. Snap the blade down into following position. The blade is now fixed onto the clipper body. (see fig. 5)
Use these instructions to switch between the clipper and beard trimmer blades and back.
SPECIAL OIL
To maintain the blades of your Conair clipper, oil them after every three ![]() or four haircuts. Gently
or four haircuts. Gently ![]()
![]()
![]()
![]()
![]()
![]()
![]()
![]()
![]()


![]() place a few drops of
place a few drops of 
![]()
![]()
![]()
![]()
oil on the teeth of the blades, using the spe-
cial Conair oil included with your set. Turn the clip- per on for a minute, then turn off. This light, natural oil was formulated specifically for the Conair high speed clipper. Because it is the right oil to use, it will not slow down the blades. Never use any other product. There is no substitute for Conair oil.
Keep oil out of reach of children.
ADJUSTABLE 5 POSITION
TAPER CONTROL
Just like levers on professional clippers, the Conair taper control is positioned at the back of the unit, which functions for both the clipper and trimmer blade so you can hold the clipper in your hand and adjust the lever at the same time...while you’re clipping/trimming. This taper control eliminates the need in some situations for an attachment comb, because it lets you gradually adjust the closeness of the cut. For the closest cut and the shortest hair, push taper control up as far as it will go to level #1. To increase cutting length, slowly push control down. If you push to the lowest position level #5 or #4, it will leave hair about the same length as the short attachment comb.
Because a different cutting edge is used in each setting, the taper lever lengthens the life of your blades.
Any other servicing should be performed by an authorized service representative. The appliance has no user serviceable parts. The product is for household use. (see note).
If clipper stops cutting, check to see if there is a clump of hair lodged between the blades. If that is the problem, unplug the clipper and then loosen the blades to remove the hair.
If the clipper stops cutting but does not stop running, you will need to check the blades. For new blades, send check or money order for $6.50 which includes postage and handling to:
Conair Corporation
150 Milford Rd.
East Windsor, NJ 08520
NOTE:
Never pull on the clipper cord. Never twist or wrap the cord around the clipper. To store your clipper, lay it flat with the cord coiled up, then place in cylinder.
Turbo button
ON/OFF
Switch
Front view
Oil | Cleaning brush |
Detachable blade set
5 position taper control switch