.final el hasta completamente llegue no éste que posible Es .Gel posición la hacia sible
.cabeza la bloqueará Esto .Gel posición la a afeitada de selector del posición la cambie luego firmemente, máquina la de cabeza la Oprima gel: con máquina la usar Para
gel/crema afeitada de selector
cabeza 4 PASO
.central sello el en correctamente obturador el inserta se no si máquina la de saldrá gel El IMPORTANTE: NOTA
asegurada quede que hasta lata la Presione -
bloqueo de lengüeta
| provista llave |
la | con crema de o gel de lata |
la | de superior parte la Remuera - |
2 PASO
crema usando esté cuando crema para boquilla la y gel, usando esté cuando gel para boquilla la use Siempre Precaución:
.instalación la durante “Crema” posición la en esté gel/crema afeitada de selector el que Asegúrese -
.crema) o (gel deseada boquilla la Instale -
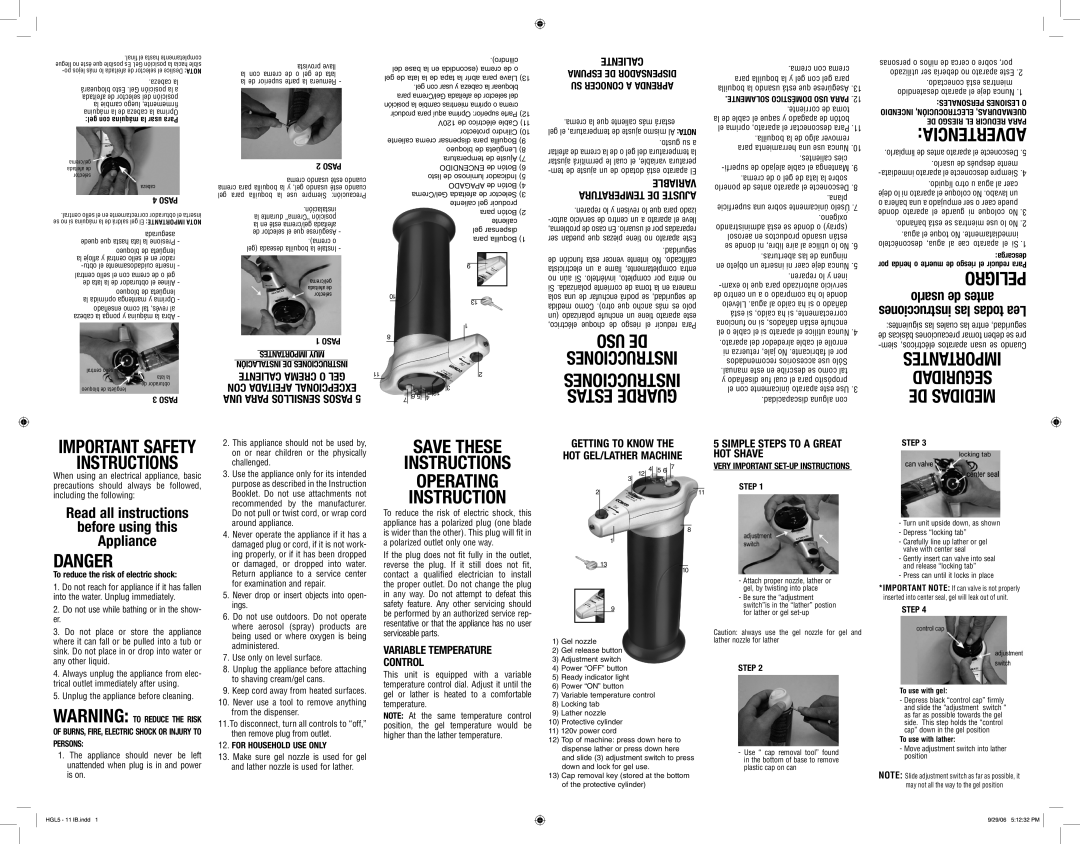
.cilindro) del base la en (escondida crema de o gel de lata la de tapa la abrir para Llave 13) .gel con usar y cabeza la bloquear para Gel/Crema afeitada de selector del posición la cambie mientras oprima o crema producir para aquí Oprima superior: Parte 12) 120V de eléctrico Cable 11) protector Cilindro 10) caliente crema dispensar para Boquilla 9) bloqueo de Lengüeta 8) temperatura de Ajuste 7) ENCENDIDO de Botón 6) listo de luminoso Indicador 5) APAGADO de Botón 4) Gel/Crema afeitada de Selector 3) caliente gel producir para Botón 2) caliente gel dispensar para Boquilla 1)
CALIENTE
ESPUMA DE DISPENSADOR
SU CONOCER A APRENDA
.crema la que caliente más estará gel el temperatura, de ajuste mismo Al NOTA:
.gusto su a afeitar de crema la de o gel del temperatura la ajustar permitirá le cual el variable, peratura
VARIABLE TEMPERATURA DE AJUSTE
.reparen lo y revisen lo que para izado
.seguridad
.crema con crema
para boquilla la y gel con gel para boquilla la usando está que Asegúrese .13
.SOLAMENTE DOMÉSTICO USO PARA .12
.corriente de toma la de cable el saque y apagado de botón el oprima aparato, el desconectar Para .11
.boquilla la de algo remover para herramienta una use Nunca .10
.calientes cies
.crema de o gel de lata la sobre ponerlo de antes aparato el Desconecte .8
.plana superficie una sobre únicamente Úselo .7
.oxígeno administrando está se donde o (spray) aerosol en productos usando están se donde ni libre, aire al utilice lo No .6
personas o niños de cerca o sobre por, utilizado ser debería no aparato Este .2
.conectado está mientras desatendido aparato el deje Nunca .1
PERSONALES: LESIONES O INCENDIO ELECTROCUCIÓN, QUEMADURAS, DE RIESGO EL REDUCIR PARA ADVERTENCIA: .limpiarlo de antes aparato el Desconecte .5
.usarlo de después mente
.líquido otro u agua al caer deje lo ni aparato el coloque No .lavabo un o bañera una a empujado ser o caer puede donde aparato el guarde ni coloque No .3
.bañando está se mientras use lo No .2
.agua el toque No .inmediatamente desconéctelo agua, al cae aparato el Si .1
la afloje y central sello el en rador
central sello el con crema de o gel de lata la de obturador el Alinee -
bloqueo de lengüeta la oprimida mantenga y Oprima -
enseñado como tal revés, al cabeza la ponga y máquina la Abra -
central sello lata la de obturador bloqueo de lengüeta
3 PASO
|
| gel/crema |
|
|
|
|
|
|
|
|
| ||
|
| afeitada de |
|
|
|
|
|
|
|
|
| ||
|
| selector | 10 |
|
|
|
|
| |||||
|
|
|
|
|
|
|
|
|
| ||||
|
| 1 PASO | 8 |
|
|
|
|
| |||||
|
|
|
|
|
|
|
|
|
|
| |||
|
|
|
|
|
|
|
|
|
|
|
|
| |
| IMPORTANTES MUY |
|
|
|
|
|
|
|
|
|
| ||
| INSTALACIÓN DE INSTRUCCIONES |
|
|
|
|
|
|
|
|
| |||
| CALIENTE CREMA O GEL | 11 |
|
|
|
|
|
|
| ||||
|
|
|
|
|
|
|
|
|
| ||||
CON AFEITADA EXCEPCIONAL |
|
|
|
|
|
| 6 | 5 |
| ||||
|
|
|
|
|
|
| |||||||
|
|
|
|
|
|
| |||||||
UNA PARA SENSILLOS PASOS 5 | 7 |
|
| ||||||||||
|
| ||||||||||||
|
|
|
| ||||||||||
4
12
9
13
1
2
3
de función esta vencer intente No .calificado electricista un a llame completamente, entra no aún Si .inviértelo completo, por entra no Si .polarizada corriente de toma la en manera sola una de enchufar podrá se seguridad, de medida Como .otro) que ancho más es polo (un polarizado enchufe un tiene aparato este eléctrico, choque de riesgo el reducir Para
USO DE INSTRUCCIONES
INSTRUCCIONES ESTAS GUARDE
.aberturas las de ninguna en objeto un inserte ni caer deje Nunca .5
.reparen lo y inen
.aparato del alrededor cable el enrolle ni retuerza jale, No .fabricante el por recomendados accesorios use Sólo .manual este en describe se como tal y diseñado fue cual el para propósito el con únicamente aparato este Use .3
.discapacidad alguna con
descarga: por herida o muerte de riesgo el reducir Para
PELIGRO usarlo de antes instrucciones las todas Lea siguientes: las cuales las entre seguridad, de básicas precauciones tomar deben se pre
IMPORTANT SAFETY
INSTRUCTIONS
When using an electrical appliance, basic precautions should always be followed, including the following:
Read all instructions
before using this
Appliance
DANGER
To reduce the risk of electric shock:
2. This appliance should not be used by, |
on or near children or the physically |
challenged. |
3. Use the appliance only for its intended |
purpose as described in the Instruction |
Booklet. Do not use attachments not |
recommended by the manufacturer. |
Do not pull or twist cord, or wrap cord |
around appliance. |
4. Never operate the appliance if it has a |
damaged plug or cord, if it is not work- |
ing properly, or if it has been dropped |
or damaged, or dropped into water. |
Return appliance to a service center |
SAVE THESE
INSTRUCTIONS
OPERATING
INSTRUCTION
To reduce the risk of electric shock, this appliance has a polarized plug (one blade is wider than the other). This plug will fit in a polarized outlet only one way.
If the plug does not fit fully in the outlet, reverse the plug. If it still does not fit, contact a qualified electrician to install
GETTING TO KNOW THE |
|
| 5 SIMPLE STEPS TO A GREAT | |||||||||||||||
HOT GEL/LATHER MACHINE |
|
| HOT SHAVE | |||||||||||||||
3 | 12 | 4 |
| 5 6 |
|
| 7 |
|
|
|
|
|
| VERY IMPORTANT | ||||
|
|
|
|
|
|
|
| |||||||||||
|
|
|
|
|
|
|
|
| ||||||||||
|
|
|
|
|
|
|
|
|
|
|
| STEP 1 | ||||||
|
|
|
|
|
|
|
|
|
|
|
|
| ||||||
2 |
|
|
|
|
|
|
|
|
|
|
|
|
|
|
|
| ||
|
|
|
|
|
|
|
|
|
|
|
|
|
| 11 | ||||
|
|
|
|
|
|
|
|
|
|
|
|
|
|
| ||||
|
|
|
|
|
|
|
|
|
|
|
|
|
|
| ||||
|
|
|
|
|
|
|
|
|
|
|
|
|
|
|
|
|
|
|
|
|
|
|
|
|
|
|
|
|
|
|
|
|
|
|
|
|
|
1 |
|
|
|
| 8 |
|
|
|
| |||||||||
|
|
|
|
|
|
|
|
|
|
|
|
|
|
| ||||
|
|
|
|
|
|
|
|
|
|
|
|
|
|
| ||||
13 |
|
|
|
|
|
|
|
|
|
|
|
|
|
|
| |||
|
|
| 10 |
|
|
|
| |||||||||||
|
|
|
|
|
|
|
|
|
|
|
| |||||||
STEP 3
- Turn unit upside down, as shown |
- Depress “locking tab” |
- Carefully line up lather or gel |
valve with center seal |
- Gently insert can valve into seal |
and release “locking tab” |
- Press can until it locks in place |
1.Do not reach for appliance if it has fallen into the water. Unplug immediately.
2.Do not use while bathing or in the show-
er.
3.Do not place or store the appliance where it can fall or be pulled into a tub or sink. Do not place in or drop into water or any other liquid.
4.Always unplug the appliance from elec- trical outlet immediately after using.
5.Unplug the appliance before cleaning.
WARNING: TO REDUCE THE RISK OF BURNS, FIRE, ELECTRIC SHOCK OR INJURY TO PERSONS:
1.The appliance should never be left unattended when plug is in and power is on.
| for examination and repair. |
5. | Never drop or insert objects into open- |
| ings. |
6. | Do not use outdoors. Do not operate |
| where aerosol (spray) products are |
| being used or where oxygen is being |
| administered. |
7. | Use only on level surface. |
8. | Unplug the appliance before attaching |
| to shaving cream/gel cans. |
9. | Keep cord away from heated surfaces. |
10. | Never use a tool to remove anything |
| from the dispenser. |
11.To disconnect, turn all controls to “off,” | |
| then remove plug from outlet. |
12. | FOR HOUSEHOLD USE ONLY |
13. | Make sure gel nozzle is used for gel |
| and lather nozzle is used for lather. |
the proper outlet. Do not change the plug in any way. Do not attempt to defeat this safety feature. Any other servicing should be performed by an authorized service rep- resentative or that the appliance has no user serviceable parts.
VARIABLE TEMPERATURE
CONTROL
This unit is equipped with a variable temperature control dial. Adjust it until the gel or lather is heated to a comfortable temperature.
NOTE: At the same temperature control position, the gel temperature would be higher than the lather temperature.
9
1)Gel nozzle
2)Gel release button
3)Adjustment switch
4)Power “OFF” button
5)Ready indicator light
6)Power “ON” button
7)Variable temperature control
8)Locking tab
9)Lather nozzle
10)Protective cylinder
11)120v power cord
12)Top of machine: press down here to dispense lather or press down here and slide (3) adjustment switch to press down and lock for gel use.
13)Cap removal key (stored at the bottom of the protective cylinder)
-Attach proper nozzle, lather or gel, by twisting into place
-Be sure the “adjustment switch”is in the “lather” postion for lather or gel
Caution: always use the gel nozzle for gel and lather nozzle for lather
STEP 2
-Use “ cap removal tool” found in the bottom of base to remove plastic cap on can
*IMPORTANT NOTE: If can valve is not properly inserted into center seal, gel will leak out of unit.
STEP 4
To use with gel:
-Depress black “control cap” firmly and slide the “adjustment switch “ as far as possible towards the gel side. This step holds the “control cap” down in the gel position
To use with lather:
-Move adjustment switch into lather position
NOTE: Slide adjustment switch as far as possible, it may not all the way to the gel position
HGL5 - 11 IB.indd 1
9/29/06 5:12:32 PM