MN252CSC Modèle
®
.fiable service de années des tirerez en vous que savons Nous .moustache et barbe à tondeuse la pour opté d’avoir remercie vous Conair
positions | 3 | sur pivotant Tête |
|
|
| 04CN1217 |
|
|
5M1 L6T Ontario Brampton,
Drive Parkshore 156
.INC PRODUCTS CONSUMER CONAIR ©2004 ca.conaircanada.www : Web site notre Visitez
.l’autre à province d’une varient qui droits d’autres accorder vous aussi peut et particuliers droits des accorde vous garantie Cette
.SOIT CE QUE IMPLICITE OU EXPRESSE GARANTIE AUTRE TOUTE DE OU GARANTIE CETTE DE BRIS LE POUR SOIT, CE QUE FORTUIT OU INDIRECT SPÉCIAL, DOMMAGE QUELQUE DE SABLE
.ÉCRITE LIMITÉE GARANTIE CETTE DE MOIS 24 DE DURÉE LA À LIMITÉE SERA
.administratifs et poste de frais les pour $ 5,50 de et caisse de bon du accompagné près, plus le
.fabrication de ou matière de vice un affiche il l’achat, de date la suivant mois 24 des cours au si, appareil un frais sans remplacera ou réparera discrétion, sa à Conair,
ANS DEUX DE LIMITÉE GARANTIE
|
| lubrification de Huile .11 | |||
|
| moustache à Peigne .10 | |||
|
| nettoyage de Brosse .9 | |||
| rangement de et chargeur Socle .8 | ||||
|
| découpe de Lame .7 | |||
|
|
|
| Rasoir .6 | |
|
| court accessoire Peigne .5 | |||
|
| long accessoire Peigne .4 | |||
|
| piles des Logement .3 | |||
|
| manche le sur Interrupteur .2 | |||
|
| barbe à Tondeuse .1 | |||
.3 | .10 |
|
|
|
|
|
|
|
|
| |
| .9 |
| .4 |
| |
|
|
|
|
| |
| .2 .11 |
| .5 |
| |
|
|
| .1 | ||
| .6 | .8 |
| . | 7 |
| MN252CSC |
|
|
| |
BARBE/MOUSTACHE À TONDEUSE | |||||
|
| .cadre le sur d’huile |
l’excédent | Essuyez | .secondes quelques |
fonctionner la laissez et tondeuse la de | ||
lames les légèrement huilez semaine, Chaque | ||
|
| .prévu l’usage |
pour que tondeuse la n’utilisez utile, durée | ||
longue une | assurer | Pour .suivante sation |
Rangez .lames les sur poils les nettoyer pour | ||
fournie brosse la utilisez usage, chaque Après | ||
.soin avec maniées être toujours doivent elles er, | ||
| .lame la sous ressort petit le dre | |
.s’enclenche lame la que ce jusqu’à | ||
fermement | Pressez .monture la sur ment |
puis tête | .place en cadre le enclenchez |
la sur et cadre la sur flèches | |
les Alignez | .refermer le de avant libre l’air |
àsécher cadre le laissez rinçage, le Après .3
.courante l’eau sous
cadre le Rincez .6) | .(ill fournie brosse petite |
la avec alentours ses et lame la Nettoyez .2 | |
6 .Ill | 5 .Ill |
| PRESSER |
| PRESSER |
ENCLENCHER | OUVRIR |
| |
| .facilement |
s’endommage et délicate est elle car grille | |
la pas poussez Ne .exposée) est lame (la rasoir | |
du tête la Enlevez | .5) .(ill grille la de ment |
:rasoir du grille la et lame la nettoyer Pour rasoir de tête la de Nettoyage
2 .Ill
FERMER
PRESSER
.lame la nettoyer pouvez vous et s’ouvre couvercle Le .2) .(ill tête la de bas le dans bouton le sur appuyant en tête la Ouvrez
barbe la pour tête la de Nettoyage LAMES DES ENTRETIEN TONDEUSE LA DE ENTRETIEN
.utilisation chaque après chargeur socle le sur tondeuse la Remettez .6
.fournie brosse la avec lame la Nettoyez .5
.d’arrêt position en tondeuse la de l’interrupteur mettez terminé, travail le fois Une .4
.voulu découpage le créer pour
.marche en tondeuse la Mettez .2 .tondeuse la sur découper à lame la Posez .1
.mâchoire la de long le ou lèvres des autour finesse avec tailler pour découper
àlame la utilisez coupés, cheveux les fois Une
.faciaux poils des fin découpage au sert lame Cette
DÉCOUPER À LAME
.moustache la de bas du ligne la découpez lame, la que n’utilisant et, peigne le enlevez taillée, moustache la fois Une
BAS EN HAUT DE MOUSTACHE LA TOUJOURS TONDEZ
).court plus réglage un avec moustache la sur repasser toujours pouvez (Vous .longue position la à réglé peigne le avec débuter de bon est
.naturelle pousse la de sens le dans moustache la Peignez .2
.résultats meilleurs de donnera humide et propre moustache Une .1
MOUSTACHE LA DE TAILLE
| .voulue longueur | ||
la de l’atteinte jusqu’à barbe la sur repasser | |||
et conséquence en peigne le ajuster pouvez | |||
vous près, plus de coupe une voulez vous Si .3 | |||
|
| .courts trop | |
coupés seront poils les sinon | |||
naturelle pousse la de traire | |||
jamais tentez (Ne .menton du | |||
direction en travaillez et favoris | |||
aux Commencez | .formes | ||
|
| ).courte plus | |
tailler la pour barbe la | |||
sur repasser toujours | |||
pouvez | (Vous .longs | ||
peigne | le et | réglage | |
le | utilisez | ments, | |
| |||
début, | |||
lame la sur | |||
.longues barbes les pour l’autre | |||
courtes, barbes les pour Un .barbe la de taille | |||
la pour multiples positions à peignes 2 a y Il | |||
BARBE LA DE TAILLE | |||
.cheveux des ligne la jusqu’à | |||
et favoris des joues, des long le supérieure | |||
ligne la Définissez .oreilles des | direction | ||
en visage du d’autre et part de haut, le vers | |||
travaillez et menton le sous forme la définir | |||
par Commencez .barbe la pour tête la Posez .3 | |||
|
| .mâchoire la | |
de niveau au découpe le Amorcez .naturelle | |||
pousse la de sens le dans barbe la Peignez .2 | |||
.humide et propre barbe une | |||
avec débuter de préférable toujours est Il .1 | |||
BARBE LA DE DÉCOUPE | |||
OUTLINING YOUR BEARD
1.It is always best to begin with a clean, slight- ly damp beard.
2.After you have combed through your beard in the direction it grows naturally, you will want to outline the desired shape, beginning under your jawline.
3.Attach the beard trimmer head. Begin defin- ing your beard’s shape under your chin and work upward on each side of your face toward your ears. Then define the upper out- line of your beard across your cheeks, past your sideburns and toward your hairline.
NOW YOU’RE READY
TO TRIM YOUR BEARD
There are 2 multi position combs for cutting dif- ferent lengths of hair. One for shorter lengths and one for longer lengths.
1.To use the multi position comb, slide it over the trimmer blades and snap down into posi-
tion. At first, until you become familiar with the adjustments, use the longest comb and trim setting. (You can
always go back and make your beard a lit-
tle shorter.)
2. Begin trimming your |
TO TRIM YOUR MUSTACHE
1.For best results, start with a clean, slightly damp mustache.
2.Comb through your mustache in the direc- tion it grows.
3.Place the multi position comb over the trim- mer blades and snap it into posi-
tion. It is a good idea to start with the longest trim setting adjust- ment. (You can always go back and cut your mustache more closely with a shorter setting.)
ALWAYS TRIM YOUR MUSTACHE
FROM THE TOP DOWN
After your mustache has been trimmed to the desired length, remove the trimming attach- ment and, using the blades only, define the out- line of the bottom of your mustache.
USING THE SCRIBE BLADE
The scribe blade is used for fine detailing of your facial hair. After trimming the hair to the desired length, us the scribe blade to make fine line details, the narrow blade width is perfect for detailing under your lips or along the jaw line
TAKING CARE OF YOUR TRIMMER
BLADE CARE
Cleaning Beard Trimmer
The head can be opened for cleaning purpose by pressing the button at the bottom of head. (Fig.2) The cover will be opened.
Fig.2
Shaver Head
To clean the shaver blade and foil:
1.Press both foil frame release buttons (Fig.5). Then remove the shaver head (the cut- ter is now in view). Be careful not to push on the foil as it is delicate and can be easily dam- aged.
into the cutter mount. Press firmly until the cutter snaps into place.
Caution: make sure you do not lose the little spring under the cutter.
Because the trimmer blades are precision made for a very special use, they should always be handled with care. Each time you finish using the trimmer, take the cleaning brush provided and brush away any loose hair that has collected in the blades. Then store the trimmer in its storage stand until the next use.
To promote the long life of the appliance, use your trimmer only for the purpose intended by the manufacturer.
Each week drop a small amount of oil on the beard trimmer blades and turn the trimmer on for a few seconds. Wipe any excess oil off the housing.
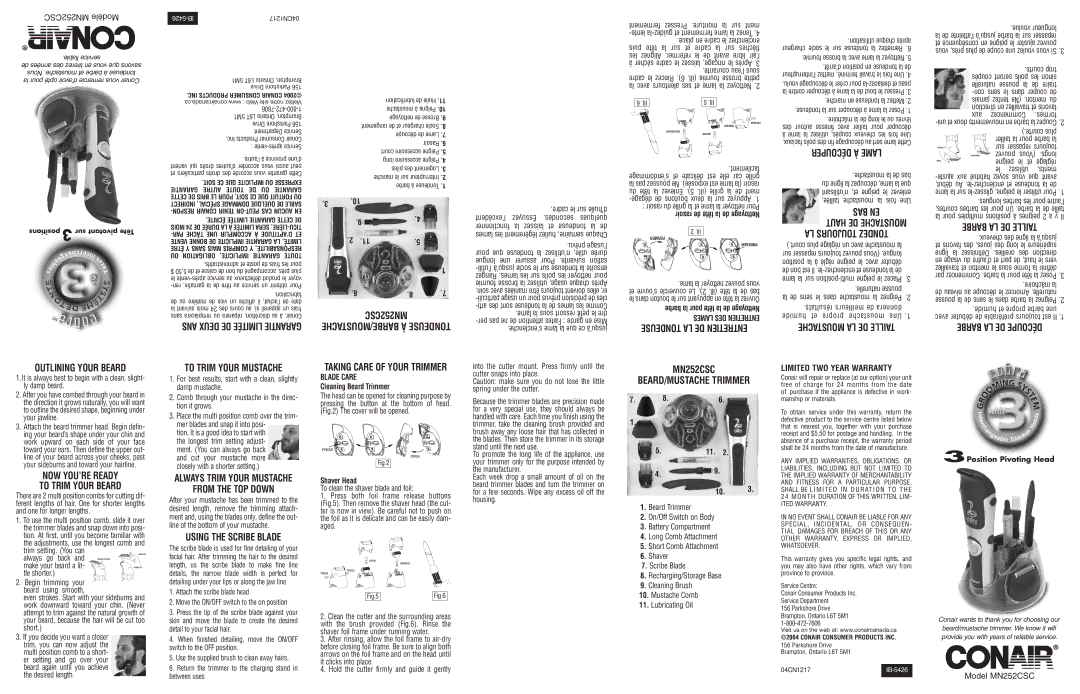
MN252CSC
BEARD/MUSTACHE TRIMMER
7. | 8. | 6. |
1.
5.11. 2.
4.9.
10. 3.
1.Beard Trimmer
2.On/Off Switch on Body
3.Battery Compartment
4.Long Comb Attachment
5.Short Comb Attachment
6.Shaver
7.Scribe Blade
8.Recharging/Storage Base
9.Cleaning Brush
LIMITED TWO YEAR WARRANTY
Conair will repair or replace (at our option) your unit free of charge for 24 months from the date of purchase if the appliance is defective in work- manship or materials.
To obtain service under this warranty, return the defective product to the service centre listed below that is nearest you, together with your purchase receipt and $5.50 for postage and handling. In the absence of a purchase receipt, the warranty period shall be 24 months from the date of manufacture.
ANY IMPLIED WARRANTIES, OBLIGATIONS, OR LIABILITIES, INCLUDING BUT NOT LIMITED TO THE IMPLIED WARRANTY OF MERCHANTABILITY AND FITNESS FOR A PARTICULAR PURPOSE, SHALL BE LIMITED IN DURATION TO THE
24MONTH DURATION OF THIS WRITTEN, LIM- ITED WARRANTY.
IN NO EVENT SHALL CONAIR BE LIABLE FOR ANY SPECIAL, INCIDENTAL, OR CONSEQUEN- TIAL DAMAGES FOR BREACH OF THIS OR ANY OTHER WARRANTY, EXPRESS OR IMPLIED, WHATSOEVER.
This warranty gives you specific legal rights, and you may also have other rights, which vary from province to province.
Service Centre:
3Position Pivoting Head
beard using smooth, |
even strokes. Start with your sideburns and |
work downward toward your chin. (Never |
attempt to trim against the natural growth of |
your beard, because the hair will be cut too |
short.) |
3. If you decide you want a closer |
trim, you can now adjust the |
multi position comb to a short- |
er setting and go over your |
beard again until you achieve |
the desired length. |
1.Attach the scribe blade head
2.Move the ON/OFF switch to the on position
3.Press the tip of the scribe blade against your skin and move the blade to create the desired detail to your facial hair.
4.When finished detailing, move the ON/OFF switch to the OFF position.
5.Use the supplied brush to clean away hairs.
6.Return the trimmer to the charging stand in between uses
Fig.5 |
| Fig.6 |
2.Clean the cutter and the surrounding areas with the brush provided (Fig.6). Rinse the shaver foil frame under running water.
3.After rinsing, allow the foil frame to
4.Hold the cutter firmly and guide it gently
10.Mustache Comb
11.Lubricating Oil
Conair Consumer Products Inc. Service Department
156 Parkshore Drive Brampton, Ontario L6T 5M1
Visit us on the web at: www.conaircanada.ca
©2004 CONAIR CONSUMER PRODUCTS INC.
156 Parkshore Drive
Brampton, Ontario L6T 5M1
04CN1217 | |
|
|
Conair wants to thank you for choosing our
beard/mustache trimmer. We know it will
provide you with years of reliable service.
®
Model MN252CSC