IMPORTANT SAFETY
INSTRUCTIONS
READ ALL INSTRUCTIONS
BEFORE USING
FOR HOUSEHOLD USE ONLY
KEEP AWAY FROM WATER
WARNING–
1.Use close supervision when the appliance is used by, on, or near children or individuals with certain disabilities.
2.Use appliance only for its intended use as described in this manual. Only use attachments recommended by the manufacturer.
3.Never operate the appliance if it is not work- ing properly, has been dropped or damaged, or dropped into water. Return the appliance to a Conair service center for examination and repair.
4.Do not use the appliance with teeth missing from the blades, as injury may result. Before each use, make certain the blades are aligned properly and oiled.
SAVE THESE
INSTRUCTIONS
TROUBLESHOOTING
There are several things to look for if your trimmer fails to operate:
1.Be sure the trimmer is turned ON.
2.Make sure that the battery is properly placed in the battery compartment. Test the battery to be sure it is working.
3.Check the blades to see if they are clogged
with hair clippings; if so, use a cleaning brush to remove hair.
4.If the trimmer still fails to operate, take or send it to a Conair Service Center (see warranty procedure and addresses).
OPERATING
INSTRUCTIONS
1. To insert battery, remove compartment cover at the back of the unit by pull-
ing straight down (Fig.1). Insert one AA alkaline battery, negative end up. (Alkaline batteries will
ensure the best perfor- mance and longest life for your appliance.) If you are not going to use the unit for a long period of time,
or if the battery is dead, remove the battery from the unit. Remove used batteries promptly. This will increase the life of your trimmer.
2. After inserting the battery, replace the battery |
compartment. |
3. Now your unit is ready to be used. *Do not use |
in the shower. To clean simply rinse trimmer blade |
4.To use your trimmer, push On/Off switch upwards to “On” position.
5.After you finish using your trimmer, push down on the On/Off switch to turn the trimmer off.
6.Always purchase the correct size and grade of battery most suitable for the intended use.
7.Replace all batteries of a set at the same time.
8.Clean the battery contacts and also those of the devise prior to battery installation.
9.Ensure the batteries are installed correctly with regard to polarity (+ and
10.Remove batteries from equipment, which is not to be used for an extended period of time.
11.Remove used batteries promptly.
12.Store unused batteries in their original packaging, away from metal objects that could
13.Never dispose of batteries in fire, except under conditions of controlled incineration. Failure to observe this precaution may result in an explosion. Never attempt to recharge primary batteries as this may cause leakage, fire, or explosion.
GETTING STARTED
TO SWITCH TRIMMER HEADS
Hold the handle of the trimmer while turning the trimmer head counterclockwise until the "I" mark is aligned properly with the "arrow" mark (Fig. 2). At this point you should be able to easily lift the trimmer head from the handle. To use a new trim- mer head on the unit, properly install the head into position making sure the "I" mark is aligned with the "arrow" mark, turn clockwise until the "I" and "circle" marks are aligned (Fig. 3) and lock into position.
Fig. 2 | Fig. 3 |
TO TRIM NECKLINE & SIDEBURNS
Attach the
TO TRIM NOSE HAIR
Attach the angled detail trimmer head to the trim- mer handle. Turn unit on. Gently insert trimmer head into nostril. Gently move trimmer in and out of the nostril to remove unwanted hair. Avoid inserting the trimmer more than ¼" to ensure safe trimming.
TO TRIM EAR HAIR
Attach the angled detail trimmer head to the trim- mer handle. Turn unit on. Gently insert trimmer head no more than ¼" into outer ear canal. Gently move trimmer around the outer ear to remove unwanted hair extending beyond the outer ear. Guide the trimmer around the outer surface of ear to trim protruding hairs. Never insert trimmer more than ¼" into ear canal.
TO TRIM EYEBROWS
Attach the angled detail trimmer to the trimmer handle. Turn unit on. To shape and define, move the trimmer without the eyebrow comb attachment slowly so as not to cut any hair you do not intend to trim. Once shaped and defined, you may thin out the hair using the eyebrow comb attachment.
USING THE 5-POSITION TRIMMING COMB
1.To use the
2.At first, until you become familiar with the adjust- ments, use the longest setting. (You can always go back and trim hair shorter.)
3.Using smooth, even strokes gently move the comb through the hair in the direction of growth. (Never attempt to trim against the natural growth of your hair because it will be cut too short.)
4.If you decide to make your hair shorter, you can now adjust the
5.When you have finished, run a comb or brush (not included) through the hair to remove any loose hairs.
TAKING CARE OF YOUR TRIMMER
BLADE CARE
Because the trimmer blades are precision made for a very special use, they should always be handled with care. Each time you finish using the trimmer, brush away any loose hair that has col- lected in the blades, then rinse blades under water only and store the trimmer in its storage stand until the next use.
To promote the long life of the appliance, use your trimmer only for the purpose intended by the manufacturer.
CLEANING YOUR TRIMMER
Make sure trimmer is off.
1. To remove the trimmer head |
|
for cleaning, turn the head |
|
Fig. 4 | |
mark aligns with the "arrow" | |
mark, then lift the head gently (Fig. 4). |
|
2.Only rinse the head under water (Fig. 5). For proper functioning of the unit, the handle can not touch or be immersed in water.
Fig. 5
3.After cleaning, make sure to shake dry the head before replacing it to the body.
4.To reassemble the head onto
the body, align the "I" mark on |
| |
the head with the "arrow" mark |
| |
on the body and then turn clock- |
| |
wise until the "I" mark aligns |
| |
with the "circle" mark on the | Fig. 6 | |
body (Fig. 6). | ||
|
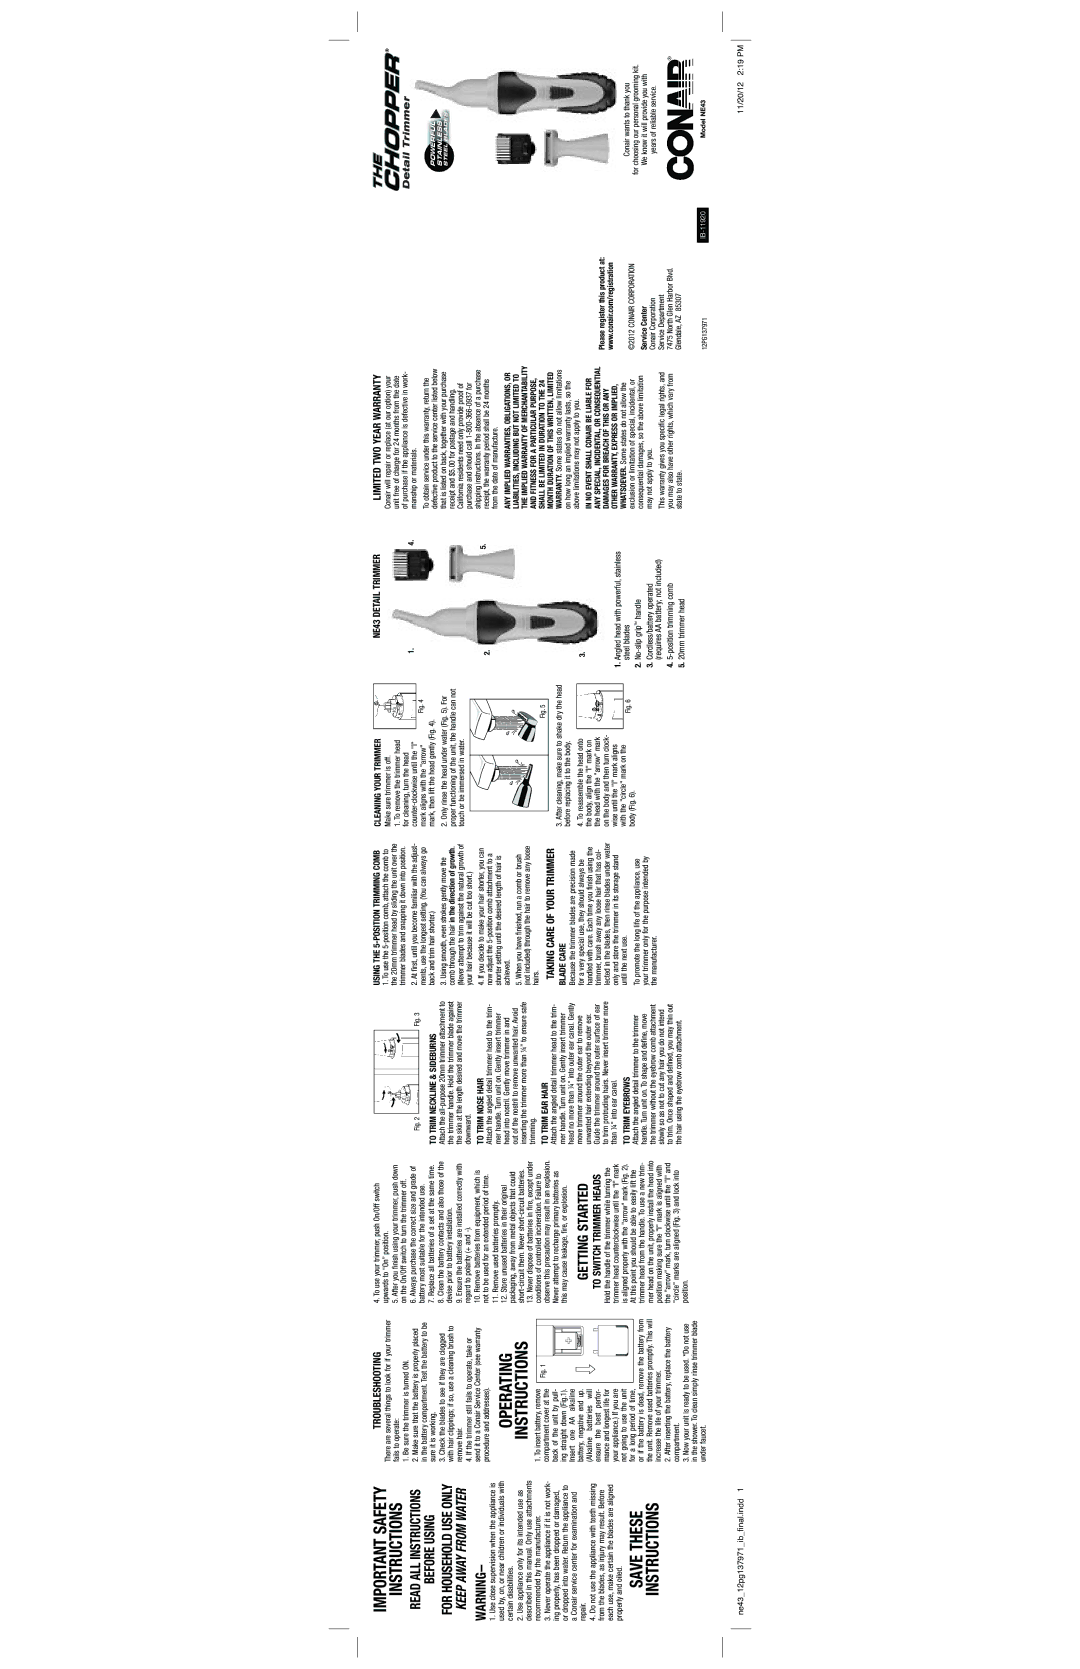
NE43 DETAIL TRIMMER
1.4.
2.5.
3.
1.Angled head with powerful, stainless steel blades
2.
3.Cordless/battery operated (requires AA battery; not included)
4.
5.20mm trimmer head
LIMITED TWO YEAR WARRANTY
Conair will repair or replace (at our option) your unit free of charge for 24 months from the date of purchase if the appliance is defective in work- manship or materials.
To obtain service under this warranty, return the defective product to the service center listed below that is listed on back, together with your purchase receipt and $5.00 for postage and handling. California residents need only provide proof of purchase and should call
ANY IMPLIED WARRANTIES, OBLIGATIONS, OR LIABILITIES, INCLUDING BUT NOT LIMITED TO THE IMPLIED WARRANTY OF MERCHANTABILITY AND FITNESS FOR A PARTICULAR PURPOSE, SHALL BE LIMITED IN DURATION TO THE 24 MONTH DURATION OF THIS WRITTEN, LIMITED WARRANTY. Some states do not allow limitations
on how long an implied warranty lasts, so the above limitations may not apply to you.
IN NO EVENT SHALL CONAIR BE LIABLE FOR ANY SPECIAL, INCIDENTAL, OR CONSEQUENTIAL DAMAGES FOR BREACH OF THIS OR ANY OTHER WARRANTY, EXPRESS OR IMPLIED, WHATSOEVER. Some states do not allow the
exclusion or limitation of special, incidental, or consequential damages, so the above limitation may not apply to you.
This warranty gives you specific legal rights, and you may also have other rights, which vary from state to state.
Please register this product at: www.conair.com/registration
©2012 CONAIR CORPORATION
Service Center
Conair Corporation
Service Department
7475 North Glen Harbor Blvd.
Glendale, AZ 85307
THE
CHOPPER ®
DETAIL TRIMMER
POWERFUL
STAINLESS
STEEL BLADES
Conair wants to thank you
for choosing our personal grooming kit.
We know it will provide you with
years of reliable service.
under faucet. |
12PG137971 | MODEL NE43 |
ne43_12pg137971_ib_final.indd 1 | 11/20/12 2:19 PM |