.jabonosa caliente agua con lavarse deben removibles piezas Las .4 .metálicos pulidores utilice Nunca .frío encuentre se doméstico -electro el que vez una suave paño un con cafetera la de exterior parte la Limpie .3 .limpieza la con proceder de antes electrodoméstico el desenchufar de olvide se No .2 .uso cada de después cafetera la Limpie .1 LIMPIEZA DE INSTRUCCIONES .programada hora la según café de destilación de proceso el iniciar para lista quedará cafetera la momento este En .ilumine se “Auto” indicadora luz la que hasta “PROG” botón el presione Finalmente, .E .deseada hora la alcanzado haya se cuando vez una “SET” botón el Presione .D .deseada hora la programar para “MIN” y “HR” botones los Utilice .C .pantalla la en intermitente manera de números los aparezcan que hasta “SET” botón el Presione .B .ilumine se “Auto” indicadora luz la que hasta “PROG” botón el Presione .A .automática destilación de función la programar (para automático temporizador del Instalación .intermitentes ser de dejen números los que hasta nuevo de “SET” botón el presione correcta, hora la programada vez Una .D .correcta hora la según minutos los y horas las programar para “MIN” y “HR” botones los utilice intermitente, manera de iluminen se números los que vez Una .C .LCD pantalla la en intermitente manera de aparezcan números los que hasta “SET” botón el presionado mantenga y Presione .B .apagadas encuentren se “ON” y “Auto” indicadoras luces dos las que hasta “PROG” botón el Presione .A .actual) hora la programar (para reloj del Programación .destilación de proceso el con comience cafetera la que y ilumine se “ON” encendido de indicadora luz a l que hará Esto . nuevo de (Programa) ” “PROG botón el Presione .3 .ilumine se “Auto” indicadora luz la que hará Esto . vez ”una “PROG botón el Presione .2 .“12:00” mostrará LCD pantalla La .cafetera la Enchufe .1


CONTROL DE PANEL DEL FUNCIONAMIENTO


11


9


inferior Cubierta .11


10

calentamiento de Plataforma .10


digital Botón .9


8

7

Asa .8

vidrio de Jarra .7


5

jarra la de Tapa .6


Base .5


3

6

Embudo .4

4

agua de Tanque .3


embudo del Cubierta .2

2


agua de tanque del Tapa .1


muestra: se que composición de diagrama el Verifique


1

PARTES DE LISTA


PART LIST

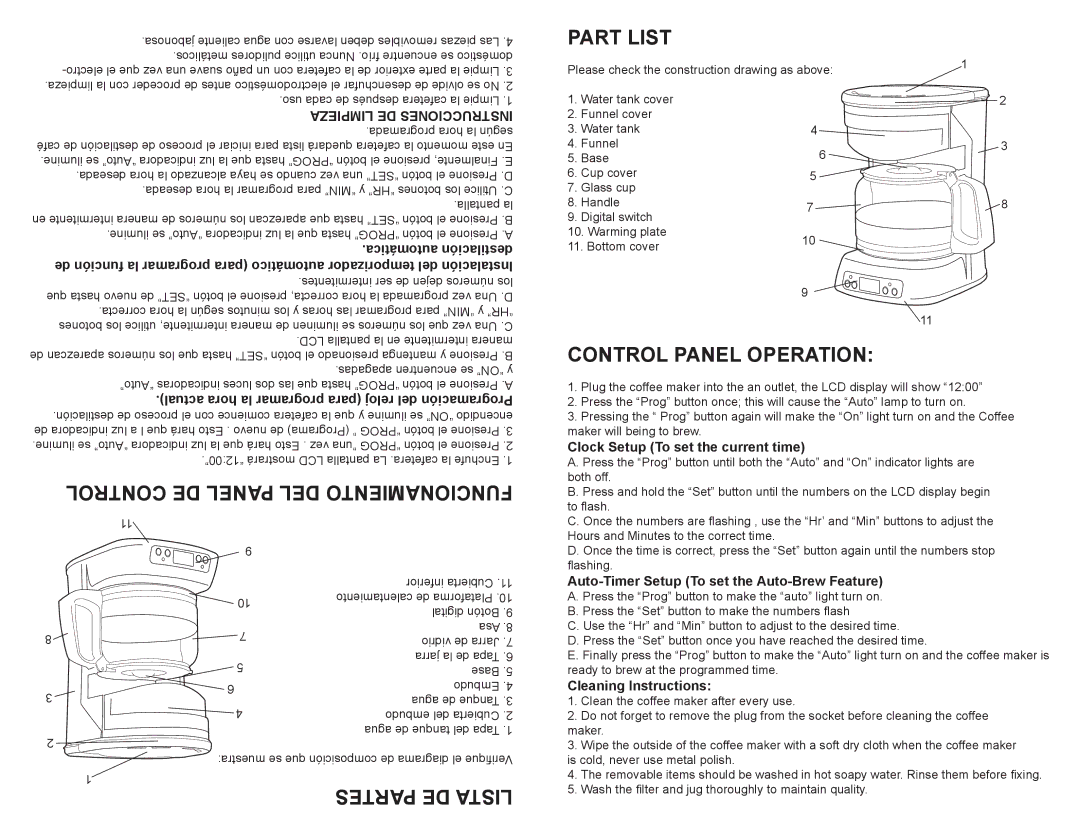
Please check the construction drawing as above:

1


1.

Water tank cover


2

2.

Funnel cover


3.

Water tank

4

3

4.

Funnel

6

5.

Base


6.

Cup cover

5


7.

Glass cup


8.

Handle

7

8

9.

Digital switch


10. Warming plate

10

11. Bottom cover


9


11

CONTROL PANEL OPERATION:

1.Plug the coffee maker into the an outlet, the LCD display will show “12:00”

2.Press the “Prog” button once; this will cause the “Auto” lamp to turn on.

3.Pressing the “ Prog” button again will make the “On” light turn on and the Coffee maker will being to brew.

Clock Setup (To set the current time)

A. Press the “Prog” button until both the “Auto” and “On” indicator lights are both off.

B. Press and hold the “Set” button until the numbers on the LCD display begin to flash.

C. Once the numbers are flashing , use the “Hr’ and “Min” buttons to adjust the

Hours and Minutes to the correct time.

D. Once the time is correct, press the “Set” button again until the numbers stop flashing.

Auto-Timer Setup (To set the Auto-Brew Feature)

A. Press the “Prog” button to make the “auto” light turn on.

B. Press the “Set” button to make the numbers flash

C. Use the “Hr” and “Min” button to adjust to the desired time.

D. Press the “Set” button once you have reached the desired time.

E. Finally press the “Prog” button to make the “Auto” light turn on and the coffee maker is ready to brew at the programmed time.

Cleaning Instructions:

1.Clean the coffee maker after every use.

2.Do not forget to remove the plug from the socket before cleaning the coffee maker.

3.Wipe the outside of the coffee maker with a soft dry cloth when the coffee maker is cold, never use metal polish.

4.The removable items should be washed in hot soapy water. Rinse them before fixing.

5.Wash the filter and jug thoroughly to maintain quality.

Page 5
Image 5
Continental Electric CE23671 Control DE Panel DEL Funcionamiento, Partes DE Lista, Part List, Control Panel Operation

CE23671, CE23679 specifications

The Continental Electric CE23679 and CE23671 are innovative kitchen appliances designed to elevate the cooking experience for home chefs. These electric skillets are built with versatility in mind, offering a range of features and technologies that make them indispensable tools in modern kitchens.

One of the standout features of both models is their generous cooking surface area. The CE23679 boasts a larger capacity, allowing users to prepare meals for families or gatherings without the need for multiple pots and pans. In contrast, the CE23671 is compact enough for smaller kitchens while still offering ample room for everyday cooking tasks. This flexibility makes both models ideal for a variety of culinary endeavors, from searing meats to sautéing vegetables.

Both skillets are equipped with an adjustable temperature control feature, enabling precise heat settings. This technology allows for exceptional temperature distribution, ensuring that food is cooked evenly without the risk of burning. Whether you're frying, grilling, or simmering, users can effortlessly maintain the desired heat level for perfect results every time.

The non-stick coating on the cooking surface enhances the cooking experience by preventing food from sticking, making cleanup a breeze. This feature not only saves time but also eliminates the need for excessive oil or butter, promoting healthier cooking habits. Both models are also designed with a removable temperature probe that simplifies cleaning while allowing for easy storage.

Another significant characteristic is the durable construction of both the CE23679 and CE23671. Made from high-quality materials, these skillets are built to withstand the rigors of daily cooking. The stylish design, complete with sleek finishes, makes them attractive additions to any kitchen countertop.

Safety features are also paramount in these skillets. Both appliances come with cool-touch handles that ensure users can safely maneuver the skillets without fear of burns. Additionally, their tempered glass lids provide added visibility while cooking, allowing users to monitor their dishes without needing to remove the lid.

In summary, the Continental Electric CE23679 and CE23671 electric skillets combine practicality, efficiency, and safety. Their adjustable temperature control, non-stick surfaces, durable construction, and user-friendly features make them exceptional choices for home cooks. Whether you're preparing a cozy family dinner or hosting friends, these skillets promise to deliver delicious results with ease.