TM
INSTALLATION INSTRUCTIONS
IMPORTANT: Read carefully before installing fixture. Retain for future reference.
VFM Vision
Fitter Mount
Sheet 1 of 1
10/09/03 IMI-563
General: Upon receipt of fixture thoroughly inspect for any freight damage, which should be brought to the attention of the delivery carrier. Compare the catalog description listed on the packing slip with the fixture label on the housing to assure you have received the correct merchandise.
Safety: This fixture must be wired in accordance with the national electrical code and applicable local codes and ordinance. Proper grounding is required to insure personal safety. Carefully observe grounding procedure under installation section. All work should be done by a qualified electrician.
WARNING: Risk of Electric Shock. Disconnect power at fuse or circuit breaker before installing or servicing.
TOOLS REQUIRED: 3/16” Allen Wrench 3/8” Allen Wrench
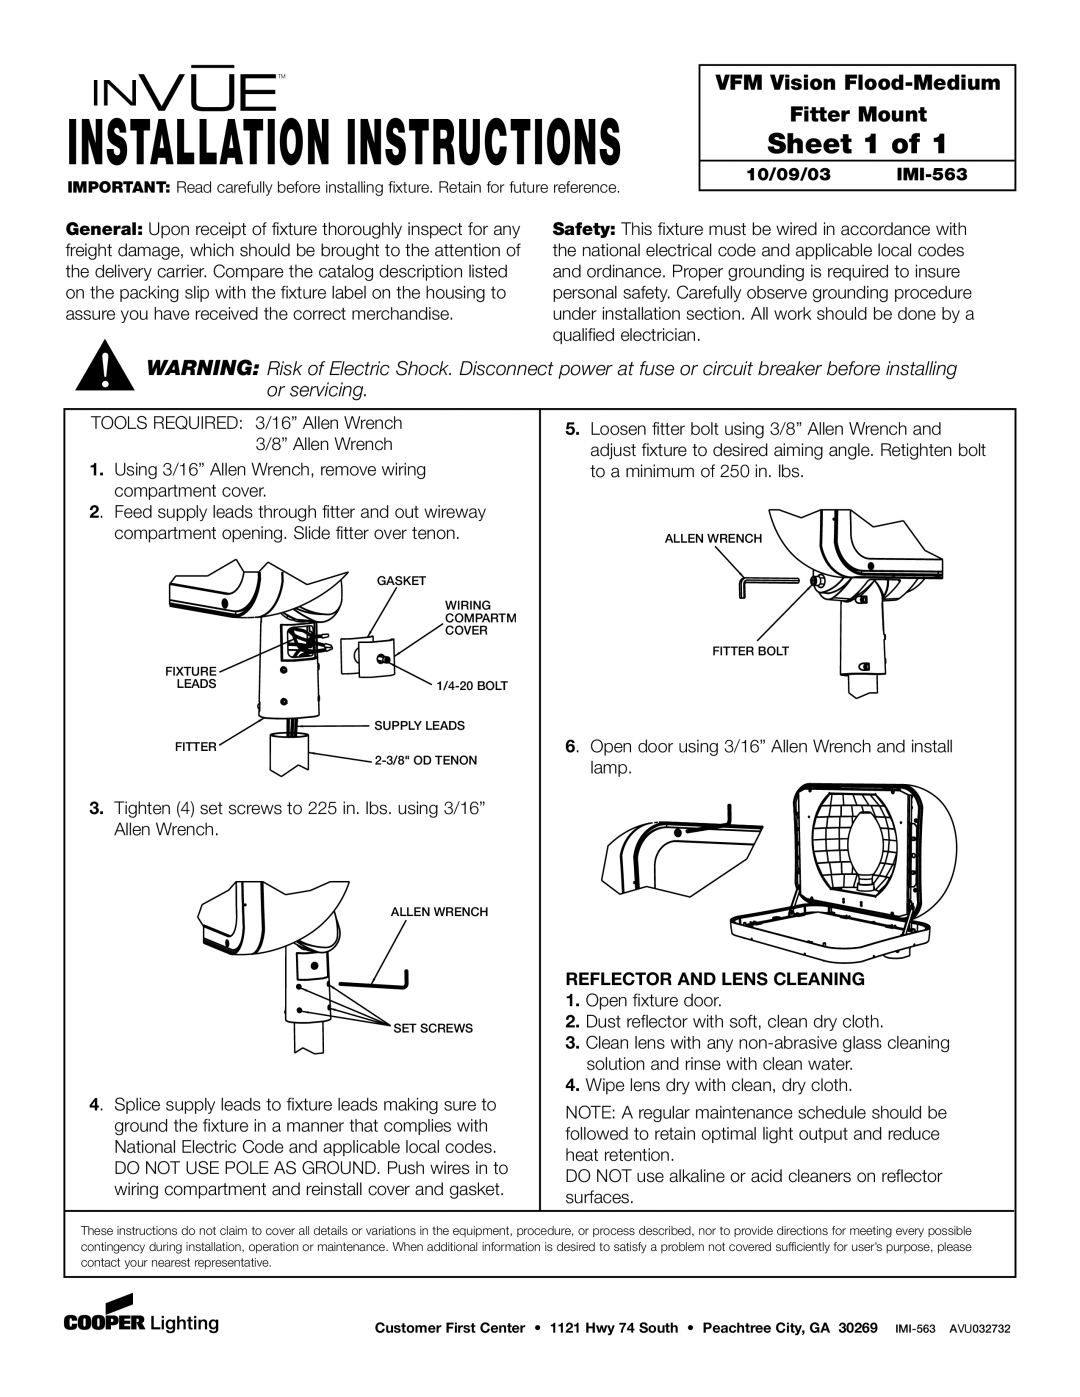
1.Using 3/16” Allen Wrench, remove wiring compartment cover.
2. Feed supply leads through fitter and out wireway
compartment opening. Slide fitter over tenon.
| GASKET |
| WIRING |
| COMPARTM |
| COVER |
FIXTURE |
|
LEADS | |
| SUPPLY LEADS |
FITTER | |
|
3.Tighten (4) set screws to 225 in. lbs. using 3/16” Allen Wrench.
ALLEN WRENCH
SET SCREWS
4. Splice supply leads to fixture leads making sure to ground the fixture in a manner that complies with National Electric Code and applicable local codes. DO NOT USE POLE AS GROUND. Push wires in to wiring compartment and reinstall cover and gasket.
5.Loosen fitter bolt using 3/8” Allen Wrench and adjust fixture to desired aiming angle. Retighten bolt to a minimum of 250 in. lbs.
ALLEN WRENCH
FITTER BOLT
6. Open door using 3/16” Allen Wrench and install lamp.
REFLECTOR AND LENS CLEANING
1.Open fixture door.
2.Dust reflector with soft, clean dry cloth.
3.Clean lens with any
4.Wipe lens dry with clean, dry cloth.
NOTE: A regular maintenance schedule should be followed to retain optimal light output and reduce heat retention.
DO NOT use alkaline or acid cleaners on reflector surfaces.
These instructions do not claim to cover all details or variations in the equipment, procedure, or process described, nor to provide directions for meeting every possible contingency during installation, operation or maintenance. When additional information is desired to satisfy a problem not covered sufficiently for user’s purpose, please contact your nearest representative.
Customer First Center • 1121 Hwy 74 South • Peachtree City, GA 30269
