Reflector
Lamp

INSTALLATION INSTRUCTIONS

IMPORTANT : READ CAREFULLY BEFORE INSTALLING FIXTURE. RETAIN FOR FUTURE REFERENCE

Impact Wall Medium

Thru-Wiring “SC” Option

Sheet 1 of 1

7/22/08IMI-699

GENERAL: Upon receipt of the fixture, thoroughly inspect for any freight damage which should be brought to the attention of the delivery carrier. Compare the catalog description listed on the packing slip with the fixture label on the housing to assure you have received the correct material.

SAFETY: This fixture must be wired in accordance with the National Electrical Code and applicable local codes and ordinances. Proper grounding is required to insure personal safety. Carefully observe grounding procedure under installation section.

WARNING: Risk of Fire/Shock. If not qualified, consult an electrician. Risk of Electric Shock. Disconnect power at fuse or circuit breaker panel or fuse box before installing or servicing.

NOTE: This instruction sheet is applicable for both Trapezoid and Cylinder shapes.

Trapezoid shape is used for illustration.

THROUGH WIRING ASSEMBLY:

NOTE: Through Wires should be rated for minimum 140°C with 320-400W fixture and minimum of 120°C with 250W and below.

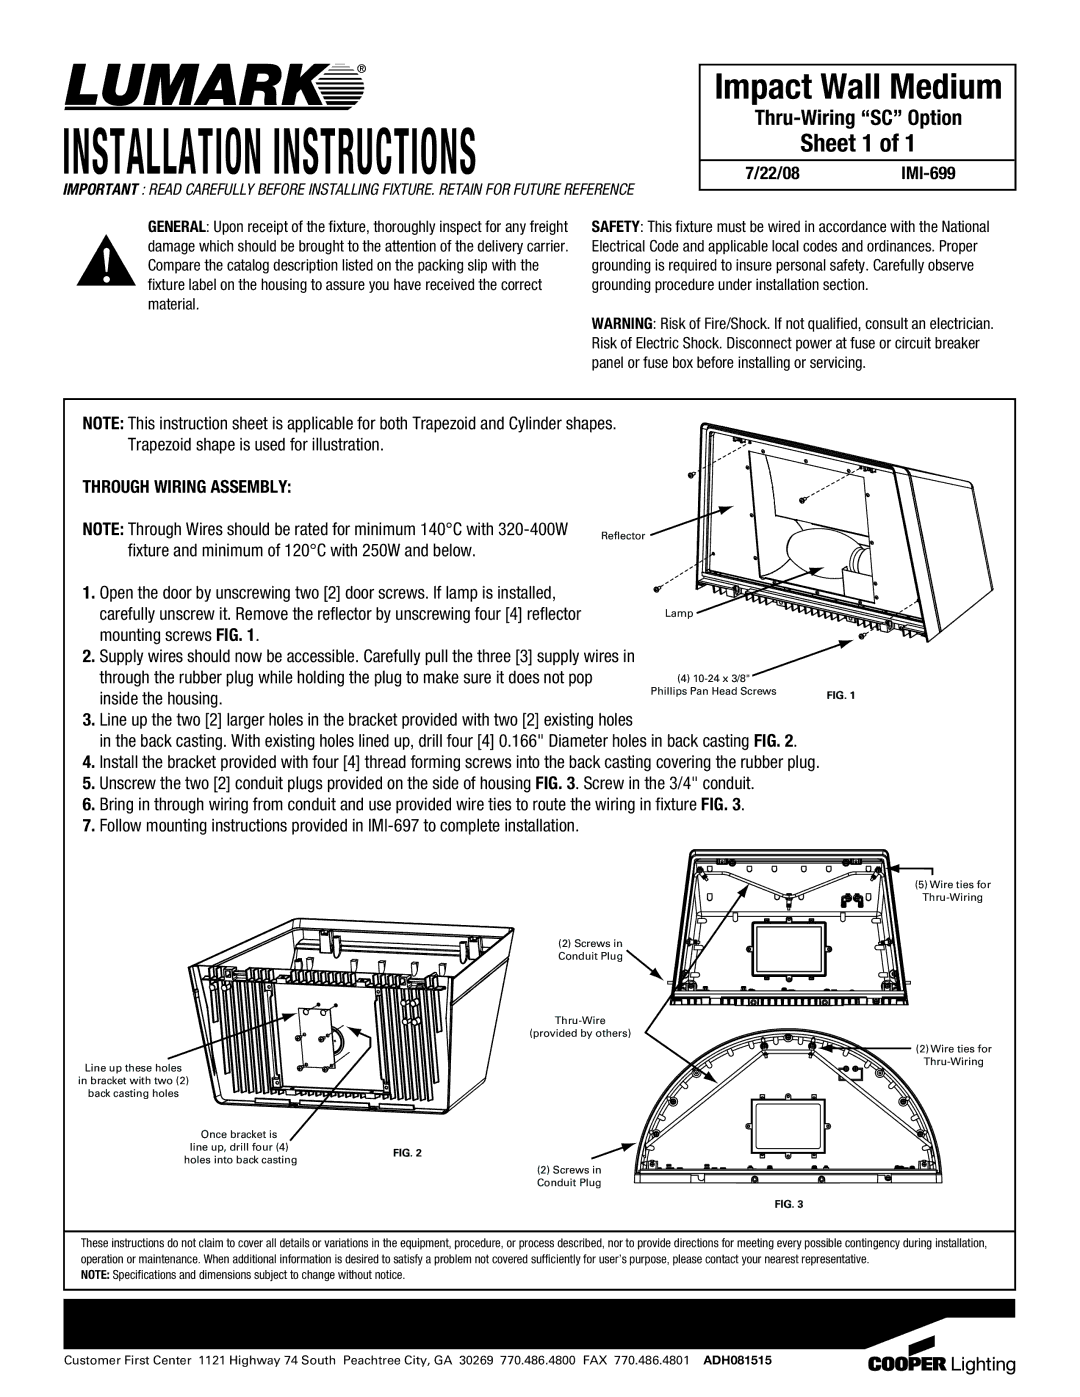
1. Open the door by unscrewing two [2] door screws. If lamp is installed, carefully unscrew it. Remove the reflector by unscrewing four [4] reflector mounting screws FIG. 1.

2.Supply wires should now be accessible. Carefully pull the three [3] supply wires in

through the rubber plug while holding the plug to make sure it does not pop

(4) 10-24 x 3/8"


inside the housing.

Phillips Pan Head Screws

FIG. 1


3.Line up the two [2] larger holes in the bracket provided with two [2] existing holes

in the back casting. With existing holes lined up, drill four [4] 0.166" Diameter holes in back casting FIG. 2.

4.Install the bracket provided with four [4] thread forming screws into the back casting covering the rubber plug.

5.Unscrew the two [2] conduit plugs provided on the side of housing FIG. 3. Screw in the 3/4" conduit.

6.Bring in through wiring from conduit and use provided wire ties to route the wiring in fixture FIG. 3.

7.Follow mounting instructions provided in IMI-697 to complete installation.

(5) Wire ties for

Thru-Wiring

(2) Screws in

Conduit Plug

Thru-Wire

(provided by others)

Line up these holes

(2) Wire ties for Thru-Wiring

in bracket with two (2)

back casting holes

Once bracket is

line up, drill four (4)FIG. 2 holes into back casting

(2) Screws in

Conduit Plug

FIG. 3

These instructions do not claim to cover all details or variations in the equipment, procedure, or process described, nor to provide directions for meeting every possible contingency during installation, operation or maintenance. When additional information is desired to satisfy a problem not covered sufficiently for user’s purpose, please contact your nearest representative.

NOTE: Specifications and dimensions subject to change without notice.

Customer First Center 1121 Highway 74 South Peachtree City, GA 30269 770.486.4800 FAX 770.486.4801 ADH081515

Page 1
Image 1
Cooper Lighting IMI-699 installation instructions Installation Instructions, Impact Wall Medium, Sheet 1

IMI-699 specifications

Cooper Lighting's IMI-699 is a versatile and innovative lighting solution designed for a wide range of applications. This fixture is particularly popular in commercial and industrial settings, where effective and efficient illumination is a priority. The IMI-699 combines advanced technology with user-friendly features, making it a go-to choice for lighting professionals.

One of the standout features of the IMI-699 is its energy efficiency. Utilizing LED technology, this fixture consumes significantly less power than traditional lighting options, resulting in lower energy bills and reduced environmental impact. Its long lifespan further enhances its value, as the need for frequent replacements is minimized. This is especially crucial in settings where maintenance can be disruptive or costly.

The IMI-699 is designed with versatility in mind. It provides multiple mounting options, including pendant, surface, and chain mount configurations, making it adaptable to various ceiling heights and layouts. This flexibility allows for tailored solutions depending on the specific needs of the space. Additionally, the fixture offers several lumen output options, allowing users to select the perfect brightness for their application, whether it be warehouses, retail spaces, or offices.

One notable characteristic of the IMI-699 is its high-quality light output. With a superior color rendering index (CRI), this fixture renders colors authentically, which is essential for environments where color differentiation is critical. The light emitted is not just bright but also pleasant, enhancing visibility without causing glare.

The IMI-699 also incorporates smart technologies that facilitate intuitive control over the lighting system. Options include dimming capabilities and wireless controls, which allow users to adjust settings based on occupancy or ambient light levels. This smart functionality contributes to further energy savings while enhancing user comfort.

In terms of durability, the IMI-699 is constructed from robust materials, ensuring that it can withstand the rigors of various environments. Its sleek, modern design complements numerous architectural styles, making it suitable for both contemporary and traditional settings.

Overall, Cooper Lighting's IMI-699 is an advanced lighting solution that embodies efficiency, versatility, and quality. With its range of features and technologies, it meets the demands of today’s lighting challenges while setting a standard for performance and reliability in commercial illumination.