Read these instructions in their en- tirety before you attempt to assem- ble or operate your new equipment. Your new equipment has been as- sembled at the factory with the ex-

ASSEMBLY

ception of those parts left unassem-

bled for shipping purposes. To en- sure safe and proper operation of your machine, all parts and hard- ware you install or adjust must be

tightened according to the assem- bly instructions. Use the correct tools as necessary to ensure proper tightness..

Tools NeededForAssembly:

(1) 7/16" Wrench

(1) 3/8" Wrench

(2) 1/2" Wrenches

(1) Needle-nose Pliers

(1) Wire Cutter Pliers

(1) Tire.Gauge

(1) Scissors or Pen Knife

UNPACKING

INSTRUCTIONS

Inspect your machine immediate- ly. Be sure neither the carton nor contents have been damaged. If you find or have reason to sus-

pect damage, contact your near- est Sears Service Center/Depart- ment for assistance.

Cut plastic banding with scissors. Open box flaps and remove any packing material from around the machine. Remove any staples securing bottom of carton to wood pallet. Lift off carton. Cut metal straps secudng unit to base.

Leave unit on base of pallet dur- ing assembly steps (to safely re- move unit from base, wait until you have completed assembly steps 1-2). Before disposing of the carton or any of the packing materials, be sure to check them thoroughly for any small parts.

Cut plastic tie straps holding three long control rods to handlebars. Also remove any packaging around the handlebars.

Perform the assembly on a clean, level surface. If you need to move the machine, be careful not to severely bend any of the con- trol cables on the equipment.

ASSEMBLYSTEPS

Before starting any assembly steps, disconnect the engine spark plug wire from the spark plug.

STEP1: AttachHandlebars

• If applicable, cut and remove any


plastic ties holding wheel drive

rod


(F, Figure 2-5) to left handlebar and

B

Y ,

blade ddve rod (C, Figure 2-5)

,

to


right handlebar. Put rods aside.

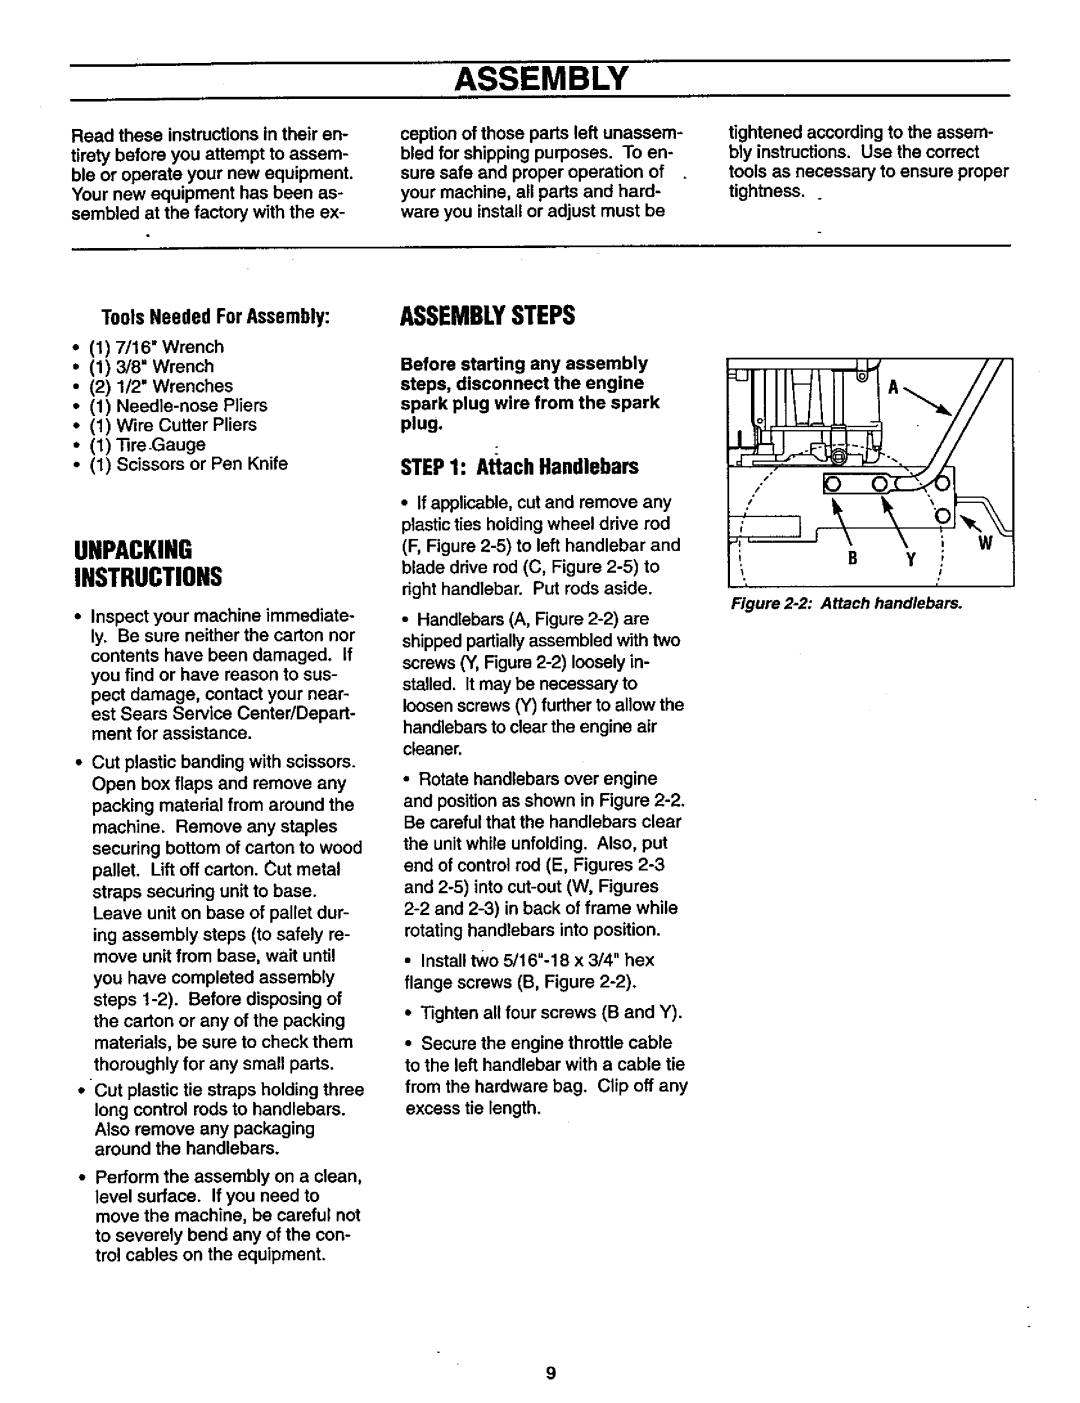
Figure 2-2: Attach handlebars.

Handlebars (A, Figure 2-2) are shipped partially assembled with two screws (Y, Figure 2-2) loosely in-

stalled. It may be necessary to loosen screws (Y) further to allow the

handlebars to clear the engine air cleaner.

• Rotate handlebars over engine and position as shown in Figure 2-2.

Be careful that the handlebars clear the unit while unfolding. Also, put end of control rod (E, Figures 2-3 and 2-5) into cut-out (W, Figures

2-2 and 2-3) in back of frame while rotating handlebars into position.

Install two 5/16"-18 x 3/4" hex flange screws (B, Figure 2-2).

Tighten all four screws (B and Y).

Secure the engine throttle cable to the left handlebar with a cable tie

from the hardware bag. Clip off any excess tie length.

9

Page 9
Image 9
Craftsman 987.889 owner manual Unpacking Instructions, Assemblysteps, AttachHandlebars, Tools NeededForAssembly

987.889 specifications

The Craftsman 987.889 is a versatile and powerful tool that embodies the hallmark of durability and performance. Known for its exceptional build quality, this tool is designed to meet the needs of both amateur and professional users alike.

One of the main features of the Craftsman 987.889 is its robust motor. With a high-performance engine, it delivers consistent power and efficiency, making it capable of handling a wide range of tasks. Whether you are tackling heavy-duty applications or precision jobs, the motor ensures optimal performance.

The Craftsman 987.889 incorporates advanced technology that sets it apart in the market. Its innovative design includes ergonomic handles that provide a comfortable grip, reducing user fatigue during extended use. The tool also features an adjustable speed setting, allowing users to customize their experience based on the specific project at hand. This flexibility is invaluable for tasks that require precision or for those that demand high power.

Durability is another key characteristic of the Craftsman 987.889. Constructed from high-quality materials, this tool is built to withstand the rigors of tough job sites. The weather-resistant casing ensures that it can be used in various conditions, making it an ideal choice for outdoor projects or in diverse environments.

Safety is paramount with the Craftsman 987.889, which includes built-in safety features. The tool is equipped with an automatic shut-off function that activates if it overheats or experiences excessive strain. This not only protects the user but also extends the life of the tool.

In addition to its standout features, the Craftsman 987.889 also offers compatibility with a wide range of accessories and attachments, enhancing its versatility. Users can easily switch out components, making it suitable for different applications such as woodworking, metalworking, or DIY projects.

Overall, the Craftsman 987.889 is a powerful, reliable, and user-friendly tool that meets the demands of modern craftsmanship. Its combination of advanced technology, ergonomic design, and safety features make it an excellent addition to any toolbox, ensuring that users can tackle projects with confidence and efficiency. Whether for professional use or personal projects, the Craftsman 987.889 is a tool that delivers performance and reliability with every use.