Craftsman C459-52833 manual Changing Friction Wheel Rubber

Models: C459-52833

1 56
Download 56 pages 56.04 Kb
Page 20
Image 20

MAINTENANCE

2.Remove the belt from the bottom drive pulley and the engine pulley.

3.Install the new belt on the pulleys in the reverse order and re-tension with the idler pulley.

Reassemble your unit by performing the previous steps in the opposite order.

Changing Friction Wheel Rubber

WARNING: Run the engine completely dry of gasoline before tipping snowthrower.

WARNING: The rubber on the friction wheel is subject to wear and should be checked after the first 25 hours of operation, and periodically thereafter. Replace the friction wheel rubber if any signs of wear or cracking are found.

1.Tip the snow thrower up and forward, so that it rests on the housing.

2.Remove screws from the frame cover underneath the snow thrower. See Figure 15.

3.Remove the right wheel(s) from the axle.

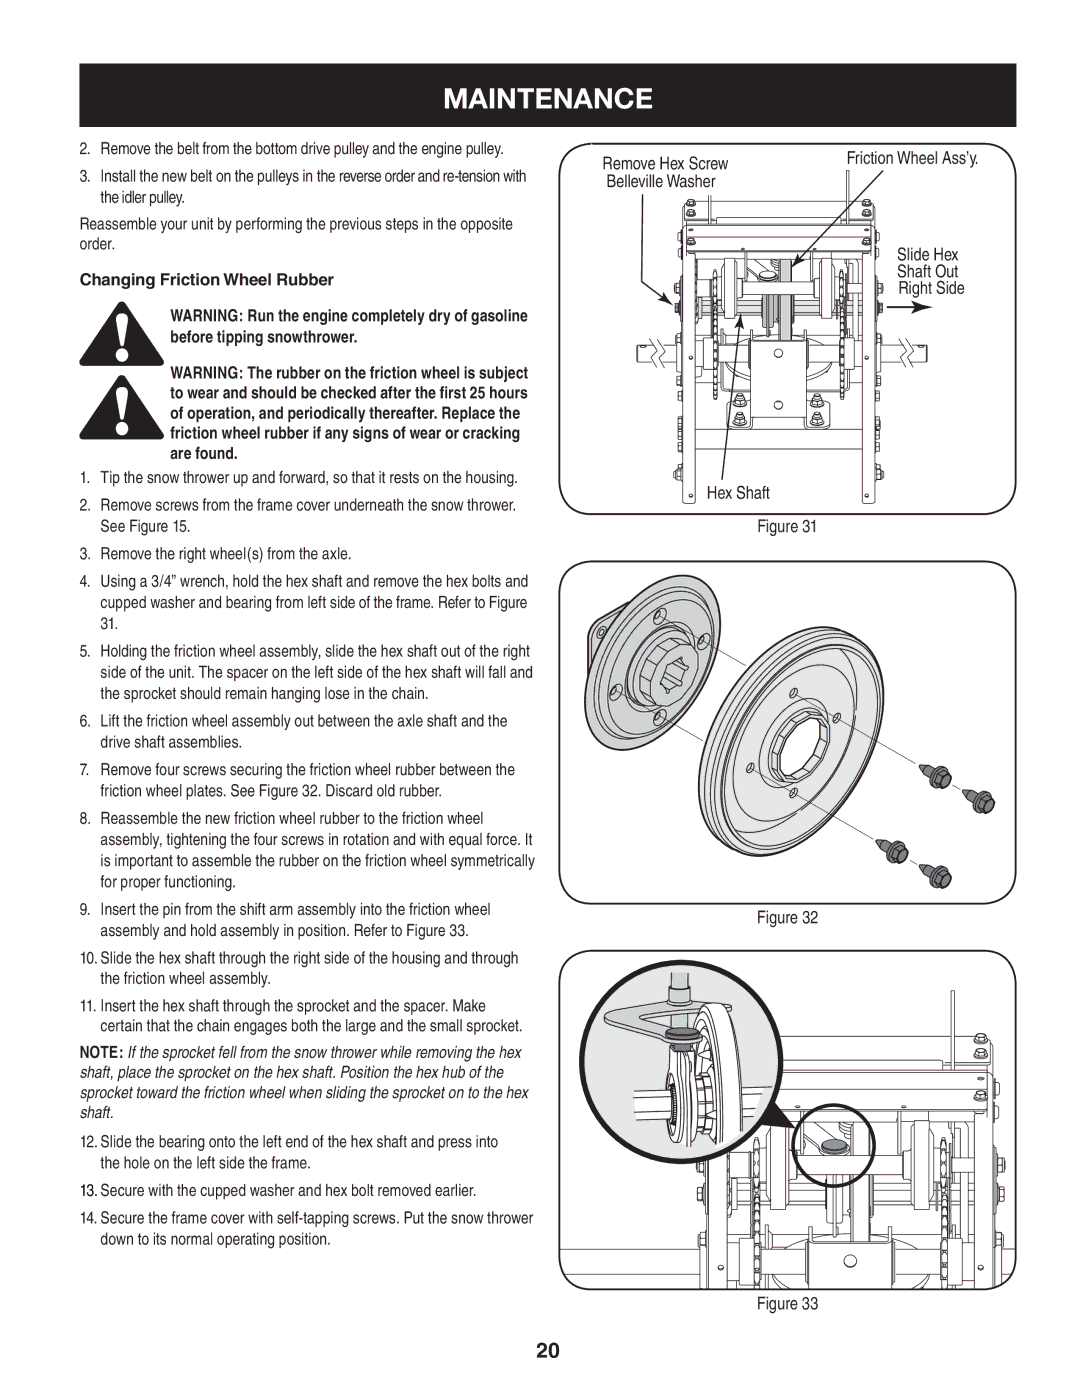
4.Using a 3/4” wrench, hold the hex shaft and remove the hex bolts and cupped washer and bearing from left side of the frame. Refer to Figure 31.

5.Holding the friction wheel assembly, slide the hex shaft out of the right side of the unit. The spacer on the left side of the hex shaft will fall and the sprocket should remain hanging lose in the chain.

6.Lift the friction wheel assembly out between the axle shaft and the drive shaft assemblies.

7.Remove four screws securing the friction wheel rubber between the friction wheel plates. See Figure 32. Discard old rubber.

8.Reassemble the new friction wheel rubber to the friction wheel assembly, tightening the four screws in rotation and with equal force. It is important to assemble the rubber on the friction wheel symmetrically for proper functioning.

9.Insert the pin from the shift arm assembly into the friction wheel assembly and hold assembly in position. Refer to Figure 33.

10.Slide the hex shaft through the right side of the housing and through the friction wheel assembly.

11.Insert the hex shaft through the sprocket and the spacer. Make certain that the chain engages both the large and the small sprocket.

NOTE: If the sprocket fell from the snow thrower while removing the hex shaft, place the sprocket on the hex shaft. Position the hex hub of the sprocket toward the friction wheel when sliding the sprocket on to the hex shaft.

12.Slide the bearing onto the left end of the hex shaft and press into the hole on the left side the frame.

13.Secure with the cupped washer and hex bolt removed earlier.

14.Secure the frame cover with self-tapping screws. Put the snow thrower down to its normal operating position.

Remove Hex Screw

Belleville Washer

Hex Shaft

Figure 31

Figure 32

Friction Wheel Ass’y.

Slide Hex

Shaft Out

Right Side

Figure 33

20

Page 20
Image 20
Craftsman C459-52833 manual Changing Friction Wheel Rubber

C459-52833 specifications

The Craftsman C459-52833 is a versatile and powerful tool that caters to the needs of both professionals and hobbyists. This tool is designed with a variety of features that enhance its usability and performance, making it an essential addition to any workshop or garage.

One of the standout features of the Craftsman C459-52833 is its robust construction. Built from high-quality materials, it ensures durability and longevity, allowing users to tackle a wide range of projects without worrying about wear and tear. The ergonomic design is another significant aspect, offering a comfortable grip that minimizes fatigue during extended use. This is particularly important for those engaging in lengthy crafting sessions or demanding tasks.

Another key characteristic of the Craftsman C459-52833 is its impressive power output. Equipped with a high-torque motor, it delivers optimal performance for various applications. This power allows users to handle tough materials easily, whether it’s wood, metal, or plastic. The adjustable speed settings further enhance its versatility, enabling users to select the appropriate speed for each specific task, thus achieving precise results.

The Craftsman C459-52833 also incorporates advanced technologies that improve its performance and ease of use. For example, it features a user-friendly interface that provides clear indicators and controls, making it accessible for beginners and experts alike. The integrated safety features, such as overload protection and an automatic shut-off mechanism, ensure safe operation, reducing the risk of accidents during usage.

In terms of versatility, the Craftsman C459-52833 supports a wide range of attachments and accessories, allowing users to customize their experience further. This adaptability makes it suitable for various applications, from detailed craftwork to heavy-duty repairs.

Furthermore, the portability of the Craftsman C459-52833 adds to its appeal. Its lightweight design and compact size make it easy to transport, enabling users to bring it to job sites or different areas of their workspace without hassle.

In summary, the Craftsman C459-52833 stands out with its robust construction, powerful motor, adjustable speed settings, and safety features. Ideal for both professionals and DIY enthusiasts, this tool combines performance, versatility, and ease of use, making it an invaluable asset in any toolkit. Whether you’re embarking on a large project or tackling everyday repairs, the Craftsman C459-52833 is poised to deliver the results you need with efficiency and reliability.