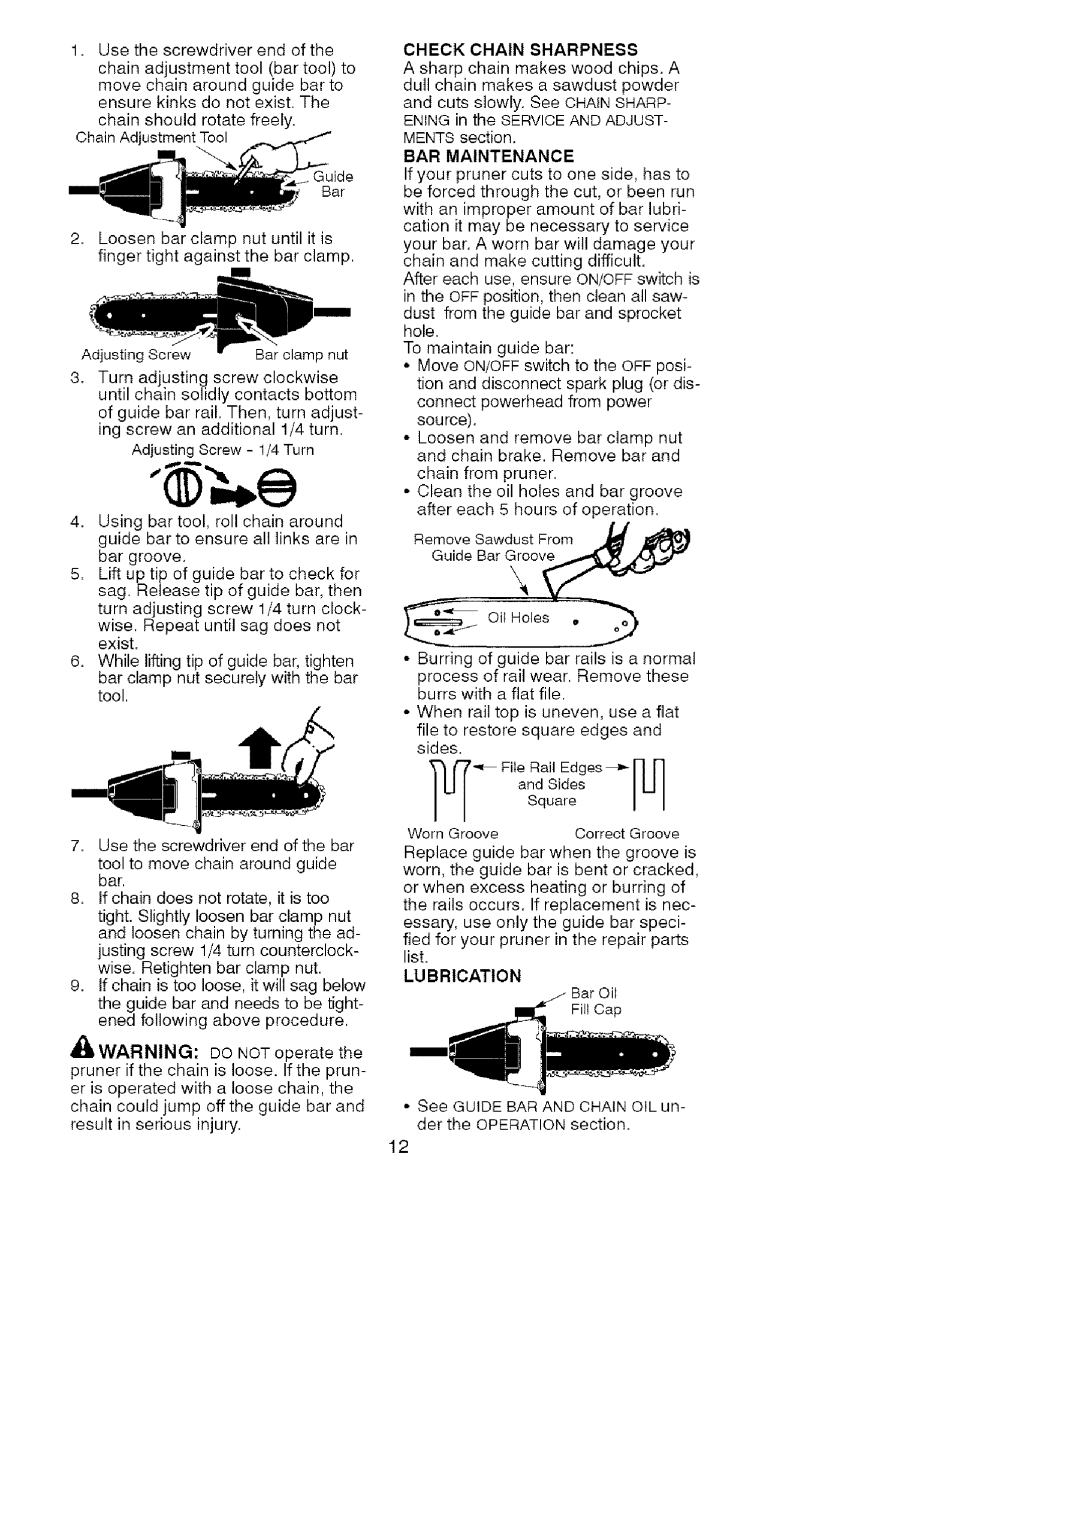
1=Usethescrewdriverendofthe

chainadjustmenttool(bartool)to movechainaroundguidebarto ensurekinksdonotexistThe. chainshouldrotatefreely.

ChainAdjustmentTool

Guide

Bar

2= Loosen bar clamp nut until it is finger tight against the bar clamp.

Adjusting Screw

Bar clamp nut

3= Turn adjusting screw clockwise until chain solidly contacts bottom of guide bar rail. Then, turn adjust- ing screw an additional 1/4 turn.

Adjusting Screw - 1/4 Turn

4.Using bar tool, roll chain around guide bar to ensure all links are in bar groove.

5.Lift up tip of guide bar to check for sag. Release tip of guide bar, then turn adjusting screw 1/4 turn clock-

wise. Repeat until sag does not exist.

6.While lifting tip of guide bar, tighten

bar clamp nut securely with tile bar tool.

7.Use the screwdriver end of the bar

tool to move chain around guide bar.

8.If chain does not rotate, it is too tight. Slightly loosen bar clamp nut and loosen chain by turning the ad- justing screw 1/4 turn counterclock- wise. Retighten bar clamp nut.

9.If chain is too loose, it will sag below the guide bar and needs to be tight- ened following above procedure.

_WARNING:

DO NOT operate the

pruner if the chain is loose. If the prun- er is operated with a loose chain, the chain could jump off the guide bar and result in serious injury.

CHECK CHAIN SHARPNESS

A sharp chain makes wood chips. A dull chain makes a sawdust powder

and cuts slowly. See CHAIN SHARP- ENING in the SERVICE AND ADJUST-

MENTS section.

BAR MAINTENANCE

If your pruner cuts to one side, has to be forced through the cut, or been run with an improper amount of bar lubri- cation it may be necessary to service your bar. A worn bar will damage your chain and make cutting difficult.

After each use, ensure ON/OFF switch is in the OFF position, then clean all saw-

dust from the guide bar and sprocket hole.

To maintain guide bar:

Move ON/OFF switch to the OFF posi- tion and disconnect spark plug (or dis- connect powerhead from power source).

Loosen and remove bar clamp nut and chain brake. Remove bar and

chain from pruner.

Clean the oil holes and bar groove after each 5 hours of operation.

Remove Sawdust From Guide Bar Groove

\

OilHoles

Burringofguide bar railsisa normal

process of rail wear. Remove these burrs with a flat file.

When rail top is uneven, use a flat

file to restore square edges and sides.


and Sides

I U

I

_-,LJrr_

File Rail Edges_r]

l

N


Square

l

Worn Groove

Correct Groove

Replace guide bar when the groove is worn, the guide bar is bent or cracked, or when excess heating or burring of the rails occurs. If replacement is nec- essary, use only the guide bar speci-

fied for your pruner in the repair parts list.

LUBRICATION

FillCap

See GUIDE BAR AND CHAIN OiL un- der the OPERATION section.

12

Page 12
Image 12
Craftsman C944.514610 ChainAdjustmentTool, =Usethescrewdriverendofthe, Check Chain Sharpness, BAR Maintenance, Lubrication

51461, C944.514610 specifications

The Craftsman 51461, also known as C944.514610, is a robust and versatile tool designed for both DIY enthusiasts and professionals alike. Built with durability and efficiency in mind, this model is an ideal choice for anyone looking to tackle a variety of projects around the home or job site.

One of the main features of the Craftsman 51461 is its powerful motor, delivering impressive performance for various tasks. Whether you need to drill, drive screws, or work on tougher materials, this tool provides the necessary strength to get the job done effectively. The motor also allows for easy adjustments in speed and torque, making it highly adaptable for different applications.

Incorporating advanced technology, the Craftsman 51461 offers enhanced battery life and charging efficiency. Its compatibility with lithium-ion battery packs ensures that users can work continuously without the frequent interruptions caused by recharging conventional batteries. This feature is particularly beneficial for those who undertake extended projects or work in remote locations where power outlets may not be readily available.

Another noteworthy characteristic of the Craftsman 51461 is its ergonomic design. The tool is crafted to provide a comfortable grip, reducing fatigue during prolonged use. The balanced weight distribution ensures stability while operating, allowing for precision and control. This ergonomic focus not only enhances performance but also prioritizes user safety.

The Craftsman name is synonymous with quality and reliability, and the 51461 model reflects that legacy. Constructed from high-quality materials, it is built to withstand the rigors of daily use while maintaining optimal functionality. Additionally, the tool features a range of accessories and attachments, further enhancing its versatility for various tasks.

In terms of maintenance, the Craftsman 51461 is designed for easy upkeep. Its user-friendly construction allows for straightforward disassembly when necessary, making cleaning and part replacement a breeze.

In conclusion, the Craftsman 51461, or C944.514610, is a top-tier tool that combines power, efficiency, and user comfort. Whether engaging in home improvement projects, crafting, or professional work, this tool stands out with its superior features and technologies, making it a valuable addition to any toolbox.