SECTION 1: ASSEMBLING YOUR SNOW THROWER

Unpacking

Remove screws from the top sides and ends of the shipping crate.

Set panel aside to avoid tire punctures or personal injury.

Remove and discard plastic bag that covers unit.

Remove any loose parts included with unit (i.e., Operator’s Manual, etc.).

Roll unit out of crate.

Loose Parts

The augers are secured to the auger shaft with two shear pins and cotter pins. If you hit a foreign object or ice jam, the snow thrower is designed so that the pins may shear. Two replacement shear pins and cotter pins are provided for your convenience. Store in a safe place until needed. See Figure 1.

Shear Pins

Cotter

Pins

Figure 1

IMPORTANT: NEVER replace the auger shear pins with standard hex pins. Any damage to the auger gearbox or other components from using standard pins will not be covered by your snow thrower’s warranty.

Items Required For Assembly

1.Pair of pliers

2.Engine oil

3.Fresh gasoline

NOTE: All references in this manual to the left or right side of the snow thrower is from the operating position only. Exceptions, if any, will be specified.

Assembling Handle

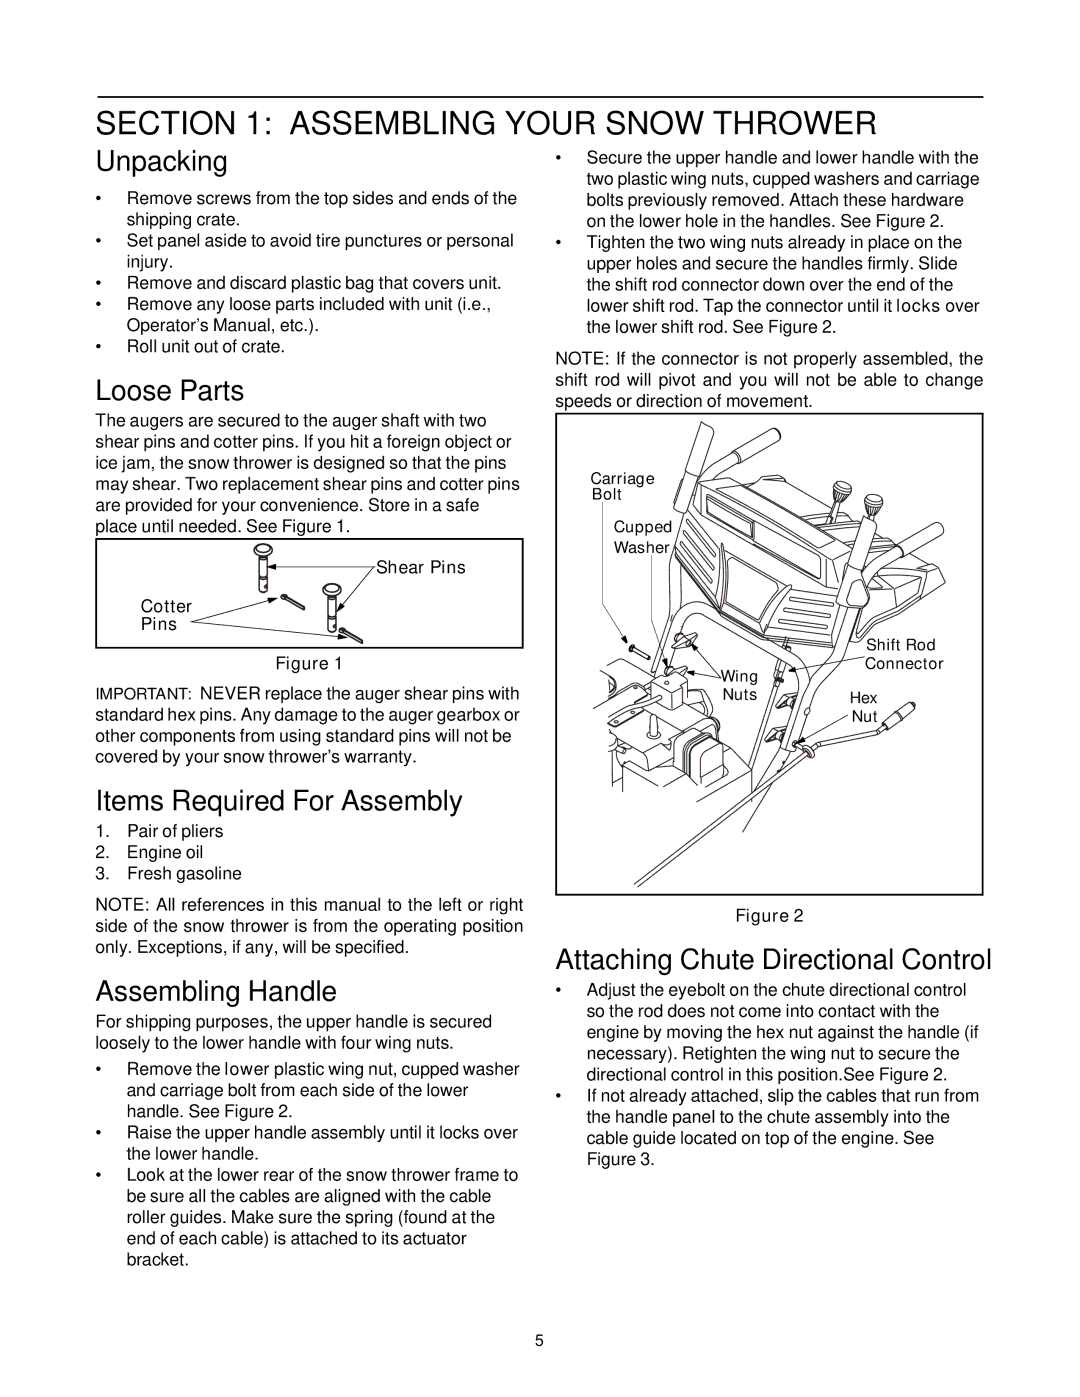
For shipping purposes, the upper handle is secured loosely to the lower handle with four wing nuts.

Remove the lower plastic wing nut, cupped washer and carriage bolt from each side of the lower handle. See Figure 2.

Raise the upper handle assembly until it locks over the lower handle.

Look at the lower rear of the snow thrower frame to be sure all the cables are aligned with the cable roller guides. Make sure the spring (found at the end of each cable) is attached to its actuator bracket.

Secure the upper handle and lower handle with the two plastic wing nuts, cupped washers and carriage bolts previously removed. Attach these hardware on the lower hole in the handles. See Figure 2.

Tighten the two wing nuts already in place on the upper holes and secure the handles firmly. Slide the shift rod connector down over the end of the lower shift rod. Tap the connector until it locks over the lower shift rod. See Figure 2.

NOTE: If the connector is not properly assembled, the shift rod will pivot and you will not be able to change speeds or direction of movement.

Carriage


Bolt


Cupped


Washer


Shift Rod

Wing

Connector


Nuts

Hex


Nut

Figure 2

Attaching Chute Directional Control

Adjust the eyebolt on the chute directional control so the rod does not come into contact with the engine by moving the hex nut against the handle (if necessary). Retighten the wing nut to secure the directional control in this position.See Figure 2.

If not already attached, slip the cables that run from the handle panel to the chute assembly into the cable guide located on top of the engine. See Figure 3.

5

Page 5
Image 5
Cub Cadet 730 STE manual Assembling Your Snow Thrower

730 STE specifications

The Cub Cadet 730 STE is a powerful and versatile snow blower designed to tackle even the toughest winter conditions. Featuring a robust 24-inch clearing width, this snow thrower is engineered to handle heavy snowfall with ease. Its impressive throwing distance, which can reach up to 40 feet, makes it an ideal choice for both residential and commercial use. The 730 STE is equipped with a strong 277cc engine that provides reliable performance and the necessary power to push through packed snow and ice.

One of the standout features of the Cub Cadet 730 STE is its innovative track drive system. This advanced system ensures superior traction and stability on various surfaces, including steep inclines and uneven terrain. The track drive design gives users added confidence, allowing them to navigate snowy pathways and driveways without slipping or losing control.

The snow blower also incorporates a user-friendly control panel, allowing operators to easily manage speed settings and directional control. With multiple speed settings, the 730 STE enables users to adjust the pace for optimal efficiency based on the depth and type of snow being cleared. The highly maneuverable design of the snow blower makes it easy to work around obstacles such as mailboxes, fences, and landscaping.

Another remarkable feature of the Cub Cadet 730 STE is its adjustable chute. The 180-degree rotating chute allows users to direct the snow wherever they wish, ensuring efficient removal without worrying about blowing snow back onto already cleared areas. The chute is made from durable materials, enhancing its lifespan while maintaining effective performance.

Safety is also a priority in the design of the 730 STE. The snow blower comes with features such as a headlight for improved visibility during early morning or late evening snow clearing, making it safer to operate under low light conditions. Additionally, the durable and reinforced construction guarantees longevity and reliability throughout many winter seasons.

In summary, the Cub Cadet 730 STE stands out in the snow blower market with its powerful engine, superior traction, adjustable chute, and user-friendly controls. These characteristics make it an exceptional choice for anyone looking to tackle winter weather efficiently and effectively. Whether you're clearing your driveway or maintaining a commercial lot, the 730 STE is equipped to handle the task with performance and precision.