BEFORE THE FIRST USE

Carefully unpack the unit and remove any packaging and promotional labels in or on the bottle warmer. Rinse all accessories thoroughly in warm soapy water.

Operation

To warm your baby’s bottle or food, please follow the instructions and the chart below.

NOTE: These instructions are to be used as a guide only. Please note that there are many variables, such as size of the bottle and starting temperature of the food, which can affect the speed at which this unit warms the bottle or jar as well as the final temperature. Adjustments to the instructions below may be

necessary. Always test the temperature of food before feeding baby.

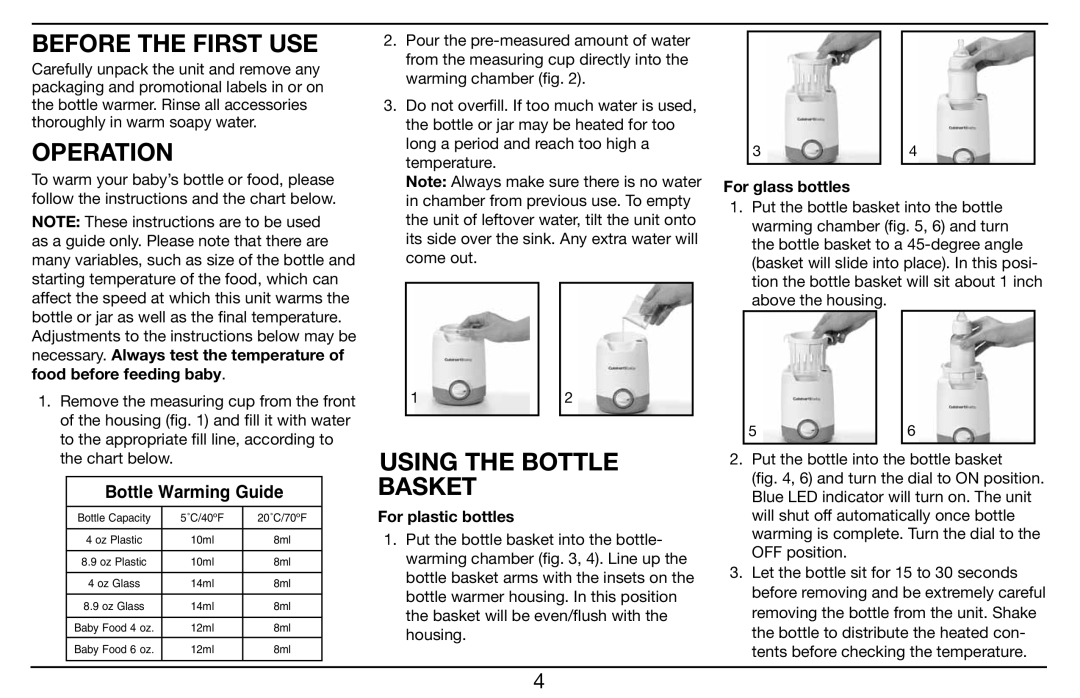
1.Remove the measuring cup from the front of the housing (fig. 1) and fill it with water to the appropriate fill line, according to the chart below.

Bottle Warming Guide

Bottle Capacity

5˚C/40ºF

20˚C/70ºF


4 oz Plastic

10ml

8ml


8.9 oz Plastic

10ml

8ml


4 oz Glass

14ml

8ml


8.9 oz Glass

14ml

8ml


Baby Food 4 oz.

12ml

8ml


Baby Food 6 oz.

12ml

8ml


2.Pour the pre-measured amount of water from the measuring cup directly into the warming chamber (fig. 2).

3. Do not overfill. If too much water is used,

the bottle or jar may be heated for too long a period and reach too high a temperature.

Note: Always make sure there is no water in chamber from previous use. To empty the unit of leftover water, tilt the unit onto its side over the sink. Any extra water will come out.

1


2


USING THE BOTTLE

BASKET

For plastic bottles

1.Put the bottle basket into the bottle- warming chamber (fig. 3, 4). Line up the bottle basket arms with the insets on the bottle warmer housing. In this position the basket will be even/flush with the housing.

3


4


For glass bottles

1.Put the bottle basket into the bottle warming chamber (fig. 5, 6) and turn the bottle basket to a 45-degree angle (basket will slide into place). In this posi- tion the bottle basket will sit about 1 inch above the housing.

5


6


2.Put the bottle into the bottle basket

(fig. 4, 6) and turn the dial to ON position. Blue LED indicator will turn on. The unit will shut off automatically once bottle warming is complete. Turn the dial to the OFF position.

3.Let the bottle sit for 15 to 30 seconds before removing and be extremely careful removing the bottle from the unit. Shake the bottle to distribute the heated con- tents before checking the temperature.

4

Page 4
Image 4
Cuisinart BW-10 manual Before the First USE, Operation, Using the Bottle Basket, For plastic bottles, For glass bottles

BW-10 specifications

The Cuisinart BW-10 is a versatile and efficient bread maker designed for both novice and experienced bakers. This kitchen appliance combines advanced technology with user-friendly features, making the bread-making process enjoyable and straightforward.

One of the standout features of the Cuisinart BW-10 is its 12 pre-programmed settings, offering a variety of baking options. These include settings for different types of bread, such as whole wheat, gluten-free, and artisan bread, as well as options for making jams and cake. This allows users to explore a wide range of recipes without needing extensive baking knowledge, making it accessible for everyone.

The machine is equipped with a 720-watt power system that provides consistent heat and ensures even baking results. It also has a non-stick baking pan, which makes for easy removal of bread, and it is dishwasher safe for hassle-free cleaning. The BW-10 features a user-friendly control panel with an LCD display that allows users to customize their bread-making experience. With options for crust color, size of the loaf, and delay start settings, users can easily tailor the baking process to their preferences.

Another significant characteristic of the Cuisinart BW-10 is its convection baking technology. This feature circulates hot air within the bread maker, promoting even browning and a perfectly risen loaf. The automatic fruit and nut dispenser allows for the addition of ingredients at the appropriate time during the baking cycle, ensuring that these elements are evenly distributed throughout the bread.

Safety is also a priority in the design of the BW-10. The bread maker includes a cool-touch outer casing that prevents burns during operation and a built-in power failure backup that ensures continuity in the baking process in case of a power outage.

Overall, the Cuisinart BW-10 is a reliable bread maker that stands out for its features, ease of use, and advanced technologies. It presents an excellent opportunity for anyone looking to enjoy freshly baked homemade bread without the complexities of traditional baking techniques. With its sleek design and robust functionality, the Cuisinart BW-10 is a worthy addition to any kitchen.