WARNING: Do not install oven over a


range cooktop or other heat-producing


appliance. If installed near or over a heat


source, the oven could be damaged and


the warranty would be void.


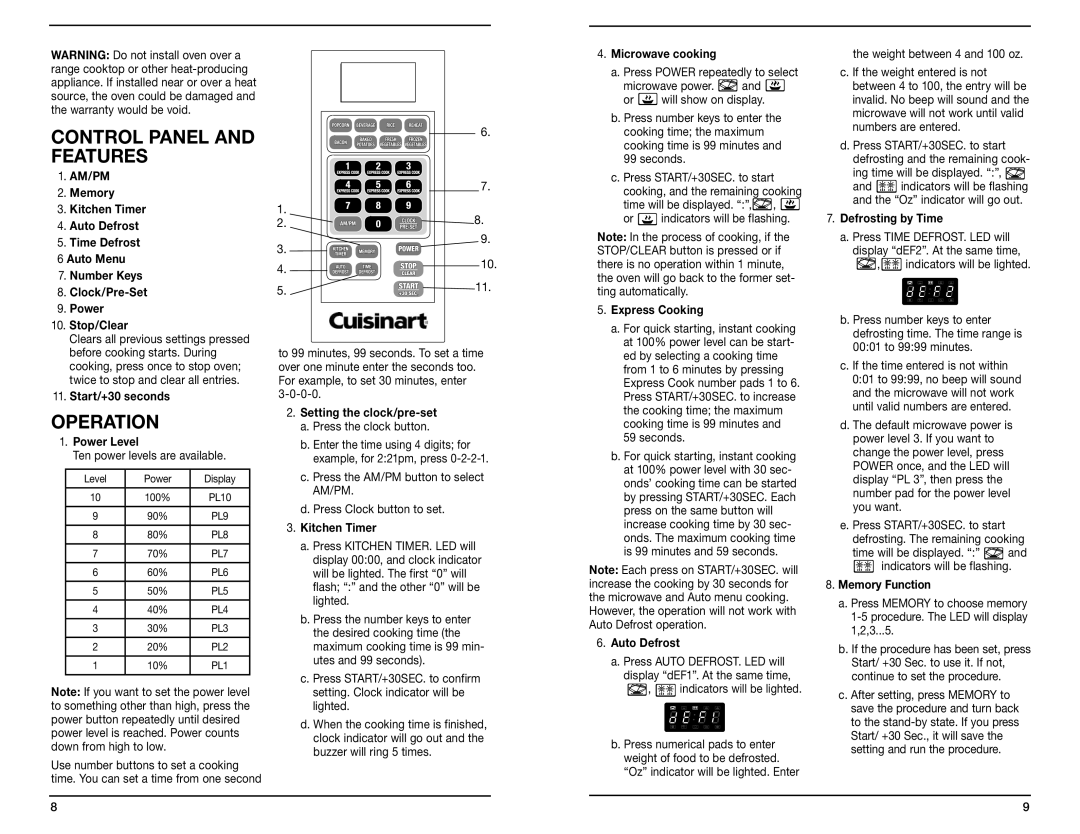
CONTROL PANEL AND


6.


FEATURES


1.

AM/PM


7.

2.

Memory


3.

Kitchen Timer

1.

8.

4.

Auto Defrost

2.

5.

Time Defrost

3.

9.

6 Auto Menu


4.

10.

7.

Number Keys


11.

8.

Clock/Pre-Set

5.


9.

Power


10. Stop/Clear


Clears all previous settings pressed


before cooking starts. During

to 99 minutes, 99 seconds. To set a time


cooking, press once to stop oven;

over one minute enter the seconds too.


twice to stop and clear all entries.

For example, to set 30 minutes, enter

11. Start/+30 seconds


3-0-0-0.

OPERATION


2. Setting the clock/pre-set


a. Press the clock button.

1. Power Level


b. Enter the time using 4 digits; for


Ten power levels are available.

example, for 2:21pm, press 0-2-2-1.


c. Press the AM/PM button to select


Level


Power

Display


AM/PM.


10


100%

PL10


d. Press Clock button to set.


9


90%

PL9


3. Kitchen Timer


8


80%

PL8


a. Press KITCHEN TIMER. LED will


7


70%

PL7


display 00:00, and clock indicator


6


60%

PL6


will be lighted. The first “0” will


5


50%

PL5

flash; “:” and the other “0” will be


lighted.


4


40%

PL4


b. Press the number keys to enter


3


30%

PL3


the desired cooking time (the


2


20%

PL2

maximum cooking time is 99 min-


utes and 99 seconds).


1


10%

PL1


c. Press START/+30SEC. to confirm


Note: If you want to set the power level

setting. Clock indicator will be

to something other than high, press the

lighted.

power button repeatedly until desired

d. When the cooking time is finished,

power level is reached. Power counts

clock indicator will go out and the

down from high to low.

buzzer will ring 5 times.

Use number buttons to set a cooking


time. You can set a time from one second


4.Microwave cooking

a.Press POWER repeatedly to select

microwave power. and

or will show on display.

b.Press number keys to enter the cooking time; the maximum cooking time is 99 minutes and 99 seconds.

c.Press START/+30SEC. to start cooking, and the remaining cooking time will be displayed. “:”, ,

or indicators will be flashing.

Note: In the process of cooking, if the STOP/CLEAR button is pressed or if there is no operation within 1 minute, the oven will go back to the former set- ting automatically.

5.Express Cooking

a.For quick starting, instant cooking at 100% power level can be start- ed by selecting a cooking time from 1 to 6 minutes by pressing Express Cook number pads 1 to 6. Press START/+30SEC. to increase the cooking time; the maximum cooking time is 99 minutes and 59 seconds.

b.For quick starting, instant cooking at 100% power level with 30 sec- onds’ cooking time can be started by pressing START/+30SEC. Each press on the same button will increase cooking time by 30 sec- onds. The maximum cooking time is 99 minutes and 59 seconds.

Note: Each press on START/+30SEC. will increase the cooking by 30 seconds for the microwave and Auto menu cooking. However, the operation will not work with Auto Defrost operation.

6.Auto Defrost

a.Press AUTO DEFROST. LED will display “dEF1”. At the same time, , indicators will be lighted.

b.Press numerical pads to enter weight of food to be defrosted. “Oz” indicator will be lighted. Enter

the weight between 4 and 100 oz.

c. If the weight entered is not between 4 to 100, the entry will be invalid. No beep will sound and the microwave will not work until valid numbers are entered.

d. Press START/+30SEC. to start defrosting and the remaining cook- ing time will be displayed. “:”,

and indicators will be flashing and the “Oz” indicator will go out.

7.Defrosting by Time

a.Press TIME DEFROST. LED will display “dEF2”. At the same time, , indicators will be lighted.

b.Press number keys to enter defrosting time. The time range is 00:01 to 99:99 minutes.

c.If the time entered is not within 0:01 to 99:99, no beep will sound and the microwave will not work until valid numbers are entered.

d.The default microwave power is power level 3. If you want to change the power level, press POWER once, and the LED will display “PL 3”, then press the number pad for the power level you want.

e.Press START/+30SEC. to start defrosting. The remaining cooking

time will be displayed. “:” and

indicators will be flashing.

8.Memory Function

a.Press MEMORY to choose memory 1-5 procedure. The LED will display 1,2,3...5.

b.If the procedure has been set, press Start/ +30 Sec. to use it. If not, continue to set the procedure.

c.After setting, press MEMORY to save the procedure and turn back to the stand-by state. If you press Start/ +30 Sec., it will save the setting and run the procedure.

8

9

Page 5
Image 5
Cuisinart CMW-100 manual Control Panel Features, Operation, Am/Pm

CMW-100 specifications

The Cuisinart CMW-100 is a versatile countertop microwave that has gained popularity for its efficient performance and user-friendly design. This appliance is perfect for those who seek a reliable microwave oven that combines functionality with modern aesthetics.

One of the most notable features of the CMW-100 is its spacious 1-cubic-foot capacity, allowing users to accommodate a variety of dishes, whether it's a family-sized casserole or a single serving of leftovers. The microwave boasts an impressive 1000 watts of power, ensuring that food is cooked evenly and thoroughly every time. With multiple power levels, users can effortlessly select the desired intensity based on their cooking needs.

The CMW-100 is equipped with several convenient cooking presets, allowing for quick access to popular functions such as popcorn, baked potatoes, and reheating frozen dinners. The one-touch control panel simplifies navigation, while the easy-to-read LCD display provides clear information on cooking times and settings.

For added convenience, the microwave features a turntable that rotates food for even cooking, which is especially beneficial when heating larger items. The turntable can be disabled if needed, accommodating oversized dishes that won’t fit on the rotating base.

In terms of design, the Cuisinart CMW-100 presents a sleek stainless steel exterior that not only enhances its visual appeal but also ensures durability. The combination of an easy-to-clean interior and a sleek facade makes it a practical choice for any kitchen decor.

Another standout characteristic is its array of safety features. The CMW-100 includes a child lock option, allowing parents to ensure safety around young children. The microwave also incorporates an automatic shut-off function that activates when the cooking cycle is complete, preventing the appliance from overheating.

Overall, the Cuisinart CMW-100 offers a perfect blend of practicality, efficiency, and stylish design. With its powerful performance, easy-to-use controls, and thoughtful safety features, this microwave is a sound investment for anyone looking to streamline their cooking process while enjoying modern conveniences. Whether you are reheating, defrosting, or cooking from scratch, the CMW-100 stands out as a reliable and attractive addition to any kitchen.