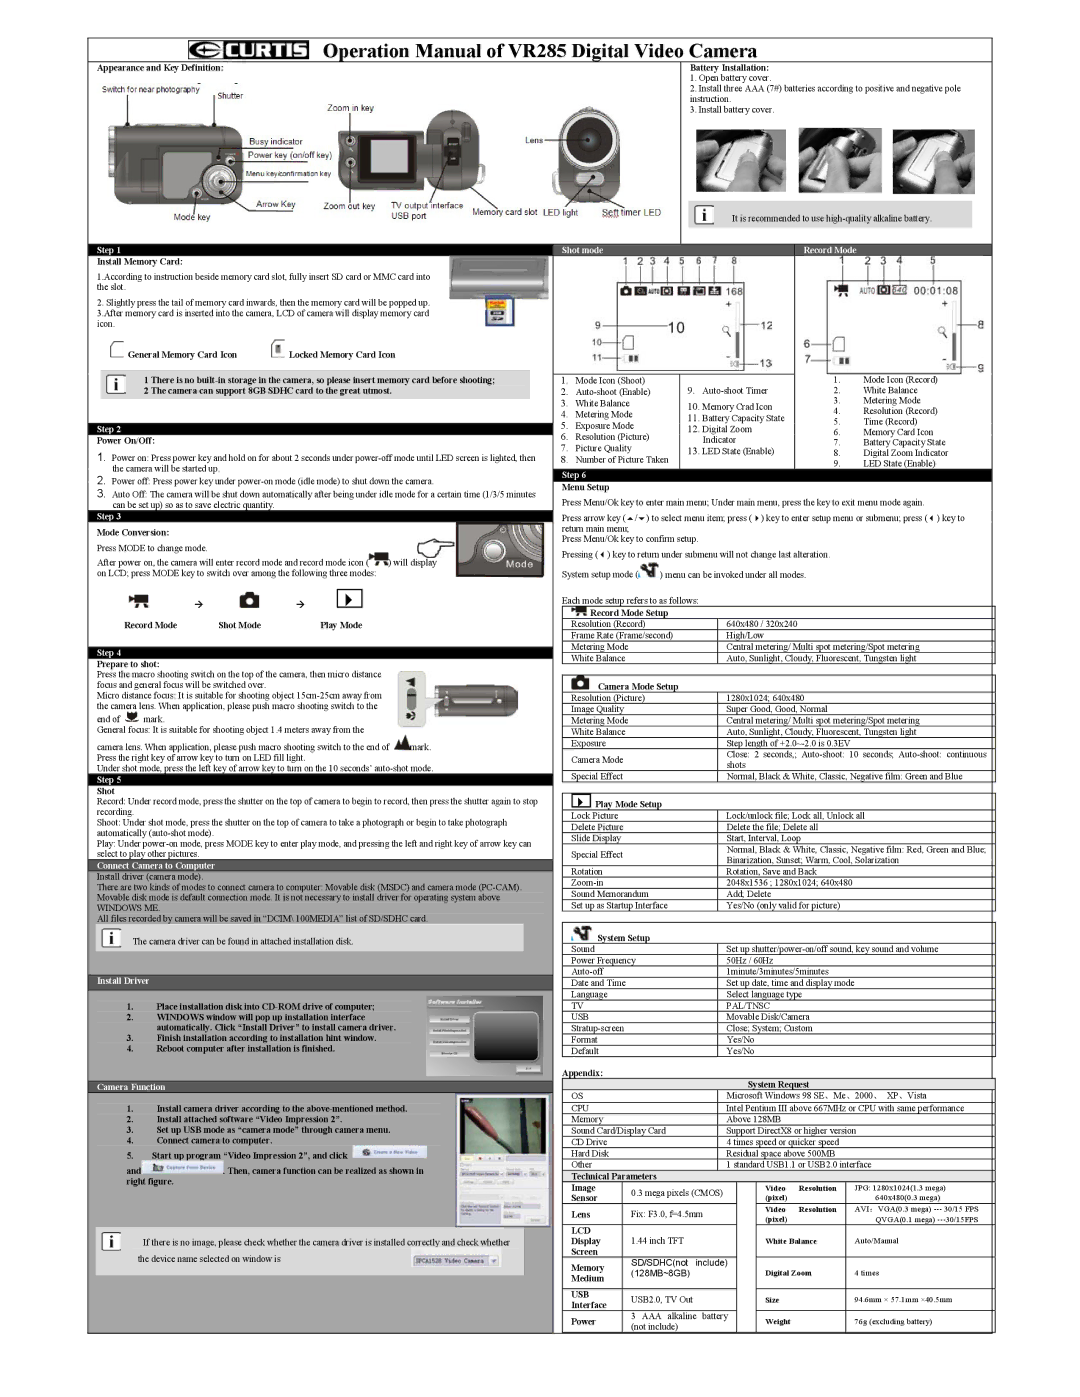
| Step 1 | | | | | | | | | | | | | Shot mode | | | | | | | | | | | Record Mode | |
| Install Memory Card: | | | | | | | | | | | | | | | | | | | | | | | | | | | | | |
| 1.According to instruction beside memory card slot, fully insert SD card or MMC card into | | | | | | | | | | | | | | | | | | | |
| the slot. | | | | | | | | | | | | | | | | | | | | | | | | | | | | | | |
| 2. Slightly press the tail of memory card inwards, then the memory card will be popped up. | | | | | | | | | | | | | | | | | | | |
| 3.After memory card is inserted into the camera, LCD of camera will display memory card | | | | | | | | | | | | | | | | | | | |
| icon. | | | | | | | | | | | | | | | | | | | | | | | | | | | | | | |
| | | | General Memory Card Icon | Locked Memory Card Icon | | | | | | | | | | | | | | | | | | | | | | | | |
| | | | | | | | | | | | | | | | | | | | | | | | | | | 1. | | Mode Icon (Record) | |
| | | | | | | 1 There is no built-in storage in the camera, so please insert memory card before shooting; | | 1. | Mode Icon (Shoot) | | 9. | | | | | | | | |
| | | | | | | 2 The camera can support 8GB SDHC card to the great utmost. | | | | | | 2. | Auto-shoot (Enable) | | Auto-shoot Timer | | 2. | | White Balance | |
| | | | | | | | | | | | | | | | | | 3. | White Balance | | | | 10. | Memory Crad Icon | | 3. | | Metering Mode | |
| | | | | | | | | | | | | | | | | | 4. | Metering Mode | | | | 4. | | Resolution (Record) | |
| | | | | | | | | | | | | | | | | | | | 11. | Battery Capacity State | | | |
| | | | | | | | | | | | | | | | | | 5. | Exposure Mode | | | | 5. | | Time (Record) | |
| Step 2 | | | | | | | | | | | | 6. | Resolution (Picture) | | 12. Digital Zoom | | | 6. | | Memory Card Icon | |
| Power On/Off: | | | | | | | | | | | | | Indicator | | | 7. | | Battery Capacity State | |
| | | | | | | | | | | 7. | Picture Quality | | | | | | | | |
| 1. Power on: Press power key and hold on for about 2 seconds under power-off mode until LED screen is lighted, then | | | | 13. LED State (Enable) | | 8. | | Digital Zoom Indicator | |
| 8. | Number of Picture Taken | | | | | | | | 9. | | LED State (Enable) | |
| | the camera will be started up. | | | | | | | | | | | | | | | | | | | | | | | | | | |
| 2. Power off: Press power key under power-on mode (idle mode) to shut down the camera. | | Step 6 | | | | | | | | | | | | | | |
| | Menu Setup | | | | | | | | | | | | | | |
| 3. Auto Off: The camera will be shut down automatically after being under idle mode for a certain time (1/3/5 minutes | | | | | | | | | | | | | | | |
| | Press Menu/Ok key to enter main menu; Under main menu, press the key to exit menu mode again. | |
| | can be set up) so as to save electric quantity. | | | | | | | | | | | |
| Step 3 | | | | | | | | | | | | | Press arrow key ( | / ) to select menu item; press ( | ) key to enter setup menu or submenu; press ( ) key to | |
| Mode Conversion: | | | | | | | | | | | | return main menu; | | | | | | | | | | | | | | |
| | | | | | | | | | | | Press Menu/Ok key to confirm setup. | | | | | | | | | | |
| Press MODE to change mode. | | | | | | | | | | | | | | | | | | | | | |
| | | | | | | | | | | | Pressing ( ) key to return under submenu will not change last alteration. | | |
| After power on, the camera will enter record mode and record mode icon ( | ) will display | | | |
| | | | | | | | | | | | | | | | | | | |
| on LCD; press MODE key to switch over among the following three modes: | | | | | | | | System setup mode ( | ) menu can be invoked under all modes. | | |
| | | | | | | Æ | | Æ | | | | | | | | | | Each mode setup refers to as follows: | | | | | | | | | | |
| | | | | | | | | | | | | | | | | | | | | | | | | | |
| | | | | | | | | | | | | | | | | | | | | Record Mode Setup | | | | | | | | | | |
| | | Record Mode | Shot Mode | Play Mode | | | | | | | | | Resolution (Record) | | | | 640x480 / 320x240 | | | | |
| | | | | | | | | | | | | | | | | | | | Frame Rate (Frame/second) | | High/Low | | | | |
| | | | | | | | | | | | | | | | | | | | Metering Mode | | | | | | Central metering/ Multi spot metering/Spot metering | |
| Step 4 | | | | | | | | | | | | | | | | | | |
| | | | | | | | | | | | | | White Balance | | | | | | Auto, Sunlight, Cloudy, Fluorescent, Tungsten light | |
| Prepare to shot: | | | | | | | | | | | | | | | | | | |
| | | | | | | | | | | | | | | | | | | | | | | | | | | | | |
| Press the macro shooting switch on the top of the camera, then micro distance | | | | | | | | | | | | | | | | | | | | | | | | | |
| focus and general focus will be switched over. | | | | | | | | | | | | | Camera Mode Setup | | | | | | | | | | |
| Micro distance focus: It is suitable for shooting object 15cm-25cm away from | | | | | | | | | Resolution (Picture) | | | | 1280x1024; 640x480 | | |
| the camera lens. When application, please push macro shooting switch to the | | | | | | | | | Image Quality | | | | | | Super Good, Good, Normal | | |
| end of | mark. | | | | | | | | | | | | | Metering Mode | | | | | | Central metering/ Multi spot metering/Spot metering | |
| General focus: It is suitable for shooting object 1.4 meters away from the | | | | | | | | | White Balance | | | | | | Auto, Sunlight, Cloudy, Fluorescent, Tungsten light | |
| camera lens. When application, please push macro shooting switch to the end of | mark. | | | Exposure | | | | | | Step length of +2.0~-2.0 is 0.3EV | | |
| Press the right key of arrow key to turn on LED fill light. | | | | | | | | | Camera Mode | | | | | | Close: 2 | seconds,; Auto-shoot: 10 seconds; Auto-shoot: continuous | |
| | | | | | | | | | | | | | shots | | | | | | |
| Under shot mode, press the left key of arrow key to turn on the 10 seconds’ auto-shot mode. | | | | | | | | | | | | | | | | |
| | | Special Effect | | | | | | Normal, Black & White, Classic, Negative film: Green and Blue | |
| Step 5 | | | | | | | | | | | | | | | | | | | |
| | | | | | | | | | | | | | | | | | | | | | | | | | | | | | |
| Shot | | | | | | | | | | | | | | | | | | | | | | | | | | | | | | |
| Record: Under record mode, press the shutter on the top of camera to begin to record, then press the shutter again to stop | | | | Play Mode Setup | | | | | | | | | | | | |
| recording. | | | | | | | | | | | | | | | | | | | | | | | | | | | | | | |
| Shoot: Under shot mode, press the shutter on the top of camera to take a photograph or begin to take photograph | | | Lock Picture | | | | | | Lock/unlock file; Lock all, Unlock all | |
| | | Delete Picture | | | | | | Delete the file; Delete all | | |
| automatically (auto-shot mode). | | | | | | | | | | | | | | | | | | | |
| | | | | | | | | | | | | Slide Display | | | | | | Start, Interval, Loop | | |
| Play: Under power-on mode, press MODE key to enter play mode, and pressing the left and right key of arrow key can | | | | | | | | | |
| | | | | | | | | | | Normal, Black & White, Classic, Negative film: Red, Green and Blue; | |
| select to play other pictures. | | | | | | | | | | | | | Special Effect | | | | | | |
| | | | | | | | | | | | | | | | | | Binarization, Sunset; Warm, Cool, Solarization | |
| Connect Camera to Computer | | | | | | | | | | | | | | | | | | | | | | | | | | | | | |
| Install driver (camera mode). | | | | | | | | | | | | | Rotation | | | | | | Rotation, Save and Back | | |
| | | | | | | | | | | | | Zoom-in | | | | | | 2048x1536 ; 1280x1024; 640x480 | | |
| There are two kinds of modes to connect camera to computer: Movable disk (MSDC) and camera mode (PC-CAM). | | | | | | | | | | |
| Movable disk mode is default connection mode. It is not necessary to install driver for operating system above | | | | Sound Memorandum | | | | Add; Delete | | | | |
| WINDOWS ME. | | | | | | | | | | | | | Set up as Startup Interface | | | | Yes/No (only valid for picture) | | |
| All files recorded by camera will be saved in “DCIM\ 100MEDIA” list of SD/SDHC card. | | | | | | | | | | | | | | | | | | | | |
| | | | | The camera driver can be found in attached installation disk. | | | | | | | | | | System Setup | | | | | | | | | | | | |
| | | | | | | | | | | | | | | | | | | | Sound | | | | | | Set up shutter/power-on/off sound, key sound and volume | |
| | | | | | | | | | | | | | | | | | | | Power Frequency | | | | | 50Hz / 60Hz | | | | |
| | | | | | | | | | | | | | | | | | | | Auto-off | | | | | | 1minute/3minutes/5minutes | | |
| Install Driver | | | | | | | | | | | | | Date and Time | | | | | | Set up date, time and display mode | | |
| | | | | | | | | | | | | | | | | | | | | | | | | | | | | | | | | |
| 1. | | Place installation disk into CD-ROM drive of computer; | | | | | | | | | Language | | | | | | Select language type | | |
| | | | | | | | | | TV | | | | | | PAL/TNSC | | | | |
| 2. | | WINDOWS window will pop up installation interface | | | | | | | | | USB | | | | | | Movable Disk/Camera | | |
| | | | | | | automatically. Click “Install Driver” to install camera driver. | | | | | | | | Stratup-screen | | | | | | Close; System; Custom | | |
| 3. | | Finish installation according to installation hint window. | | | | | | | | | Format | | | | | | Yes/No | | | | | | |
| 4. | | Reboot computer after installation is finished. | | | | | | | | | Default | | | | | | Yes/No | | | | | | |
| | | | | | | | | | | | | | | | | | | Appendix: | | | | | | | | | | | | | | |
| Camera Function | | | | | | | | | | | | | | | | | | | | | | System Request | | |
| 1. | | Install camera driver according to the above-mentioned method. | | | | | | | | OS | | | | | | Microsoft Windows 98 SE、Me、2000、 XP、Vista | |
| | | | | | | | | CPU | | | | | | Intel Pentium III above 667MHz or CPU with same performance | |
| 2. | | Install attached software “Video Impression 2”. | | | | | | | | | Memory | | | | | | Above 128MB | | | | |
| 3. | | Set up USB mode as “camera mode” through camera menu. | | | | | | | | Sound Card/Display Card | | | | Support DirectX8 or higher version | |
| 4. | | Connect camera to computer. | | | | | | | | | | | | CD Drive | | | | | | 4 times speed or quicker speed | | |
| 5. | | Start up program “Video Impression 2”, and click | | | | | | | | | Hard Disk | | | | | | Residual space above 500MB | | |
| | | | and | | . Then, camera function can be realized as shown in | | | | | | | Other | | | | | | 1 standard USB1.1 or USB2.0 interface | |
| | | | right figure. | | | | | | | | | | | | | Technical Parameters | | | | | | | | | | | | |
| | | | | | | | | | | | | | | | | | | | Image | | 0.3 mega pixels (CMOS) | | | Video | Resolution | | JPG: 1280x1024(1.3 mega) | |
| | | | | | | | | | | | | | | | | | | | Sensor | | | | (pixel) | | | 640x480(0.3 mega) | |
| | | | | | | | | | | | | | | | | | | | | | | | | | | | | | | |
| | | | | | | | | | | | | | | | | | | | Lens | | Fix: F3.0, f=4.5mm | | | Video | Resolution | | AVI:VGA(0.3 mega) --- 30/15 FPS | |
| | | | | | | | | | | | | | | | | | | | | | | (pixel) | | | QVGA(0.1 mega) ---30/15FPS | |
| | | | | | | | | | | | | | | | | | | | | | | | | | | | | | | | | |
| | | | | | | | | | | | | | | | | | | | LCD | | | | | | | | | | | | | | | |
| | | | | | | If there is no image, please check whether the camera driver is installed correctly and check whether | | | | Display | | 1.44 inch TFT | | | | | White Balance | | Auto/Manual | |
| | | | | | the device name selected on window is | | | | | | | | | | | | Screen | | | | | | | | | | | | | | | |
| | | | | | | | | | | | | | | | | Memory | | SD/SDHC(not include) | | | | | | | 4 times | |
| | | | | | | | | | | | | | | | | | | | | | | | | | | |
| | | | | | | | | | | | | | | | | | | | | (128MB~8GB) | | | | | Digital Zoom | | |
| | | | | | | | | | | | | | | | | | | | Medium | | | | | | | | | | | | | | | |
| | | | | | | | | | | | | | | | | | | | | | | | | | | | | | | | | | | | |
| | | | | | | | | | | | | | | | | | | | USB | | USB2.0, TV Out | | | | | Size | | | 94.6mm × 57.1mm ×40.5mm | |
| | | | | | | | | | | | | | | | | | | | Interface | | | | | | | | |
| | | | | | | | | | | | | | | | | | | | | | | | | | | | | | | | | | |
| | | | | | | | | | | | | | | | | | | | Power | | 3 | AAA | alkaline | battery | | | Weight | | | 76g (excluding battery) | |
| | | | | | | | | | | | | | | | | | | | | (not include) | | | | | | | |
| | | | | | | | | | | | | | | | | | | | | | | | | | | | | | | | | | | | |