Quick Install Guide
Wireless N450 MediaBridge®/Access Point
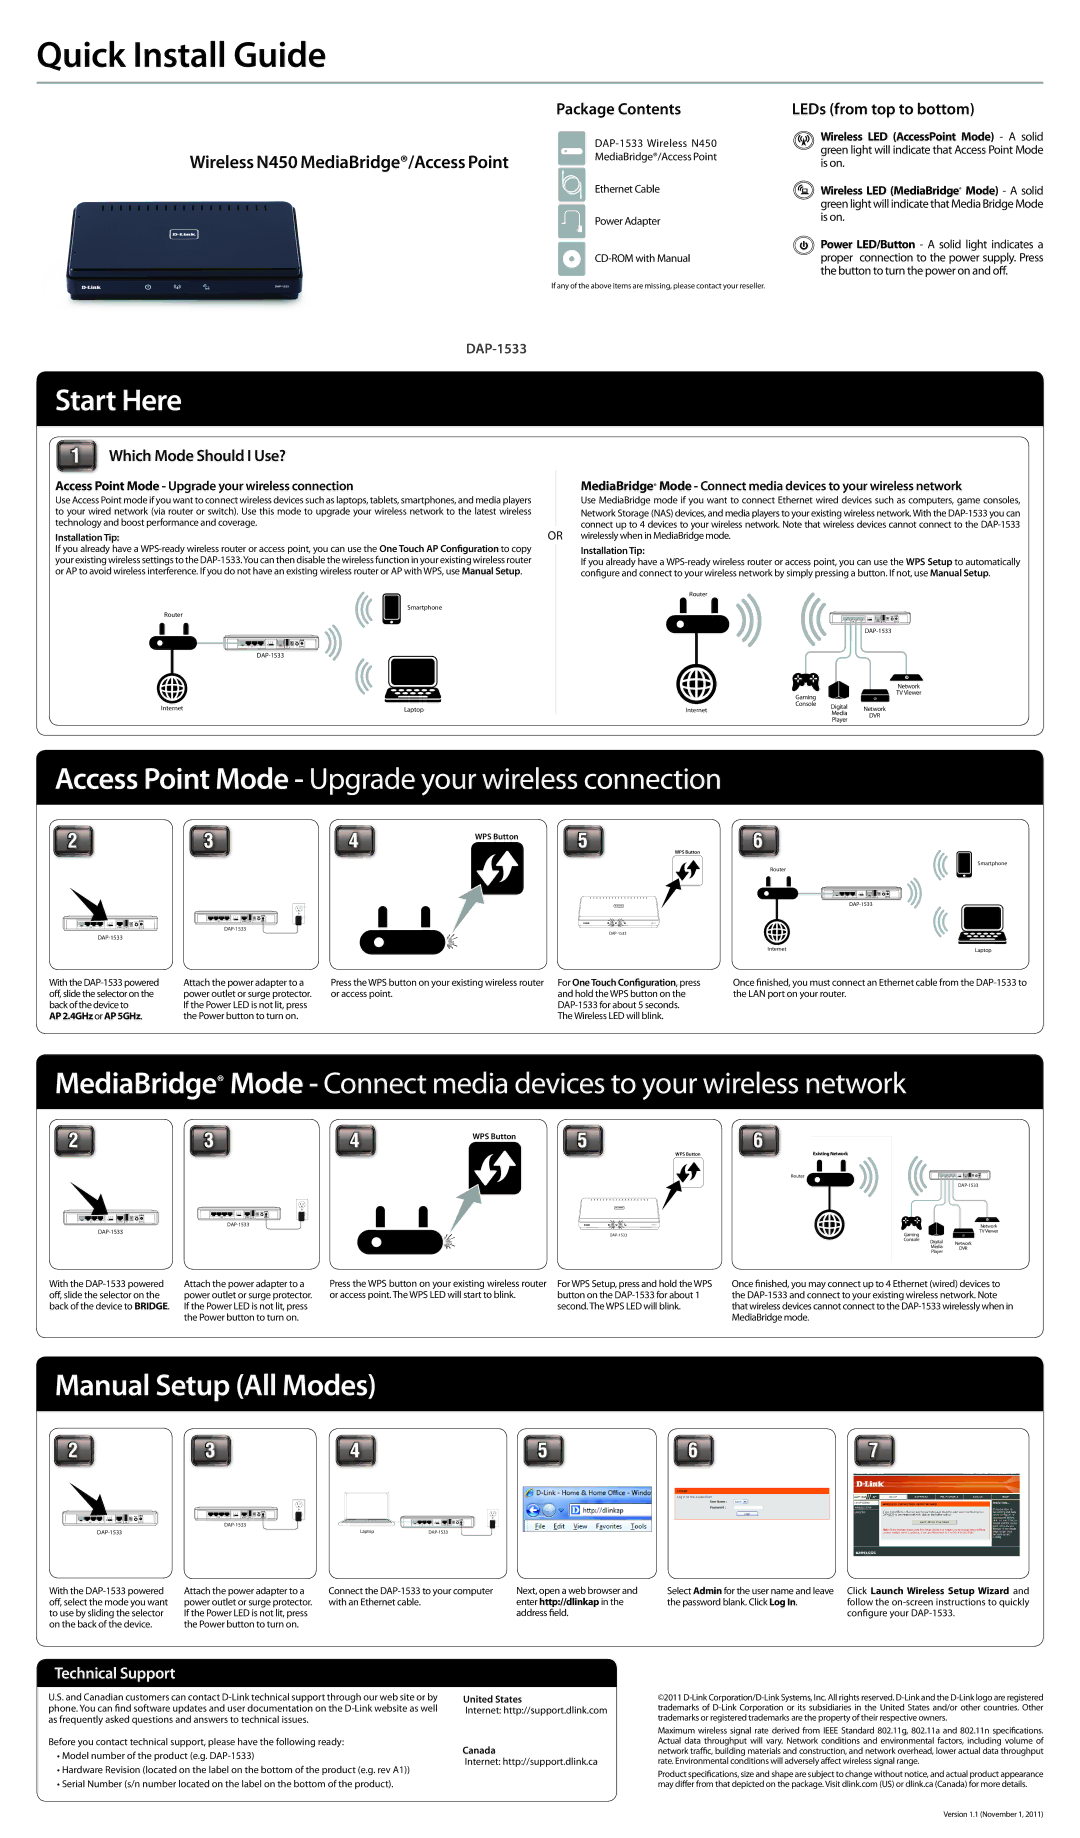
Package Contents
MediaBridge®/Access Point
Ethernet Cable
Power Adapter
If any of the above items are missing, please contact your reseller.
LEDs (from top to bottom)
Wireless LED (AccessPoint Mode) - A solid green light will indicate that Access Point Mode is on.
Wireless LED (MediaBridge® Mode) - A solid green light will indicate that Media Bridge Mode is on.
Power LED/Button - A solid light indicates a proper connection to the power supply. Press the button to turn the power on and off.
Start Here
1Which Mode Should I Use?
Access Point Mode - Upgrade your wireless connection |
|
| MediaBridge® Mode - Connect media devices to your wireless network | |
Use Access Point mode if you want to connect wireless devices such as laptops, tablets, smartphones, and media players |
|
| Use MediaBridge mode if you want to connect Ethernet wired devices such as computers, game consoles, | |
to your wired network (via router or switch). Use this mode to upgrade your wireless network to the latest wireless |
|
| Network Storage (NAS) devices, and media players to your existing wireless network. With the | |
technology and boost performance and coverage. |
|
| connect up to 4 devices to your wireless network. Note that wireless devices cannot connect to the | |
OR | ||||
Installation Tip: | wirelessly when in MediaBridge mode. | |||
If you already have a |
|
| Installation Tip: | |
|
| |||
your existing wireless settings to the |
|
| If you already have a | |
or AP to avoid wireless interference. If you do not have an existing wireless router or AP with WPS, use Manual Setup. |
|
| configure and connect to your wireless network by simply pressing a button. If not, use Manual Setup. | |
Router |
|
|
|
|
|
Smartphone |
|
|
|
|
|
Router |
|
|
| RESET |
|
1 | 2 | LAN 3 | 4 | INTERNET USB | 12V - - - 2A |
|
|
|
|
|
|
| RESET |
|
|
|
|
1 2 LAN 3 4 | INTERNET USB | ON/OFF |
|
|
|
|
12V - - - 2A |
|
|
|
| ||
|
|
|
|
| ||
|
|
|
|
|
| Network |
|
|
|
| Gaming |
| TV Viewer |
|
|
|
|
|
| |
Internet |
| Laptop | Internet | Console | Digital | Network |
|
| |||||
|
|
|
|
| Media | DVR |
|
|
|
|
| Player | |
|
|
|
|
|
| |
Access Point Mode - Upgrade your wireless connection
23456
WPS Button
WPS Button
Smartphone
Router
|
|
|
|
|
|
|
| RESET |
| 1 | 2 | LAN | 3 | 4 | INTERNET | USB | ON/OFF |
RESET | 12V - - - 2A |
1 2 LAN 3 4 | INTERNET USB | ON/OFF |
| |
12V | - - - 2A |
RESET |
1 2 LAN 3 4 | INTERNET USB | 12V - - - 2A |
| ||
Internet |
| Laptop |
With the
AP 2.4GHz or AP 5GHz.
Attach the power adapter to a power outlet or surge protector. If the Power LED is not lit, press the Power button to turn on.
Press the WPS button on your existing wireless router or access point.
For One Touch Configuration, press and hold the WPS button on the
The Wireless LED will blink.
Once finished, you must connect an Ethernet cable from the
MediaBridge® Mode - Connect media devices to your wireless network
2 | 3 | 4 | WPS Button | 5 | 6 |
|
|
|
|
| |
|
|
|
| WPS Button | Existing Network |
|
|
|
|
|
|
|
| RESET |
RESET | 1 | 2 | LAN | 3 | 4 | INTERNET | USB | ON/OFF |
| 12V - - - 2A |
1 2 LAN 3 4 | INTERNET USB | ON/OFF |
|
12V - - - 2A | |||
|
|
|
|
Router
Network
GamingTV Viewer
Console Digital Network
Media DVR
Player
With the
Attach the power adapter to a power outlet or surge protector. If the Power LED is not lit, press the Power button to turn on.
Press the WPS button on your existing wireless router or access point. The WPS LED will start to blink.
For WPS Setup, press and hold the WPS button on the
Once finished, you may connect up to 4 Ethernet (wired) devices to the
Manual Setup (All Modes)
2 | 3 | 4 | 5 | 6 | 7 |
|
|
|
|
|
|
|
| RESET |
RESET | 1 | 2 | LAN | 3 | 4 | INTERNET | USB | ON/OFF |
| 12V - - - 2A |
1 | 2 | LAN | 3 | 4 | INTERNET | USB | ON/OFF |
|
|
|
|
|
|
| RESET | |
12V - - - 2A |
|
|
|
|
|
|
|
| ||||||||
|
|
|
|
|
|
|
| 1 | 2 | LAN | 3 | 4 | INTERNET | USB | 12V - - - 2A |
Laptop |
With the | Attach the power adapter to a | Connect the | Next, open a web browser and |
off, select the mode you want | power outlet or surge protector. | with an Ethernet cable. | enter http://dlinkap in the |
to use by sliding the selector | If the Power LED is not lit, press |
| address field. |
on the back of the device. | the Power button to turn on. |
|
|
Technical Support
U.S. and Canadian customers can contact | United States | |
phone. You can find software updates and user documentation on the | Internet: http://support.dlink.com | |
as frequently asked questions and answers to technical issues. |
| |
Before you contact technical support, please have the following ready: | Canada | |
• Model number of the product (e.g. | ||
Internet: http://support.dlink.ca | ||
• Hardware Revision (located on the label on the bottom of the product (e.g. rev A1)) | ||
| ||
• Serial Number (s/n number located on the label on the bottom of the product). |
|
Select Admin for the user name and leave | Click Launch Wireless Setup Wizard and |
the password blank. Click Log In. | follow the |
| configure your |
©2011
Maximum wireless signal rate derived from IEEE Standard 802.11g, 802.11a and 802.11n specifications. Actual data throughput will vary. Network conditions and environmental factors, including volume of network traffic, building materials and construction, and network overhead, lower actual data throughput rate. Environmental conditions will adversely affect wireless signal range.
Product specifications, size and shape are subject to change without notice, and actual product appearance may differ from that depicted on the package. Visit dlink.com (US) or dlink.ca (Canada) for more details.
Version 1.1 (November 1, 2011)