Danby DDR586R owner manual Remote Control Features, Control Buttons

Models: DDR586R

1 14
Download 14 pages 49.46 Kb
Page 9
Image 9
Remote Control Features

Fonctions des touches du tableau de commande électronique :

3

4


1

2

5

Remote Control Features

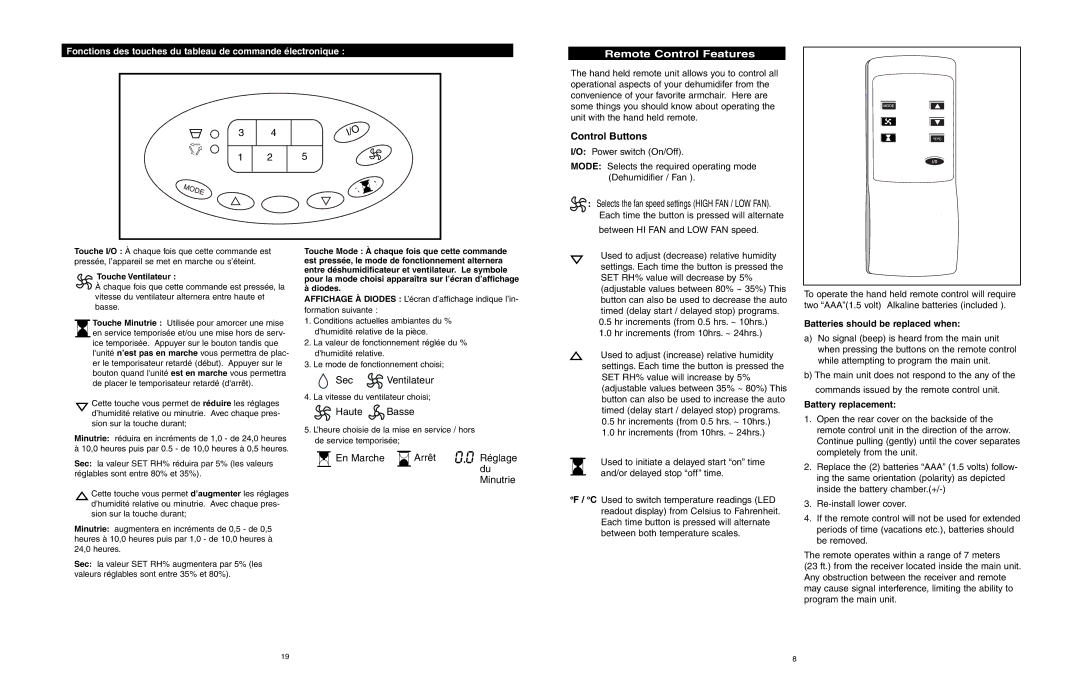
The hand held remote unit allows you to control all operational aspects of your dehumidifer from the convenience of your favorite armchair. Here are some things you should know about operating the unit with the hand held remote.

Control Buttons

I/O: Power switch (On/Off).

MODE: Selects the required operating mode (Dehumidifier / Fan ).

:Selects the fan speed settings (HIGH FAN / LOW FAN).

Each time the button is pressed will alternate

between HI FAN and LOW FAN speed.

Touche I/O : À chaque fois que cette commande est pressée, l’appareil se met en marche ou s’éteint.

Touche Ventilateur :

Àchaque fois que cette commande est pressée, la vitesse du ventilateur alternera entre haute et basse.

Control Buttons Touche Minutrie : Utilisée pour amorcer une mise Manual background en service temporisée et/ou une mise hors de serv- ice temporisée. Appuyer sur le bouton tandis que l'unité n’est pas en marche vous permettra de plac- er le temporisateur retardé (début). Appuyer sur le bouton quand l'unité est en marche vous permettra de placer le temporisateur retardé (d'arrêt).

Cette touche vous permet de réduire les réglages d’humidité relative ou minutrie. Avec chaque pres- sion sur la touche durant;

Minutrie: réduira en incréments de 1,0 - de 24,0 heures à 10,0 heures puis par 0.5 - de 10,0 heures à 0,5 heures.

Sec: la valeur SET RH% réduira par 5% (les valeurs réglables sont entre 80% et 35%).

Cette touche vous permet d’augmenter les réglages d’humidité relative ou minutrie. Avec chaque pres- sion sur la touche durant;

Minutrie: augmentera en incréments de 0,5 - de 0,5 heures à 10,0 heures puis par 1,0 - de 10,0 heures à 24,0 heures.

Sec: la valeur SET RH% augmentera par 5% (les valeurs réglables sont entre 35% et 80%).

Touche Mode : À chaque fois que cette commande est pressée, le mode de fonctionnement alternera entre déshumidificateur et ventilateur. Le symbole pour la mode choisi apparaîtra sur l’écran d’affichage à diodes.

AFFICHAGE À DIODES : L’écran d’affichage indique l’in- formation suivante :

1.Conditions actuelles ambiantes du % d’humidité relative de la pièce.

2.La valeur de fonctionnement réglée du % d’humidité relative.

3.Le mode de fonctionnement choisi;

Manual backgroundSec Manual background Ventilateur

4.La vitesse du ventilateur choisi;

Manual background Haute Manual background Basse

5.L’heure choisie de la mise en service / hors de service temporisée;

En Marche

Arrêt

0.0 Réglage


du


Minutrie

Used to adjust (decrease) relative humidity settings. Each time the button is pressed the SET RH% value will decrease by 5% (adjustable values between 80% ~ 35%) This button can also be used to decrease the auto timed (delay start / delayed stop) programs.

0.5hr increments (from 0.5 hrs. ~ 10hrs.)

1.0hr increments (from 10hrs. ~ 24hrs.)

Used to adjust (increase) relative humidity settings. Each time the button is pressed the SET RH% value will increase by 5% (adjustable values between 35% ~ 80%) This button can also be used to increase the auto timed (delay start / delayed stop) programs.

0.5hr increments (from 0.5 hrs. ~ 10hrs.)

1.0hr increments (from 10hrs. ~ 24hrs.)

Used to initiate a delayed start “on” time and/or delayed stop “off” time.

ºF / ºC Used to switch temperature readings (LED readout display) from Celsius to Fahrenheit. Each time button is pressed will alternate between both temperature scales.

To operate the hand held remote control will require two “AAA”(1.5 volt) Alkaline batteries (included ).

Batteries should be replaced when:

a)No signal (beep) is heard from the main unit when pressing the buttons on the remote control while attempting to program the main unit.

b)The main unit does not respond to the any of the commands issued by the remote control unit.

Battery replacement:

1.Open the rear cover on the backside of the remote control unit in the direction of the arrow. Continue pulling (gently) until the cover separates completely from the unit.

2.Replace the (2) batteries “AAA” (1.5 volts) follow- ing the same orientation (polarity) as depicted inside the battery chamber.(+/-)

3.Re-install lower cover.

4.If the remote control will not be used for extended periods of time (vacations etc.), batteries should be removed.

The remote operates within a range of 7 meters

(23 ft.) from the receiver located inside the main unit. Any obstruction between the receiver and remote may cause signal interference, limiting the ability to program the main unit.

19

8


Page 9
Image 9
Danby DDR586R owner manual Remote Control Features, Control Buttons