Display Controls and Indicators

A.

-/+ buttons

Decrease/increase the OSD bar value.

B.Up/down arrow buttons Select between OSD items and activates "Hot key" function for

brightness/contrast adjustment.

C. MENU button

Enter OSD operation mode, submenu, back to previous screen, and exit OSD.

D.Input selection button and Select an input mode among 1. D-sub, 2. DVI-D, 3. S-video and 4. Composite.

LED indicators

E. Auto Key

Automatically adjust vertical position, horizontal position, pixel clock and phase.

F.Power button and LED Turn the display on/off and indicate the status of power management. indicator

Driver Installation

Use the display CD to install the appropriate display driver for your operating system.

MicrosoftWindowsXP Operating System

To manually install or update the driver, perform the following steps:

1.Insert the monitor CD into the CD-ROM drive.

2.Click Start Æ Control Panel Æ Appearance & Themes and then click the Display icon.

3.In the Display Properties window, click the Settings tab, and then click Advanced.

4.Click the Monitor tab, and then click Properties Æ Driver tab Æ Update Driver.

5.When the Hardware Update Wizard dialog box appears, choose “Install the software automatically,” and click Next> and then Finish to complete the installation.

6.Close the Display Properties window.

MicrosoftWindowsMillennium Operating System

To manually install or update the driver, perform the following steps:

1.Click StartÆ SettingsÆ Control Panel and then double-click Display.

2.In the Display Properties window, click the Settings tab, and then click Advanced.

3.Click the Monitor tab, and then click ChangeÆ Specify the location of the driverÆNext.

4.When the Update Device Driver Wizard dialog box appears, select “Display a list of all the drivers in a specific location, so you can select the driver you want,” and click Next>.

5.Insert the display CD into the CD-ROM drive, then click Have Disk

6.Type d:\ (change the drive letter to match your CD-ROM drive if it is not drive D) in the Copy manufacturer’s files from: box, then click OK.

7.Click Next>, Next>, and then Finish to complete the installation.

8.Close the Display Properties window.

MicrosoftWindows2000 Operating System

To manually install or update the driver, perform the following steps:

1.Click StartÆ SettingsÆ Control Panel and then double-clickDisplay.

2.In the Display Properties window, click the Settings tab, and then click Advanced.

3.Click the Monitor tab, and then click PropertiesÆ DriverÆ Update Driver.

4.When the Update Device Driver Wizard dialog box appears, choose “Search for a suitable driver for my device,” and click Next>.

2

Dell 2000FP Color Display Quick Setup Guide

Page 2
Image 2
Dell 2000FP setup guide Display Controls and Indicators, Driver Installation, Microsoft Windows XP Operating System

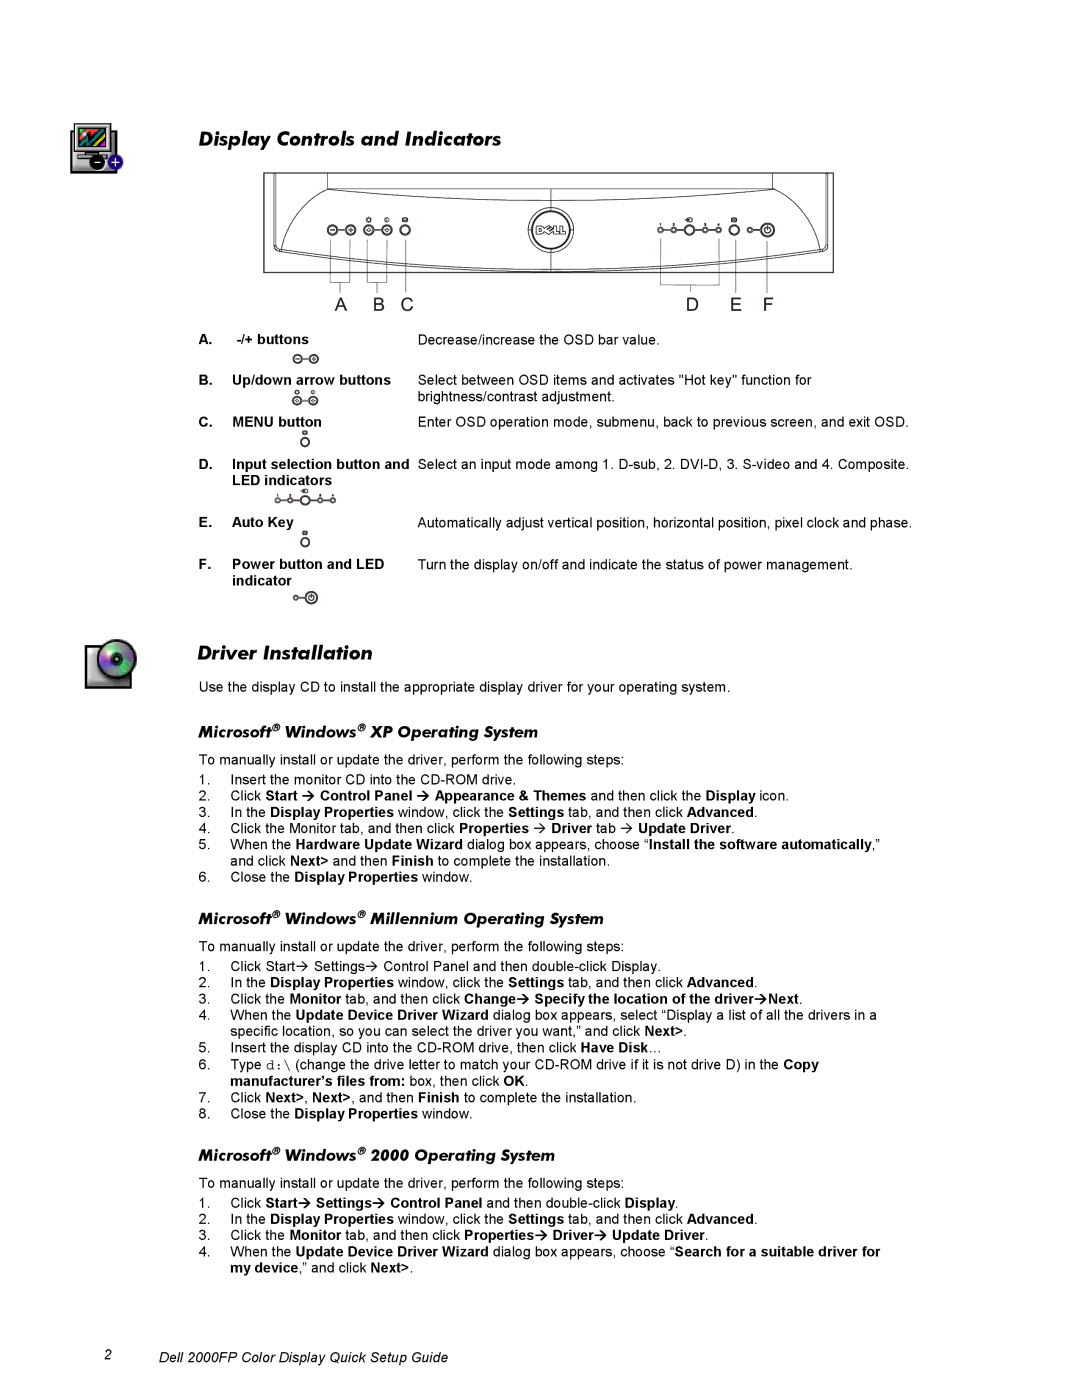
2000FP specifications

The Dell 2000FP is a notable flat panel display that was released as part of Dell's commitment to providing high-quality monitors that cater to a diverse range of users, from casual home workers to serious professionals. This 20-inch LCD monitor gained popularity for its impressive features and innovative technologies, marking a significant step in the evolution of display technology in the early 2000s.

One of the standout features of the Dell 2000FP is its native resolution of 1600 x 1200 pixels, which allows for stunning clarity and detail, particularly appreciated in graphic design, photo editing, and other visually intensive tasks. The monitor supports a 4:3 aspect ratio, offering a comfortable viewing experience for users accustomed to standard screen dimensions.

The Dell 2000FP employs advanced LCD technology, which provides a brightness level of around 250 cd/m² and a contrast ratio that enhances color depth and image fidelity. With a response time of approximately 25 ms, it is capable of handling standard multimedia tasks effectively, although it may not be ideal for fast-paced gaming applications that require instantaneous responses.

In terms of connectivity, the 2000FP is equipped with various input options, including VGA and DVI ports, allowing users to connect it easily to a range of devices and computer systems. This flexibility ensures compatibility with a wide array of graphics cards and laptops, making it a versatile choice for any workstation.

Moreover, the Dell 2000FP incorporates ergonomic design features, such as tilt and height adjustment capabilities, enabling users to customize the monitor’s position according to their comfort preferences. This is especially beneficial for prolonged use, reducing the risk of neck strain and eye fatigue during extended working hours.

The monitor's sleek design, featuring thin bezels and a sturdy stand, complements modern workspace aesthetics while showcasing Dell's commitment to both functionality and style. As an addition to any office environment, the 2000FP delivers reliable performance with an emphasis on user comfort and productivity.

In conclusion, the Dell 2000FP stands out as an exemplary display from its era, combining robust performance, versatile connectivity, and ergonomic design, making it a practical choice for users seeking a reliable and efficient LCD monitor. While newer technology has since emerged, the legacy of the Dell 2000FP remains a testament to the foundations of modern display innovations.