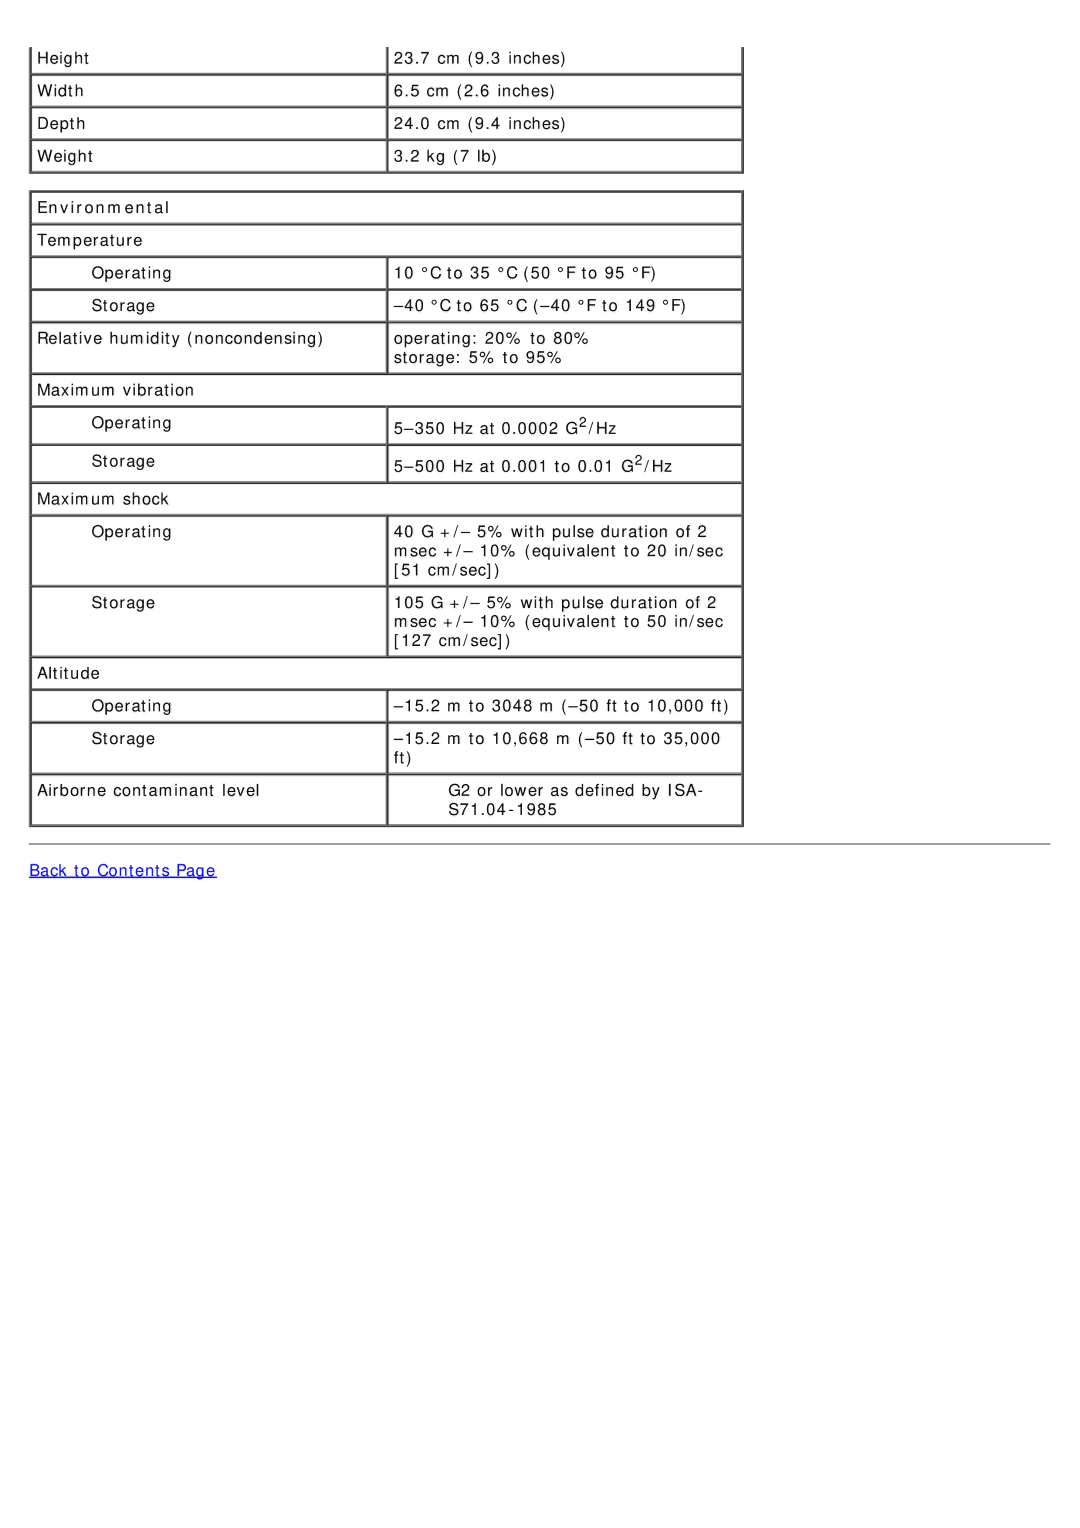
System Board Layout System Setup Diagnostics
Working on Your Computer Removing and Replacing Parts Specifications
Notes, Cautions, and Warnings
Before Working Inside Your Computer
Dell OptiPlex 780 Ultra Small Form Factor-Service Manual
Back to Contents Page
Working on Your Computer
In Windows XP Click Start Turn Off Computer Turn Off
Turning Off Your Computer
After Working Inside Your Computer
In Windows Vista
Internal Speaker Memory I/O Board Power Supply
Removing and Replacing Parts
Cover Drive Cage Optical Drive Wireless Local Area Network WLAN Card
System Fan Heat Sink and Processor Intrusion Switch Coin-Cell Battery
Video
Specifications
Processor
Memory
Drives
External Connectors
System Board Connectors
Power
Back to Contents Page
Environmental
Back to Contents Page
System Board Layout
Dell OptiPlex 780 Ultra Small Form Factor-Service Manual
Back to Contents Page
Dell OptiPlex 760 Ultra Small Form Factor-Service Manual
System Setup
Entering System Setup
System Setup Screen
Enable default
System Setup Options
Disable USB Internal default Read Only
System Configuration
Video
Disable AT PS/2 default EPP ECP No DMA ECP DMA ECP DMA
COM1 COM3
Front USB Rear Dual USB Rear Quad USB PCI slots Audio
Power Off default
Deactivate default Activate Clear
Deactivate default Disable Activate
Power Management
Static IP
Maintenance
Image Server
Static IP DNS
Enable F12 = Boot menu enabled by default
Boot Sequence
Option Settings
Changing the Boot Sequence for the Current Boot
System Password
Booting to a USB Device
Password Protection
Changing the Boot Sequence for Future Boots
If Password Status is set to Locked
Assigning a System Password
Typing Your System Password
Deleting or Changing an Existing System Password
Deleting or Changing an Existing Administrator Password
Administrator Password
Assigning an Administrator Password
Operating Your Computer With an Administrator Password Enabled
Jumper Setting
Jumper Settings
Clearing Forgotten Passwords
Disabling a Forgotten Password and Setting a New Password
Back to Contents Page
Clearing CMOS Settings
Page
Starting the Dell Diagnostics From Your Hard Drive
Diagnostics
Dell Diagnostics
When to Use the Dell Diagnostics
Option
Power Button Light Codes
Dell Diagnostics Main Menu
Power Light State Off Blinking Amber Solid
Cause
Beep Codes
Amber Blinking Green Solid Green
Code
Problem Description Suggested Resolution
Diagnostic Lights
Light Pattern
Repeat this process for each expansion card installed. If the computer
Back to Contents Page
Dell OptiPlex 780 Ultra Small Form Factor-Service Manual
1. Follow the procedures in Before Working Inside Your Computer
Cover
Removing the Cover
Back to Contents Page
Replacing the Cover
To replace the cover, perform the above steps in reverse order
Cover
Dell OptiPlex 780 Ultra Small Form Factor-Service Manual
Back to Contents Page
1. Follow the procedures in Before Working Inside Your Computer
Replacing the Cover
Back to Contents Page
Drive Cage
Removing the Drive Cage
Dell OptiPlex 780 Ultra Small Form Factor-Service Manual
6. Flip over the drive cage and place it on the computer
5. Disconnect the power and data cables from the optical drive
8. Remove the drive cage from the computer
7. Disconnect the power and data cables from the hard drive
Back to Contents Page
Replacing the Drive Cage
To replace the drive cage, perform the above steps in reverse order
1. Follow the procedures in Before Working Inside Your Computer
Optical Drive
Removing the Optical Drive
Back to Contents Page
6. Remove the optical-drive bracket from the optical-drive assembly
Replacing the Optical Drive
Back to Contents Page
Wireless Local Area Network WLAN Card
Removing the WLAN Card
Dell OptiPlex 780 Ultra Small Form Factor-Service Manual
7. Remove the WLAN card from the connector on the system board
Back to Contents Page
Replacing the WLAN Card
To replace the WLAN card, perform the above steps in reverse order
Back to Contents Page
System Fan
Removing the System Fan
Dell OptiPlex 780 Ultra Small Form Factor-Service Manual
7. Remove the screws that secure the fan to the computer chassis
6. Release the fan cable from its routing on the computer
To replace the system fan, perform the above steps in reverse order
Replacing the System Fan
Back to Contents Page
8. Remove the system fan from the computer
Back to Contents Page
Heat Sink and Processor
Removing the Heat Sink and Processor
Dell OptiPlex 780 Ultra Small Form Factor-Service Manual
7. Lift the heat sink out of the computer
6. Loosen the captive screws on the heat sink
9. Open the processor cover
Back to Contents Page
Replacing the Heat Sink and Processor
10. Remove the processor from the system board
Back to Contents Page
Intrusion Switch
Removing the Intrusion Switch
Dell OptiPlex 780 Ultra Small Form Factor-Service Manual
Back to Contents Page
Replacing the Intrusion Switch
Dell OptiPlex 780 Ultra Small Form Factor-Service Manual
Coin-Cell Battery
Removing the Coin-Cell Battery
6. Remove the heat sink and processor
9. Lift the coin-cell battery up and remove it from the system board
Replacing the Coin-Cell Battery
5. Remove the heat sink and processor
9. Remove the wireless local area network card
System Board
Removing the System Board
12. Disconnect the internal antenna cable
15. Remove the system board from the computer
14. Remove the 7 mm hex screw from the system board
Back to Contents Page
Replacing the System Board
To replace the system board, perform the above steps in reverse order
Back to Contents Page
Front Bezel
Removing the Front Bezel
Dell OptiPlex 780 Ultra Small Form Factor-Service Manual
5. Remove the front bezel from the computer
Replacing the Front Bezel
Back to Contents Page
4. Rotate the front bezel away from the computer
Back to Contents Page
Hard Drive
Removing the Hard Drive
Dell OptiPlex 780 Ultra Small Form Factor-Service Manual
Back to Contents Page
Replacing the Hard Drive
To replace the hard drive, perform the above steps in reverse order
Back to Contents Page
Control Panel
Removing the Control Panel
Dell OptiPlex 780 Ultra Small Form Factor-Service Manual
7. Remove the screw that secures the control panel to the computer
6. Remove the cable from the routing guides on the computer chassis
Back to Contents Page
Replacing the Control Panel
8. Remove the control panel from the computer
Back to Contents Page
Internal Antenna Cable
Removing the Internal Antenna Cable
Dell OptiPlex 780 Ultra Small Form Factor-Service Manual
Page
Back to Contents Page
Replacing the Internal Antenna Cable
8. Remove the internal antenna cable from the computer
Back to Contents Page
Internal Speaker
Removing the Internal Speaker
Dell OptiPlex 780 Ultra Small Form Factor-Service Manual
Replacing the Internal Speaker
Back to Contents Page
Memory
Removing the Memory Modules
Dell OptiPlex 780 Ultra Small Form Factor-Service Manual
Back to Contents Page
Replacing the Memory Modules
To replace the memory, perform the above steps in reverse order
1. Follow the procedures in Before Working Inside Your Computer
I/O Panel
Removing the I/O Panel
Back to Contents Page
7. Remove the I/O board by pulling it away from the computer
Back to Contents Page
Replacing the I/O Panel
To replace the I/O panel, perform the above steps in reverse order
Dell OptiPlex 780 Ultra Small Form Factor-Service Manual
Power Supply
Removing the Power Supply
5. Remove the intrusion switch 6. Remove the heat sink and processor
8. Remove the screw that secures the power supply to the system board
Replacing the Power Supply