Common Symptoms

What You Experience


Possible Solutions

No Video/Power LED off

No picture

Ensure that the video cable connecting the monitor and the computer is properly


connected and secure.


Verify that the power outlet is functioning properly using any other electrical equipment.


Ensure that the power button is depressed fully.


No Video/Power LED on

No picture or no brightness

Increase brightness & contrast controls via OSD.


Perform monitor self-test feature check.


Check for bent or broken pins in the video cable connector.


Run the built-in diagnostics.


Poor Focus

Picture is fuzzy, blurry, or

Perform Auto Adjust via OSD.


ghosting

Adjust the Phase and Pixel Clock controls via OSD.


Eliminate video extension cables.


Reset the monitor to Factory Settings.


Change the video resolution to the correct aspect ration (16:10).


Shaky/Jittery Video

Wavy picture or fine movement

Perform Auto Adjust via OSD.


Adjust the Phase and Pixel Clock controls via OSD.


Reset the monitor to Factory Settings.


Check environmental factors.


Relocate the monitor and test in another room.


Missing Pixels

LCD screen has spots

Cycle power on-off.


Pixel that is permanently off is a natural defect that can occur in LCD technology.


Run the built-in diagnostics.


Stuck-on Pixels

LCD screen has bright spots

Cycle power on-off.


Pixel that is permanently off is a natural defect that can occur in LCD technology.


Run the built-in diagnostics.


Brightness Problems

Picture too dim or too bright

Reset the monitor to Factory Settings.


Auto Adjust via OSD.


Adjust brightness & contrast controls via OSD.


Geometric Distortion

Screen not centered correctly

Reset the monitor to Factory Settings.


Auto Adjust via OSD.


Adjust brightness & contrast controls via OSD.


Horizontal/Vertical Lines

Screen has one or more lines

Reset the monitor to Factory Settings.


Perform Auto Adjust via OSD.


Adjust Phase and Pixel Clock controls via OSD.


Perform monitor self-test feature check and determine if these lines are also in self-test


mode.


Check for bent or broken pins in the video cable connector.


Run the built-in diagnostics.


Synchronization Problems

Screen is scrambled or appears

Reset the monitor to Factory Settings.


torn

Perform Auto Adjust via OSD.


Adjust Phase and Pixel Clock controls via OSD.


Perform monitor self-test feature check to determine if the scrambled screen appears in


self-test mode.


Check for bent or broken pins in the video cable connector.


Restart the computer in the safe mode.


Safety Related Issues

Visible signs of smoke or

Do not perform any troubleshooting steps.


sparks

Contact Dell immediately.


Intermittent Problems

Monitor malfunctions on & off

Ensure that the video cable connecting the monitor to the computer is connected


properly and is secure.


Reset the monitor to Factory Settings.


Perform monitor self-test feature check to determine if the intermittent problem occurs in


self-test mode.


Missing Color

Picture missing color

Perform monitor self-test feature check.


Ensure that the video cable connecting the monitor to the computer is connected


properly and is secure.


Check for bent or broken pins in the video cable connector.


Wrong Color

Picture color not good

Change the Color Setting Mode in the Color Settings OSD to Graphics or Video


depending on the application.


Try different Color Preset Settings in Color Settings OSD. Adjust R/G/B value in Color


Settings OSD if the Color Management is turned off.


Change the Input Color Format to PC RGB or YPbPr in the Advance Setting OSD.


Run the built-in diagnostics.


Image retention from a static

Faint shadow from the static

Use the Power Management feature to turn off the monitor at all times when not in use

image left on the monitor for a

image displayed appears on


(for more information, see Power Management Modes).

long period of time

the screen

Alternatively, use a dynamically changing screensaver.


In OSD Menu, under Reset to Factory Settings, select Enable LCD Conditioning. Using


this option may take several hours before the image is eliminated.


NOTE: Image Burn-in is not covered by your warranty.


Product Specific Problems

Page 26
Image 26
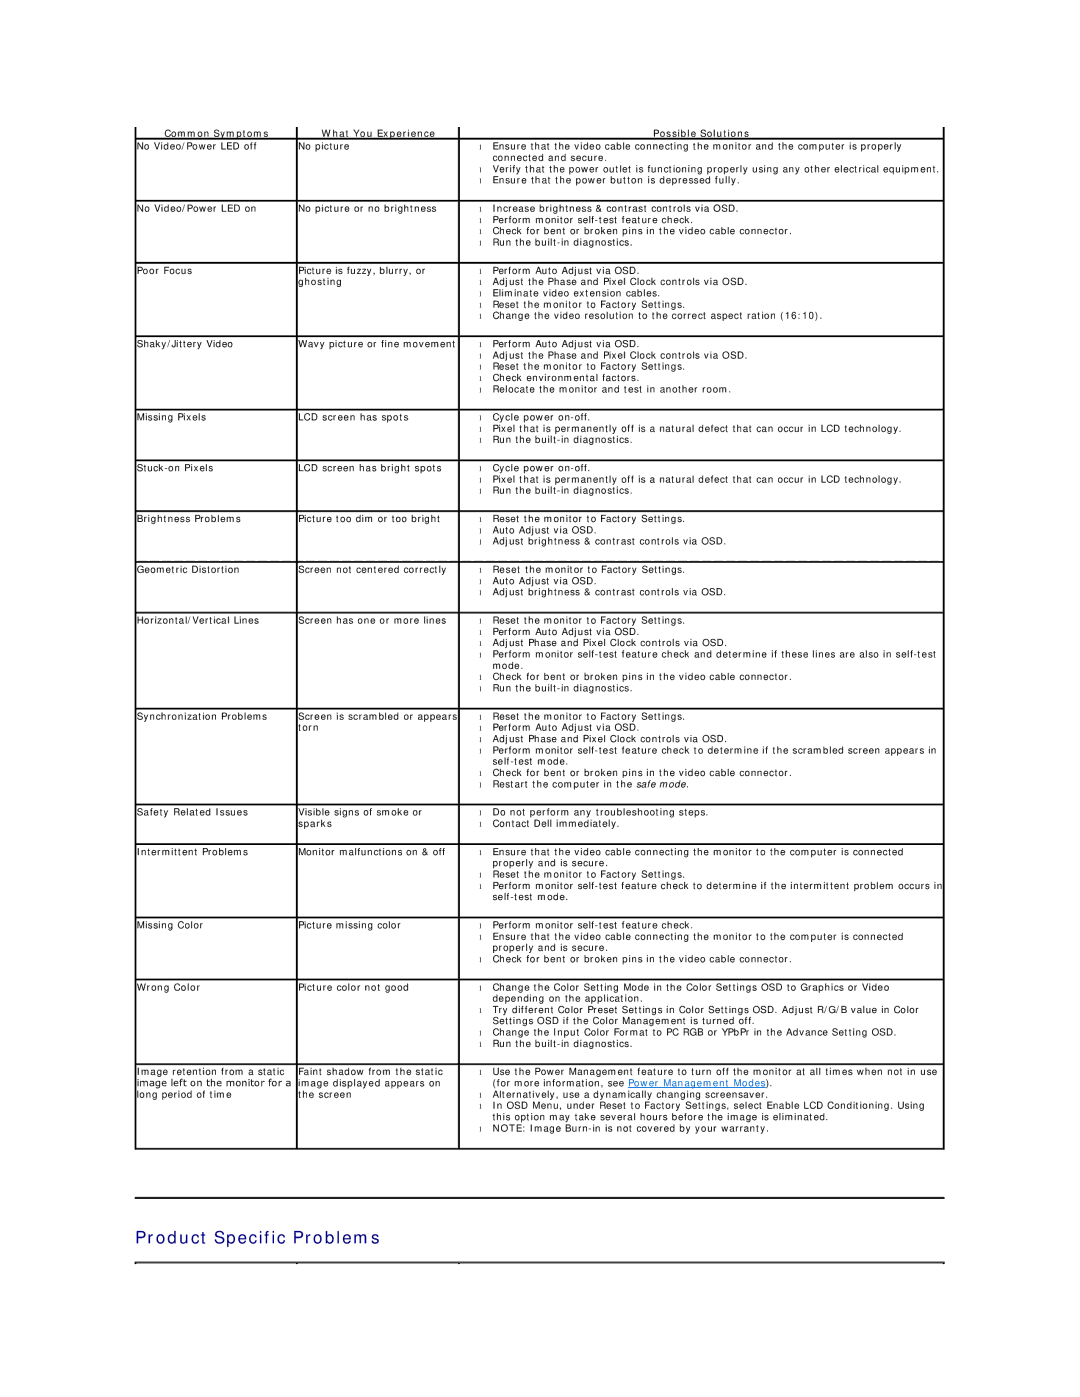
Dell E1709WC appendix Product Specific Problems, Common Symptoms What You Experience Possible Solutions

E1709WC, E1709W specifications

The Dell E1709W and E1709WC are reliable monitors designed for both professional and personal usage, delivering excellent performance and functionality. These models are part of Dell's E-series, which focuses on providing efficient and cost-effective display solutions.

The Dell E1709W features a 17-inch widescreen display with a resolution of 1440 x 900 pixels. This aspect ratio allows for an optimal viewing experience, particularly for those who work with multiple applications and need ample screen space. The monitor has a brightness level of 250 cd/m², which ensures clear visibility in various lighting conditions. The 1000:1 contrast ratio enhances image quality by providing deeper blacks and brighter whites, making it suitable for tasks that require detail and precision.

One of the key technologies incorporated in the E1709W is Dell's ComfortView, which minimizes harmful blue light emissions without altering color accuracy. This feature is particularly beneficial for users who spend long hours in front of the screen, helping to reduce eye strain and improve overall comfort. The monitor also boasts a 5ms response time, which is adequate for everyday multimedia applications and general computing tasks.

In addition to the E1709W, the E1709WC offers similar specifications with the added capability of built-in speakers, making it a convenient choice for users who wish to save desk space and simplify their setup. Both models support a variety of connectivity options, including VGA and DVI-D ports, ensuring compatibility with a range of devices.

The design of the E1709W and E1709WC is functional and straightforward, featuring a sturdy stand that allows for tilt adjustments. This flexibility in positioning helps users find the most comfortable viewing angle, whether they are working at a desk or engaging in collaborative tasks.

In terms of energy efficiency, both monitors are Energy Star certified, which indicates they meet rigorous standards for power consumption. This aspect not only helps users save on electricity bills but also aligns with environmentally conscious practices.

Overall, the Dell E1709W and E1709WC are solid options for individuals seeking dependable and functional monitors. Their combination of decent specifications, user-friendly features, and energy-efficient design makes them suitable choices for various computing needs. Whether for home or office use, these monitors deliver reliable performance that can enhance productivity and provide a satisfying viewing experience.