C

C

Fig. 21

Fig. 22

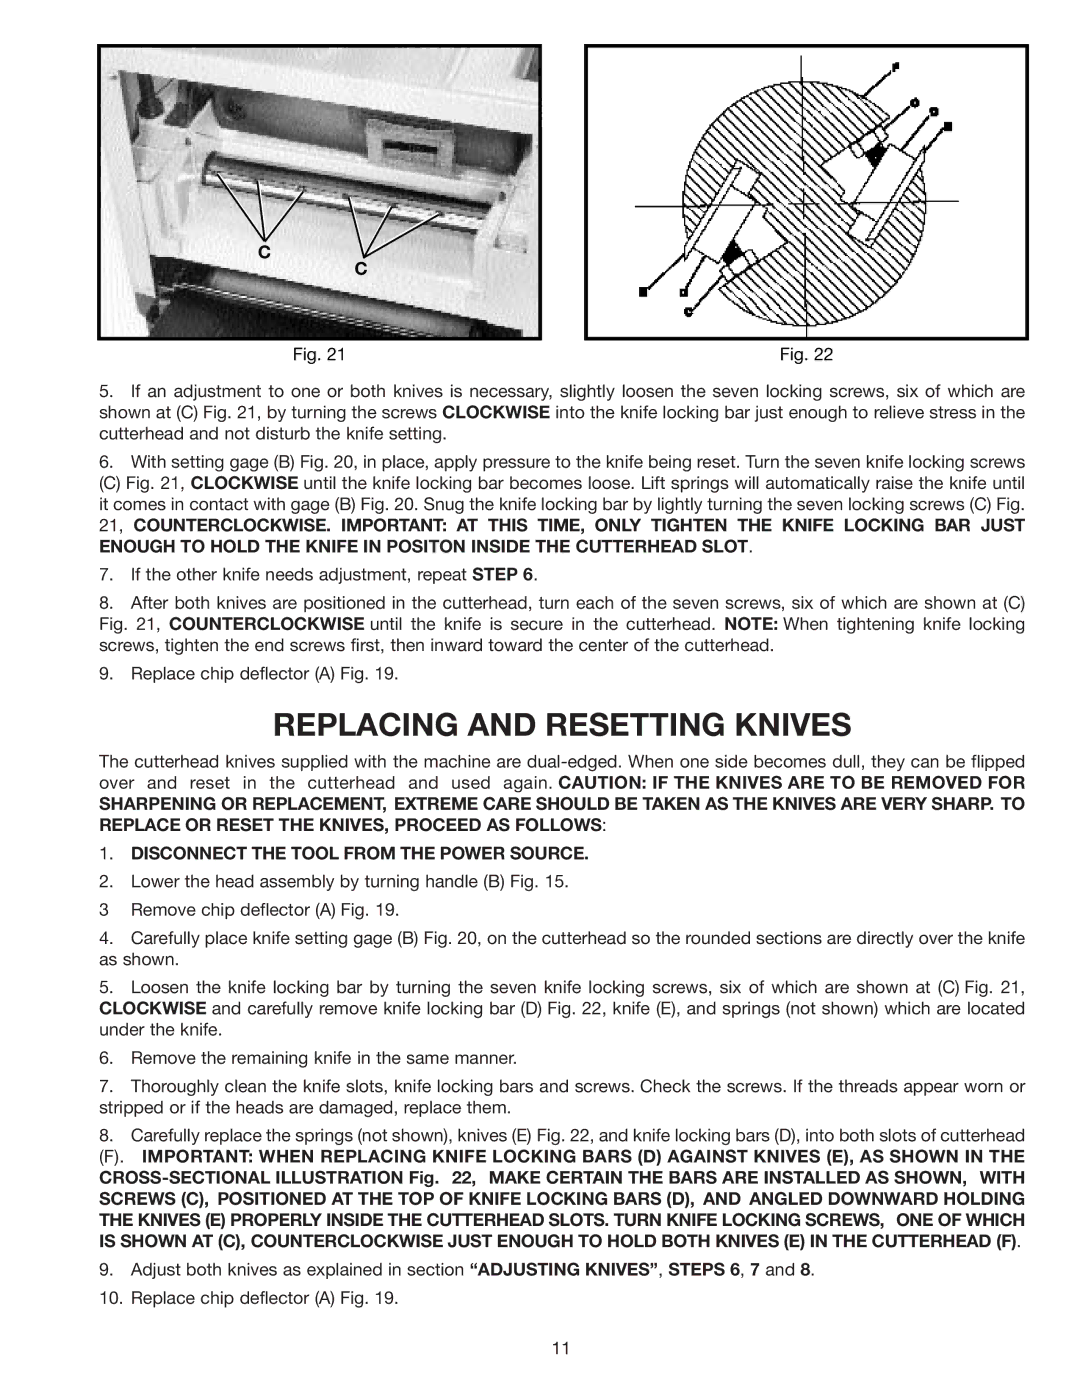
5.If an adjustment to one or both knives is necessary, slightly loosen the seven locking screws, six of which are shown at (C) Fig. 21, by turning the screws CLOCKWISE into the knife locking bar just enough to relieve stress in the cutterhead and not disturb the knife setting.

6.With setting gage (B) Fig. 20, in place, apply pressure to the knife being reset. Turn the seven knife locking screws

(C) Fig. 21, CLOCKWISE until the knife locking bar becomes loose. Lift springs will automatically raise the knife until it comes in contact with gage (B) Fig. 20. Snug the knife locking bar by lightly turning the seven locking screws (C) Fig.

21, COUNTERCLOCKWISE. IMPORTANT: AT THIS TIME, ONLY TIGHTEN THE KNIFE LOCKING BAR JUST ENOUGH TO HOLD THE KNIFE IN POSITON INSIDE THE CUTTERHEAD SLOT.

7.If the other knife needs adjustment, repeat STEP 6.

8.After both knives are positioned in the cutterhead, turn each of the seven screws, six of which are shown at (C) Fig. 21, COUNTERCLOCKWISE until the knife is secure in the cutterhead. NOTE: When tightening knife locking screws, tighten the end screws first, then inward toward the center of the cutterhead.

9.Replace chip deflector (A) Fig. 19.

REPLACING AND RESETTING KNIVES

The cutterhead knives supplied with the machine are dual-edged. When one side becomes dull, they can be flipped over and reset in the cutterhead and used again. CAUTION: IF THE KNIVES ARE TO BE REMOVED FOR

SHARPENING OR REPLACEMENT, EXTREME CARE SHOULD BE TAKEN AS THE KNIVES ARE VERY SHARP. TO REPLACE OR RESET THE KNIVES, PROCEED AS FOLLOWS:

1.DISCONNECT THE TOOL FROM THE POWER SOURCE.

2.Lower the head assembly by turning handle (B) Fig. 15.

3 Remove chip deflector (A) Fig. 19.

4.Carefully place knife setting gage (B) Fig. 20, on the cutterhead so the rounded sections are directly over the knife as shown.

5.Loosen the knife locking bar by turning the seven knife locking screws, six of which are shown at (C) Fig. 21, CLOCKWISE and carefully remove knife locking bar (D) Fig. 22, knife (E), and springs (not shown) which are located under the knife.

6.Remove the remaining knife in the same manner.

7.Thoroughly clean the knife slots, knife locking bars and screws. Check the screws. If the threads appear worn or stripped or if the heads are damaged, replace them.

8.Carefully replace the springs (not shown), knives (E) Fig. 22, and knife locking bars (D), into both slots of cutterhead

(F). IMPORTANT: WHEN REPLACING KNIFE LOCKING BARS (D) AGAINST KNIVES (E), AS SHOWN IN THE

CROSS-SECTIONAL ILLUSTRATION Fig. 22, MAKE CERTAIN THE BARS ARE INSTALLED AS SHOWN, WITH SCREWS (C), POSITIONED AT THE TOP OF KNIFE LOCKING BARS (D), AND ANGLED DOWNWARD HOLDING THE KNIVES (E) PROPERLY INSIDE THE CUTTERHEAD SLOTS. TURN KNIFE LOCKING SCREWS, ONE OF WHICH IS SHOWN AT (C), COUNTERCLOCKWISE JUST ENOUGH TO HOLD BOTH KNIVES (E) IN THE CUTTERHEAD (F).

9.Adjust both knives as explained in section “ADJUSTING KNIVES”, STEPS 6, 7 and 8.

10.Replace chip deflector (A) Fig. 19.

11

Page 11
Image 11
Delta 22-540 instruction manual Replacing and Resetting Knives

22-540 specifications

The Delta 22-540 is a powerful and versatile woodworking tool designed for both amateur and professional woodworkers. Known for its robust construction and reliability, this 13-inch thickness planer features a host of technologies and characteristics that make it a standout choice in any workshop.

At the heart of the Delta 22-540 is its powerful 15-amp motor, which delivers impressive performance and allows users to tackle a range of materials with ease. The motor runs at a speed of 20,000 RPM, enabling smooth and efficient operation for various wood thicknesses. This ensures that users can achieve a uniform finish and consistent results every time.

One of the most notable features of the Delta 22-540 is its precision-ground, cast iron table. This heavy-duty tabletop provides a stable work surface that minimizes vibration during operation, which is essential for achieving a smooth finish. Additionally, the table has a dual adjustment system that allows for easy height adjustments, ensuring users can set the thickness precisely to their requirements.

The Delta 22-540 is equipped with high-quality knives that are easy to replace, ensuring longer tool life and enhanced cutting performance. The knife-edge design optimizes wood chip evacuation, which not only improves cutting efficiency but also reduces the likelihood of snipe, making it an ideal choice for users concerned about maintaining the quality of their wood surfaces.

Safety features are also a priority in the design of the Delta 22-540. The planer comes with a blade guard that protects users from accidental contact with the cutting blades. Furthermore, the onboard dust port promotes a cleaner workspace by connecting to a dust collection system, capturing debris and chips efficiently.

In terms of portability, the Delta 22-540 is designed with a sturdy yet lightweight frame, allowing for easy movement around the workshop. Its compact size makes it suitable for small spaces without sacrificing performance or capability.

Overall, the Delta 22-540 thickness planer combines power, precision, and user-friendly features, making it an excellent addition to any woodworking setup. Its blend of advanced technologies, durability, and safety characteristics ensures that woodworkers can complete their projects with confidence and ease, elevating their craftsmanship to the next level. Whether you are flattening rough lumber or bringing life back to old wood, the Delta 22-540 stands out as a reliable tool to achieve high-quality results.