OWNER’S MANUAL
TROUBLESHOOTING
Continued
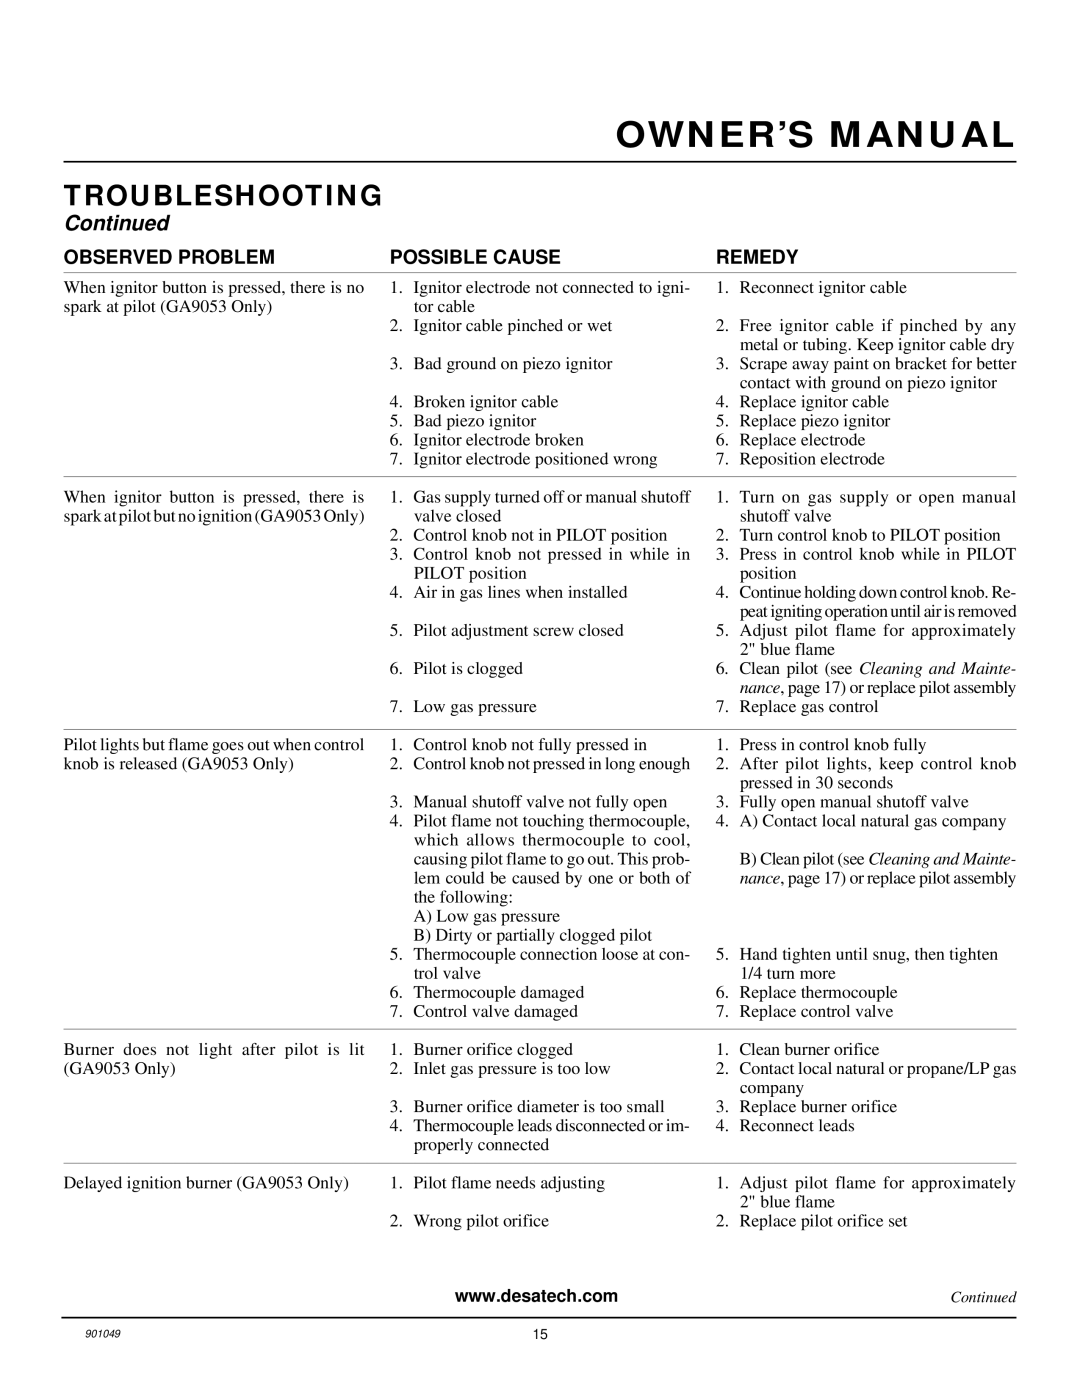
OBSERVED PROBLEM | POSSIBLE CAUSE | REMEDY | ||
When ignitor button is pressed, there is no | 1. | Ignitor electrode not connected to igni- | 1. | Reconnect ignitor cable |
spark at pilot (GA9053 Only) |
| tor cable |
|
|
| 2. | Ignitor cable pinched or wet | 2. | Free ignitor cable if pinched by any |
|
|
|
| metal or tubing. Keep ignitor cable dry |
| 3. | Bad ground on piezo ignitor | 3. | Scrape away paint on bracket for better |
|
|
|
| contact with ground on piezo ignitor |
| 4. | Broken ignitor cable | 4. | Replace ignitor cable |
| 5. | Bad piezo ignitor | 5. | Replace piezo ignitor |
| 6. | Ignitor electrode broken | 6. | Replace electrode |
| 7. | Ignitor electrode positioned wrong | 7. | Reposition electrode |
|
|
|
|
|
When ignitor button is pressed, there is | 1. | Gas supply turned off or manual shutoff | 1. | Turn on gas supply or open manual |
spark at pilot but no ignition (GA9053 Only) |
| valve closed |
| shutoff valve |
| 2. | Control knob not in PILOT position | 2. | Turn control knob to PILOT position |
| 3. | Control knob not pressed in while in | 3. | Press in control knob while in PILOT |
|
| PILOT position |
| position |
| 4. | Air in gas lines when installed | 4. | Continue holding down control knob. Re- |
|
|
|
| peat igniting operation until air is removed |
| 5. | Pilot adjustment screw closed | 5. | Adjust pilot flame for approximately |
|
|
|
| 2" blue flame |
| 6. | Pilot is clogged | 6. | Clean pilot (see Cleaning and Mainte- |
|
|
|
| nance, page 17) or replace pilot assembly |
| 7. | Low gas pressure | 7. | Replace gas control |
|
|
|
|
|
Pilot lights but flame goes out when control | 1. | Control knob not fully pressed in | 1. | Press in control knob fully |
knob is released (GA9053 Only) | 2. | Control knob not pressed in long enough | 2. | After pilot lights, keep control knob |
|
|
|
| pressed in 30 seconds |
| 3. | Manual shutoff valve not fully open | 3. | Fully open manual shutoff valve |
| 4. | Pilot flame not touching thermocouple, | 4. | A) Contact local natural gas company |
|
| which allows thermocouple to cool, |
|
|
|
| causing pilot flame to go out. This prob- |
| B) Clean pilot (see Cleaning and Mainte- |
|
| lem could be caused by one or both of |
| nance, page 17) or replace pilot assembly |
|
| the following: |
|
|
|
| A) Low gas pressure |
|
|
|
| B) Dirty or partially clogged pilot |
|
|
| 5. | Thermocouple connection loose at con- | 5. | Hand tighten until snug, then tighten |
|
| trol valve |
| 1/4 turn more |
| 6. | Thermocouple damaged | 6. | Replace thermocouple |
| 7. | Control valve damaged | 7. | Replace control valve |
|
|
|
|
|
Burner does not light after pilot is lit | 1. | Burner orifice clogged | 1. | Clean burner orifice |
(GA9053 Only) | 2. | Inlet gas pressure is too low | 2. | Contact local natural or propane/LP gas |
|
|
|
| company |
| 3. | Burner orifice diameter is too small | 3. | Replace burner orifice |
| 4. | Thermocouple leads disconnected or im- | 4. | Reconnect leads |
|
| properly connected |
|
|
|
|
|
|
|
Delayed ignition burner (GA9053 Only) | 1. | Pilot flame needs adjusting | 1. | Adjust pilot flame for approximately |
|
|
|
| 2" blue flame |
| 2. | Wrong pilot orifice | 2. | Replace pilot orifice set |
|
| www.desatech.com |
| Continued |
901049 | 15 |
