OWNER’S MANUAL

INSTALLATION

Continued

3.For an 18" set, use a 10mm socket or nut driver to remove the orifice from the propane/LP burner inlet fitting. Choose the correct orifice for your log set size and install in place of the ori- fice you just removed.

4.Using thread sealant (resistant to the action of propane/LP gas) on larger end of fitting, screw the burner inlet fitting through hole and into burner manifold. Tighten using a wrench.

5 . Follow steps 1 through 12 under Natu- ral Gas Installation, pages 9 and 10.

Changing Pilot Orifice

The pilot is provided with a natural gas orifice installed. For propane/LP gas you must remove it and replace it with an pro- pane/LP orifice. The hardware kit contains an propane/LP orifice with a red stripe for converting the pilot.

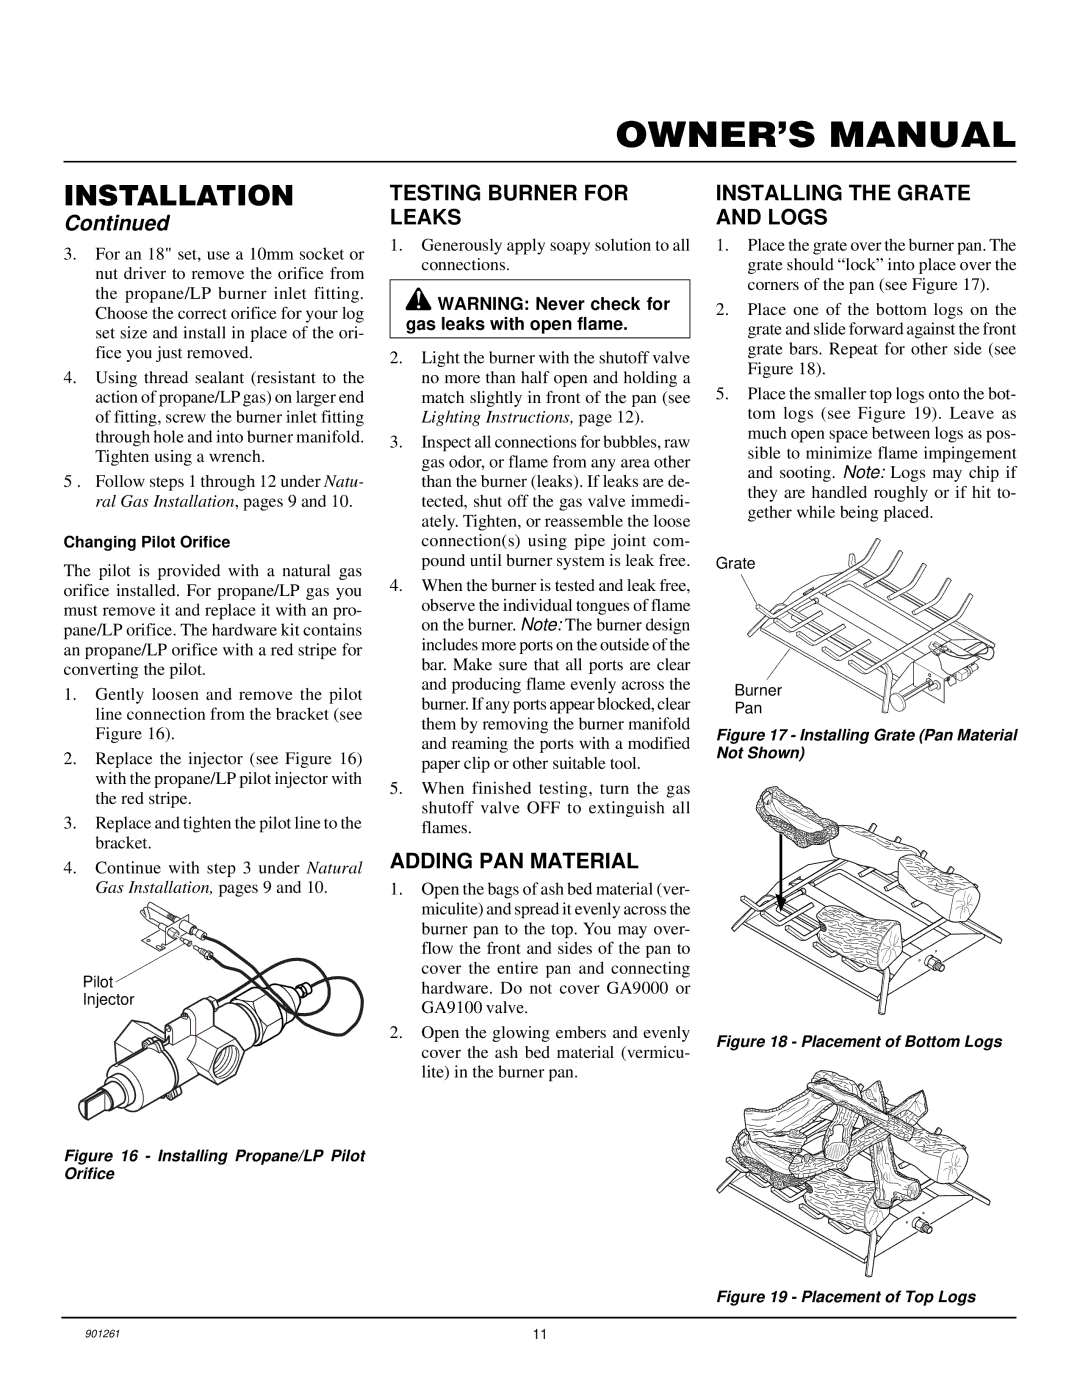
1.Gently loosen and remove the pilot line connection from the bracket (see Figure 16).

2.Replace the injector (see Figure 16) with the propane/LP pilot injector with the red stripe.

3.Replace and tighten the pilot line to the bracket.

4.Continue with step 3 under Natural Gas Installation, pages 9 and 10.

Pilot

Injector

Figure 16 - Installing Propane/LP Pilot Orifice

TESTING BURNER FOR LEAKS

1.Generously apply soapy solution to all connections.

WARNING: Never check for gas leaks with open flame.

2.Light the burner with the shutoff valve no more than half open and holding a match slightly in front of the pan (see Lighting Instructions, page 12).

3.Inspect all connections for bubbles, raw gas odor, or flame from any area other than the burner (leaks). If leaks are de- tected, shut off the gas valve immedi- ately. Tighten, or reassemble the loose connection(s) using pipe joint com- pound until burner system is leak free.

4.When the burner is tested and leak free, observe the individual tongues of flame on the burner. Note: The burner design includes more ports on the outside of the bar. Make sure that all ports are clear and producing flame evenly across the burner. If any ports appear blocked, clear them by removing the burner manifold and reaming the ports with a modified paper clip or other suitable tool.

5.When finished testing, turn the gas shutoff valve OFF to extinguish all flames.

ADDING PAN MATERIAL

1.Open the bags of ash bed material (ver- miculite) and spread it evenly across the burner pan to the top. You may over- flow the front and sides of the pan to cover the entire pan and connecting hardware. Do not cover GA9000 or GA9100 valve.

2.Open the glowing embers and evenly cover the ash bed material (vermicu- lite) in the burner pan.

INSTALLING THE GRATE AND LOGS

1.Place the grate over the burner pan. The grate should “lock” into place over the corners of the pan (see Figure 17).

2.Place one of the bottom logs on the grate and slide forward against the front grate bars. Repeat for other side (see Figure 18).

5.Place the smaller top logs onto the bot- tom logs (see Figure 19). Leave as much open space between logs as pos- sible to minimize flame impingement and sooting. Note: Logs may chip if they are handled roughly or if hit to- gether while being placed.

Grate

Burner

Pan

Figure 17 - Installing Grate (Pan Material Not Shown)

Figure 18 - Placement of Bottom Logs

Figure 19 - Placement of Top Logs

901261

11

Page 11
Image 11
Desa FVMR18, FVMR24 installation manual Testing Burner for Leaks, Adding PAN Material, Installing the Grate and Logs

FVMR24, FVMR18 specifications

Desa FVMR18 and FVMR24 are innovative models that stand out in the world of HVAC (Heating, Ventilation, and Air Conditioning) systems. Designed for modern living and commercial environments, these units combine efficiency, performance, and advanced technology to meet diverse climate control needs.

The FVMR18 is designed for residential spaces, featuring a compact and sleek design that easily fits into various interior layouts. Its primary strength lies in its energy efficiency, boasting an impressive SEER (Seasonal Energy Efficiency Ratio) rating. This not only reduces overall power consumption but also minimizes utility bills, aligning with eco-friendly initiatives. The FVMR24, on the other hand, caters to larger areas, including commercial buildings, offering enhanced cooling and heating capabilities.

Both models utilize inverter technology, which allows them to adjust the compressor speed based on the ambient temperature. This means the units can operate more quietly and sustainably, delivering just the right amount of heating or cooling without the drastic fluctuations typical of conventional systems. The inverter technology also contributes significantly to the longevity of the unit, preventing wear and tear associated with frequent restarts.

A standout feature of both the FVMR18 and FVMR24 units is their advanced air filtration system. Equipped with HEPA filters, these models not only provide optimal temperature control but also ensure a clean and healthy indoor environment by capturing dust, allergens, and other airborne particles. This is particularly beneficial for those with respiratory issues or allergies.

Another key characteristic is the user-friendly interface, which includes a smart remote control and compatibility with smart home systems. This allows users to easily adjust temperatures, set timers, and monitor energy consumption through mobile applications. Additionally, both units are designed with quiet operation technology, ensuring minimal noise disruption, which is crucial in residential and office settings.

In summary, Desa FVMR18 and FVMR24 models represent a blend of cutting-edge technology and user-centric features. With their efficient performance, advanced filtration, and smart capabilities, they effectively address the diverse demands of contemporary climate control, making them a valuable investment for both home and business environments.