INSTRUCCIONES DE ENSAMBLAJE Continuación

DOMO Y EMISOR

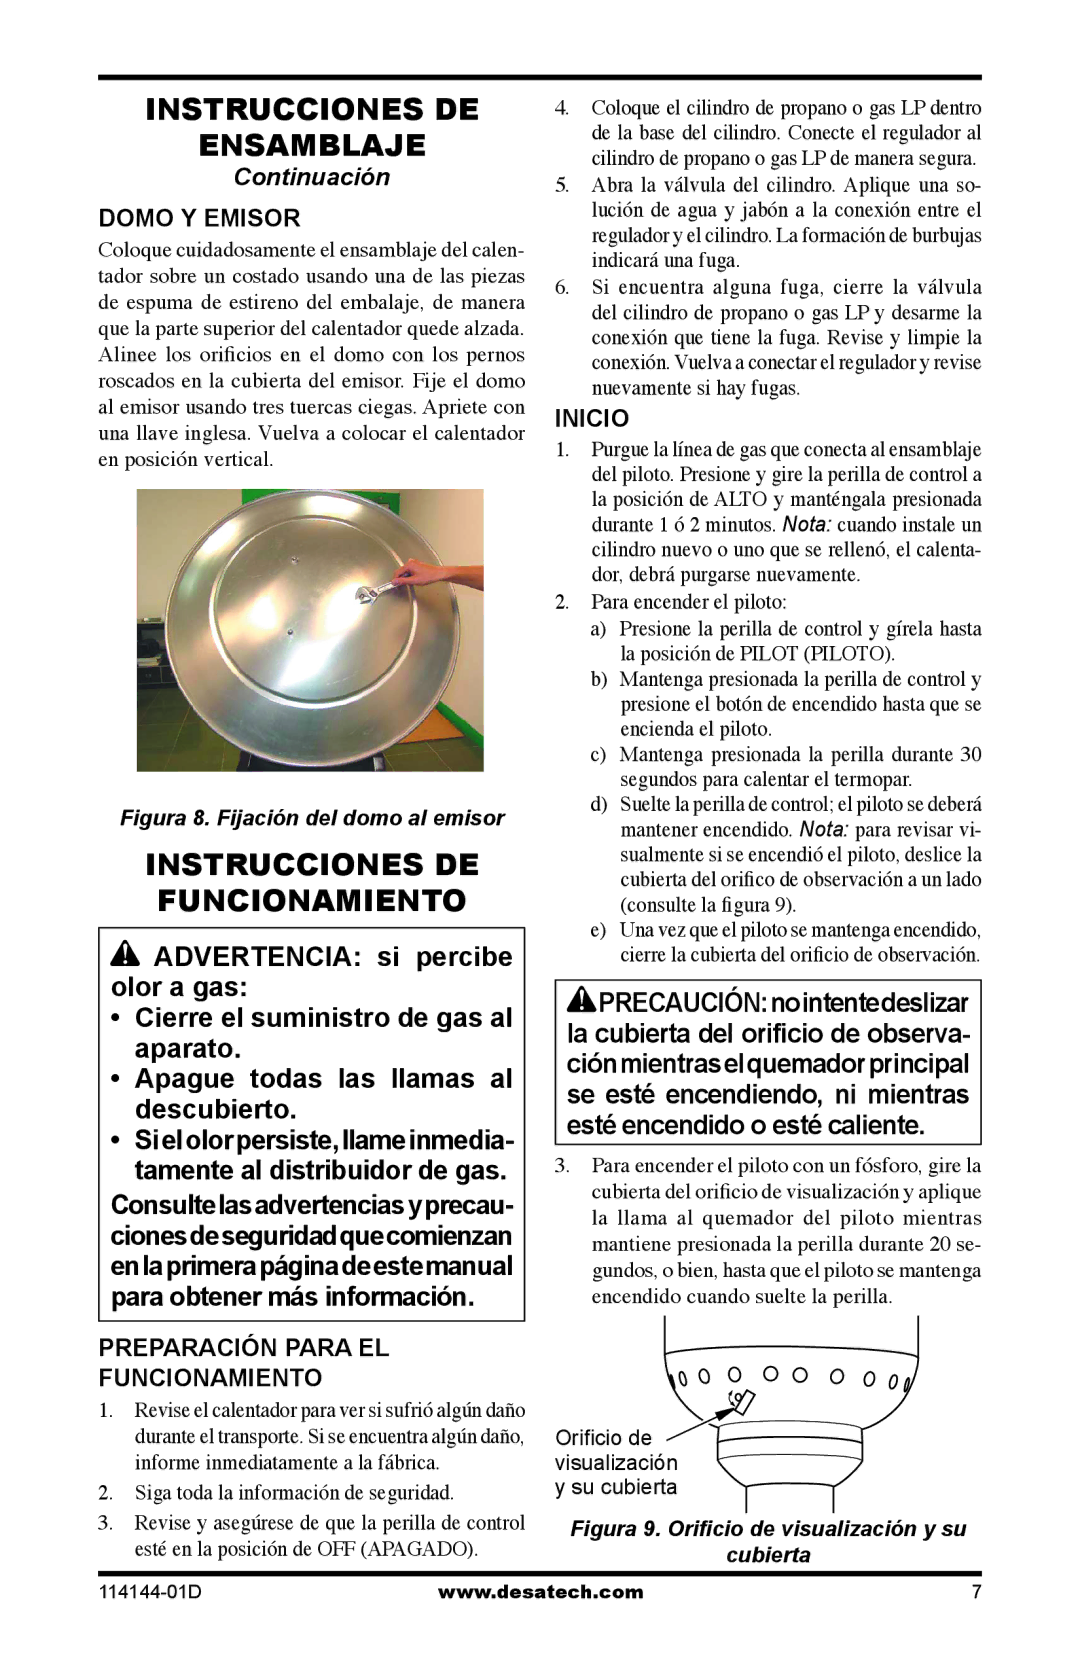
Coloque cuidadosamente el ensamblaje del calen- tador sobre un costado usando una de las piezas de espuma de estireno del embalaje, de manera que la parte superior del calentador quede alzada. Alinee los orificios en el domo con los pernos roscados en la cubierta del emisor. Fije el domo al emisor usando tres tuercas ciegas. Apriete con una llave inglesa. Vuelva a colocar el calentador en posición vertical.

Figura 8. Fijación del domo al emisor

INSTRUCCIONES DE FUNCIONAMIENTO

ADVERTENCIA: si percibe olor a gas:

Cierre el suministro de gas al aparato.

Apague todas las llamas al descubierto.

Sielolorpersiste,llameinmedia- tamente al distribuidor de gas.

Consultelasadvertenciasyprecau- cionesdeseguridadquecomienzan enlaprimerapáginadeestemanual para obtener más información.

PREPARACIÓN PARA EL

FUNCIONAMIENTO

1.Revise el calentador para ver si sufrió algún daño durante el transporte. Si se encuentra algún daño, informe inmediatamente a la fábrica.

2.Siga toda la información de seguridad.

3.Revise y asegúrese de que la perilla de control esté en la posición de OFF (APAGADO).

4.Coloque el cilindro de propano o gas LP dentro de la base del cilindro. Conecte el regulador al cilindro de propano o gas LP de manera segura.

5.Abra la válvula del cilindro. Aplique una so- lución de agua y jabón a la conexión entre el regulador y el cilindro. La formación de burbujas indicará una fuga.

6.Si encuentra alguna fuga, cierre la válvula del cilindro de propano o gas LP y desarme la conexión que tiene la fuga. Revise y limpie la conexión. Vuelva a conectar el regulador y revise nuevamente si hay fugas.

INICIO

1.Purgue la línea de gas que conecta al ensamblaje del piloto. Presione y gire la perilla de control a la posición de ALTO y manténgala presionada durante 1 ó 2 minutos. Nota: cuando instale un cilindro nuevo o uno que se rellenó, el calenta- dor, debrá purgarse nuevamente.

2.Para encender el piloto:

a)Presione la perilla de control y gírela hasta la posición de PILOT (PILOTO).

b)Mantenga presionada la perilla de control y presione el botón de encendido hasta que se encienda el piloto.

c)Mantenga presionada la perilla durante 30 segundos para calentar el termopar.

d)Suelte la perilla de control; el piloto se deberá mantener encendido. Nota: para revisar vi- sualmente si se encendió el piloto, deslice la cubierta del orifico de observación a un lado (consulte la figura 9).

e)Una vez que el piloto se mantenga encendido, cierre la cubierta del orificio de observación.

PRECAUCIÓN:nointentedeslizar la cubierta del orificio de observa- ciónmientraselquemadorprincipal se esté encendiendo, ni mientras esté encendido o esté caliente.

3.Para encender el piloto con un fósforo, gire la cubierta del orificio de visualización y aplique la llama al quemador del piloto mientras mantiene presionada la perilla durante 20 se- gundos, o bien, hasta que el piloto se mantenga encendido cuando suelte la perilla.

Orificio de visualización

y su cubierta

Figura 9. Orificio de visualización y su

cubierta

114144-01D

www.desatech.com

7

Page 19
Image 19
Desa SPC-54PHT, SPC-54PHS Instrucciones DE Funcionamiento, Domo Y Emisor, Preparación Para EL Funcionamiento, Inicio

SPC-54PHB, SPC-54PHT, SPC-54PHS specifications

Desa SPC-54PHS, SPC-54PHB, and SPC-54PHT are advanced heating solutions that exemplify modern technology and design, catering to diverse residential and commercial needs. These models seamlessly combine style, functionality, and energy efficiency, making them popular choices for users seeking reliable heating options.

The SPC-54PHS variant is designed with a sleek and contemporary aesthetic, perfect for modern interiors. It features a powerful heating capacity that ensures warm environments even in the coldest climates. The unit is equipped with an intuitive digital thermostat, allowing precise temperature control and improved energy efficiency. Users can easily set their desired temperature and let the automatic system maintain it, reducing energy wastage and ensuring comfort.

The SPC-54PHB model takes functionality further with smart technology integration. This version is compatible with home automation systems, enabling users to control their heating remotely via smartphone applications. This feature not only adds convenience but also enhances energy savings by allowing homeowners to adjust settings based on their schedules. Additionally, the SPC-54PHB incorporates safety features such as automatic shut-off capabilities and child locks, prioritizing peace of mind for families.

Meanwhile, the SPC-54PHT model stands out for its innovative heating technology. It utilizes advanced ceramic heating elements that provide faster and more efficient heat distribution. This technology ensures that rooms warm up quickly, reducing the time and energy required to maintain comfortable temperatures. The unit is designed to operate quietly, making it an ideal choice for bedrooms or shared living spaces.

All three models are built with durability in mind, featuring high-quality materials that withstand the rigors of daily use. They are designed for easy maintenance, with accessible filters and components that simplify cleaning and upkeep.

With a range of features including adjustable heating levels, energy-efficient operation, and smart technology integration, Desa SPC-54PHS, SPC-54PHB, and SPC-54PHT represent the forefront of heating solutions. Suitable for various settings, they ensure warmth while providing users with the flexibility and efficiency necessary for modern living. Whether seeking a stylish unit or a technologically advanced heater, these models meet a wide array of residential heating needs.