OWNER’S MANUAL

INSTALLATION

Continued

Attaching Mounting Bracket To Wall

Note: Wall anchors, mounting screws, and spacers are in hardware package. The hard- ware package is provided with heater.

Attaching To Wall Stud Method

For attaching mounting bracket to wall studs

1.Drill holes at marked locations using 9/64" drill bit.

2.Place mounting bracket onto wall. Line up last hole on each end of bracket with holes drilled in wall.

3.Insert mounting screws through bracket and into wall studs.

4.Tighten screws until mounting bracket is firmly fastened to wall studs.

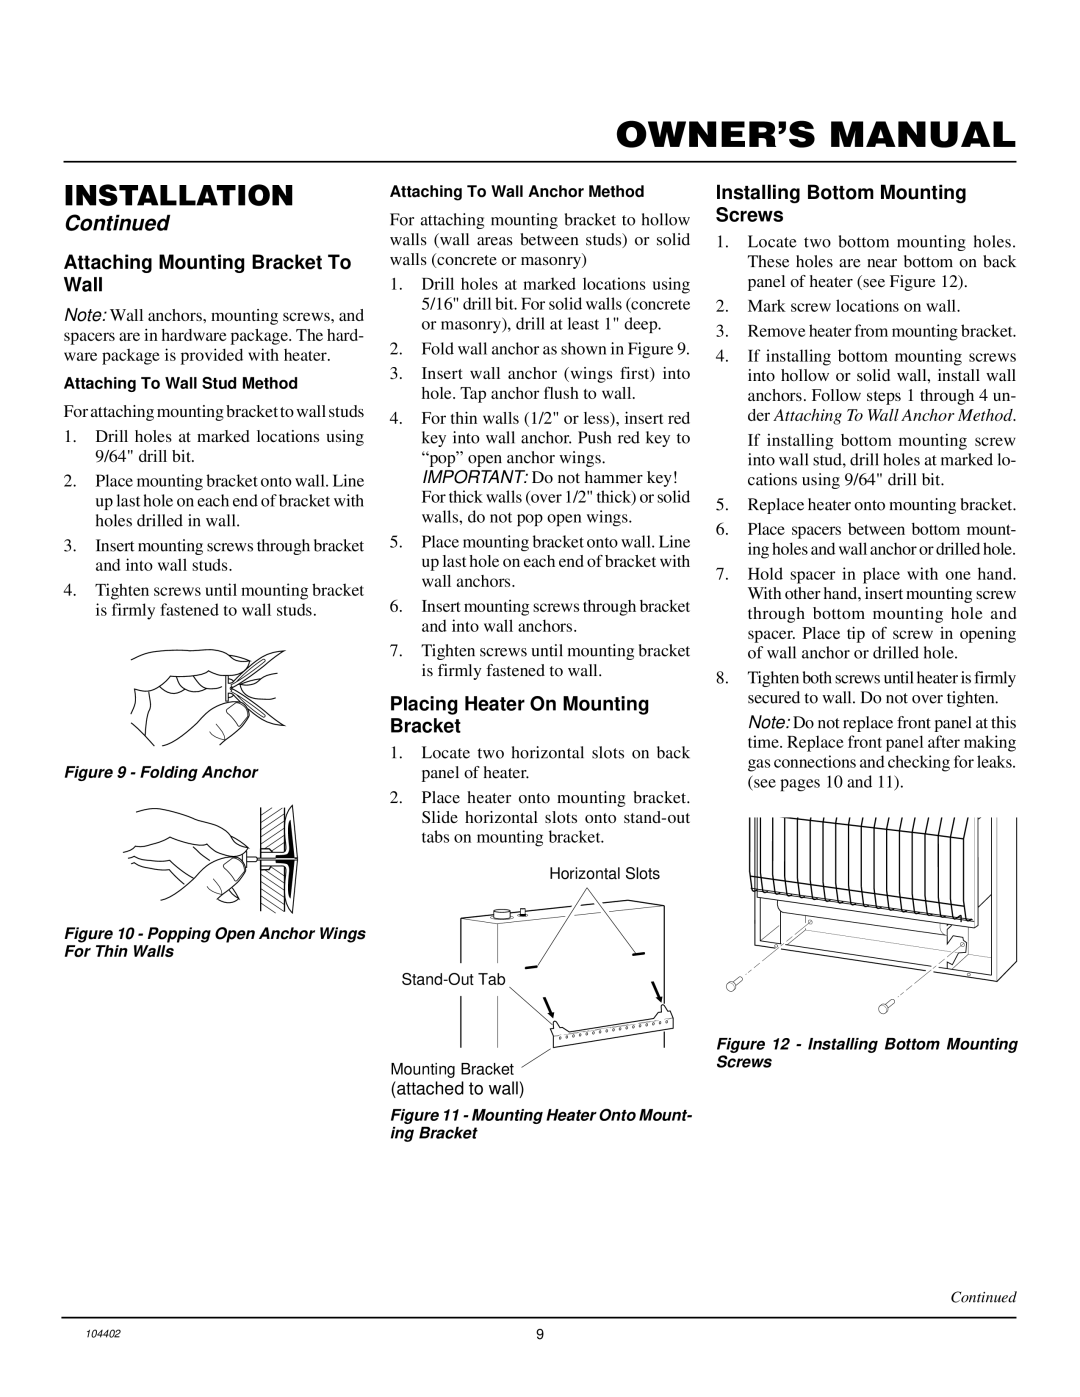
Figure 9 - Folding Anchor

Figure 10 - Popping Open Anchor Wings For Thin Walls

Attaching To Wall Anchor Method

For attaching mounting bracket to hollow walls (wall areas between studs) or solid walls (concrete or masonry)

1.Drill holes at marked locations using 5/16" drill bit. For solid walls (concrete or masonry), drill at least 1" deep.

2.Fold wall anchor as shown in Figure 9.

3.Insert wall anchor (wings first) into hole. Tap anchor flush to wall.

4.For thin walls (1/2" or less), insert red key into wall anchor. Push red key to “pop” open anchor wings.

IMPORTANT: Do not hammer key! For thick walls (over 1/2" thick) or solid walls, do not pop open wings.

5.Place mounting bracket onto wall. Line up last hole on each end of bracket with wall anchors.

6.Insert mounting screws through bracket and into wall anchors.

7.Tighten screws until mounting bracket is firmly fastened to wall.

Placing Heater On Mounting Bracket

1.Locate two horizontal slots on back panel of heater.

2.Place heater onto mounting bracket. Slide horizontal slots onto stand-out tabs on mounting bracket.

Horizontal Slots

Stand-Out Tab

Installing Bottom Mounting Screws

1.Locate two bottom mounting holes. These holes are near bottom on back panel of heater (see Figure 12).

2.Mark screw locations on wall.

3.Remove heater from mounting bracket.

4.If installing bottom mounting screws into hollow or solid wall, install wall anchors. Follow steps 1 through 4 un- der Attaching To Wall Anchor Method.

If installing bottom mounting screw into wall stud, drill holes at marked lo- cations using 9/64" drill bit.

5.Replace heater onto mounting bracket.

6.Place spacers between bottom mount- ing holes and wall anchor or drilled hole.

7.Hold spacer in place with one hand. With other hand, insert mounting screw through bottom mounting hole and spacer. Place tip of screw in opening of wall anchor or drilled hole.

8.Tighten both screws until heater is firmly secured to wall. Do not over tighten.

Note: Do not replace front panel at this time. Replace front panel after making gas connections and checking for leaks. (see pages 10 and 11).

Mounting Bracket

(attached to wall)

Figure 11 - Mounting Heater Onto Mount- ing Bracket

Figure 12 - Installing Bottom Mounting Screws

Continued

104402

9

Page 9
Image 9
Desa VN2000BTD Attaching Mounting Bracket To Wall, Placing Heater On Mounting Bracket, Installing Bottom Mounting Screws

VN2000BTD, VN2800BTD specifications

The Desa VN2800BTD and VN2000BTD are two advanced space heaters that represent the pinnacle of technology and design in the heating industry. Both models are engineered for efficiency, ensuring warmth and comfort in various settings, from homes to workshops.

One of the primary features of the VN2800BTD and VN2000BTD is their versatility in application. They are ideal for supplemental heating, capable of warming up rooms quickly and effectively with an easy-to-use design. The VN2800BTD boasts an output of 28,000 BTUs, while the VN2000BTD offers a slightly lower but still robust output of 20,000 BTUs. This makes them suitable for a diverse range of spaces and heating needs.

A key characteristic of these models is their advanced technology, which includes a forced air heating mechanism. This system allows heated air to circulate rapidly throughout the room, providing even warmth without the cold spots often found in traditional heaters. Both units are fueled by propane, making them highly efficient and eco-friendly compared to electric options.

Safety is another significant aspect of the Desa VN2800BTD and VN2000BTD. These models are equipped with automatic shut-off features that activate in case of a malfunction or if the heater tips over. Additionally, they have built-in oxygen depletion sensors that monitor air quality, ensuring safe operation in enclosed spaces. This focus on user safety reflects Desa's commitment to providing reliable heating solutions.

The design of the VN2800BTD and VN2000BTD is pragmatic and attractive, allowing them to blend seamlessly into any environment. They come with a durable construction that ensures longevity, even under demanding conditions. Portability is another benefit; both models often feature handles or wheels that make it easy to transport them from one area to another, enhancing their utility.

Easy ignition systems are another highlight, with many units incorporating a piezo ignition feature that allows for quick and reliable starts. This user-friendly approach minimizes the hassle often associated with traditional heating methods.

In summary, the Desa VN2800BTD and VN2000BTD heaters are exemplary products that combine powerful heating capabilities with safety and user convenience. Their advanced technology and thoughtful features make them an outstanding choice for anyone looking to enhance their comfort through effective space heating solutions.