Operating Heater

FOR YOUR SAFETY

READ BEFORE LIGHTING

WARNING: If you do not fol- low these instructions exactly, a fire or explosion may result causing property damage, per- sonal injury or loss of life.

A.This appliance has a pilot which must be lighted by hand. When lighting the pilot, follow these instructions exactly.

B.BEFORE LIGHTING smell all around the appliance area for gas. Be sure to smell next to the floor because some gas is heavier than air and will settle on the floor.

WHAT TO DO IF YOU SMELL GAS

Do not try to light any appliance.

Do not touch any electric switch; do not use any phone in your building.

Immediately call your gas supplier from a neighbor’s phone. Follow the gas supplier’s instructions.

If you cannot reach your gas supplier, call the fire department.

C.Use only your hand to push in or turn the gas control knob. Never use tools. If the knob will not push in or turn by hand, don’t try to repair it, call a qualified service technician. Force or attempted repair may result in a fire or explosion.

D.Do not use this appliance if any part has been under water. Immediately call a qualified service technician to inspect the appliance and to replace any part of the control system and any gas control which has been under water.

LIGHTING

INSTRUCTIONS

1.STOP! Read the safety information beginning on page 13.

2.Make sure equipment shutoff valve is fully open.

3.Turn off any electric power to the appliance if service is to be performed.

4.Turn control knob clockwise to the OFF position.

5.Wait five minutes to clear out any gas. Then smell for gas, including near the floor. If you smell gas, STOP! Follow “B” in the safety information beginning on page 13. If you don’t smell gas, go to the next step.

6.Turn control knob counterclockwise to the PILOT position. Press in control knob for five (5) seconds.

7.With control knob pressed in, push down and release ignitor button. This will light pilot. The pilot is attached to the front of burner. Note: You may be running this heater for the first time after hooking up to gas supply. If so, you may need to press in control knob for 30 seconds or more. This will allow air to bleed from the gas system. If needed, keep press- ing ignitor button until pilot lights. If ignitor does not light pilot, refer to Troubleshooting, page 17 or contact a qualified service person or gas supplier for repairs. Until repairs are made, light pilot with match. To light pilot with match, see Manual Lighting Procedure, page 15.

8.Keep control knob pressed in for 30 seconds after lighting pilot. After 30 seconds, release control knob.

If control knob does not pop up when re- leased, contact a qualified service person or gas supplier for repairs.

Note: If pilot goes out, repeat steps 4 thru 7. Thermostat models have a safety interlock system. Wait one (1) minute before lighting pilot again.

9.Turn control knob counterclockwise to desired heating level. The main burner should light.

CAUTION: Do not try to ad- just heating levels by using the equipment shutoff valve.

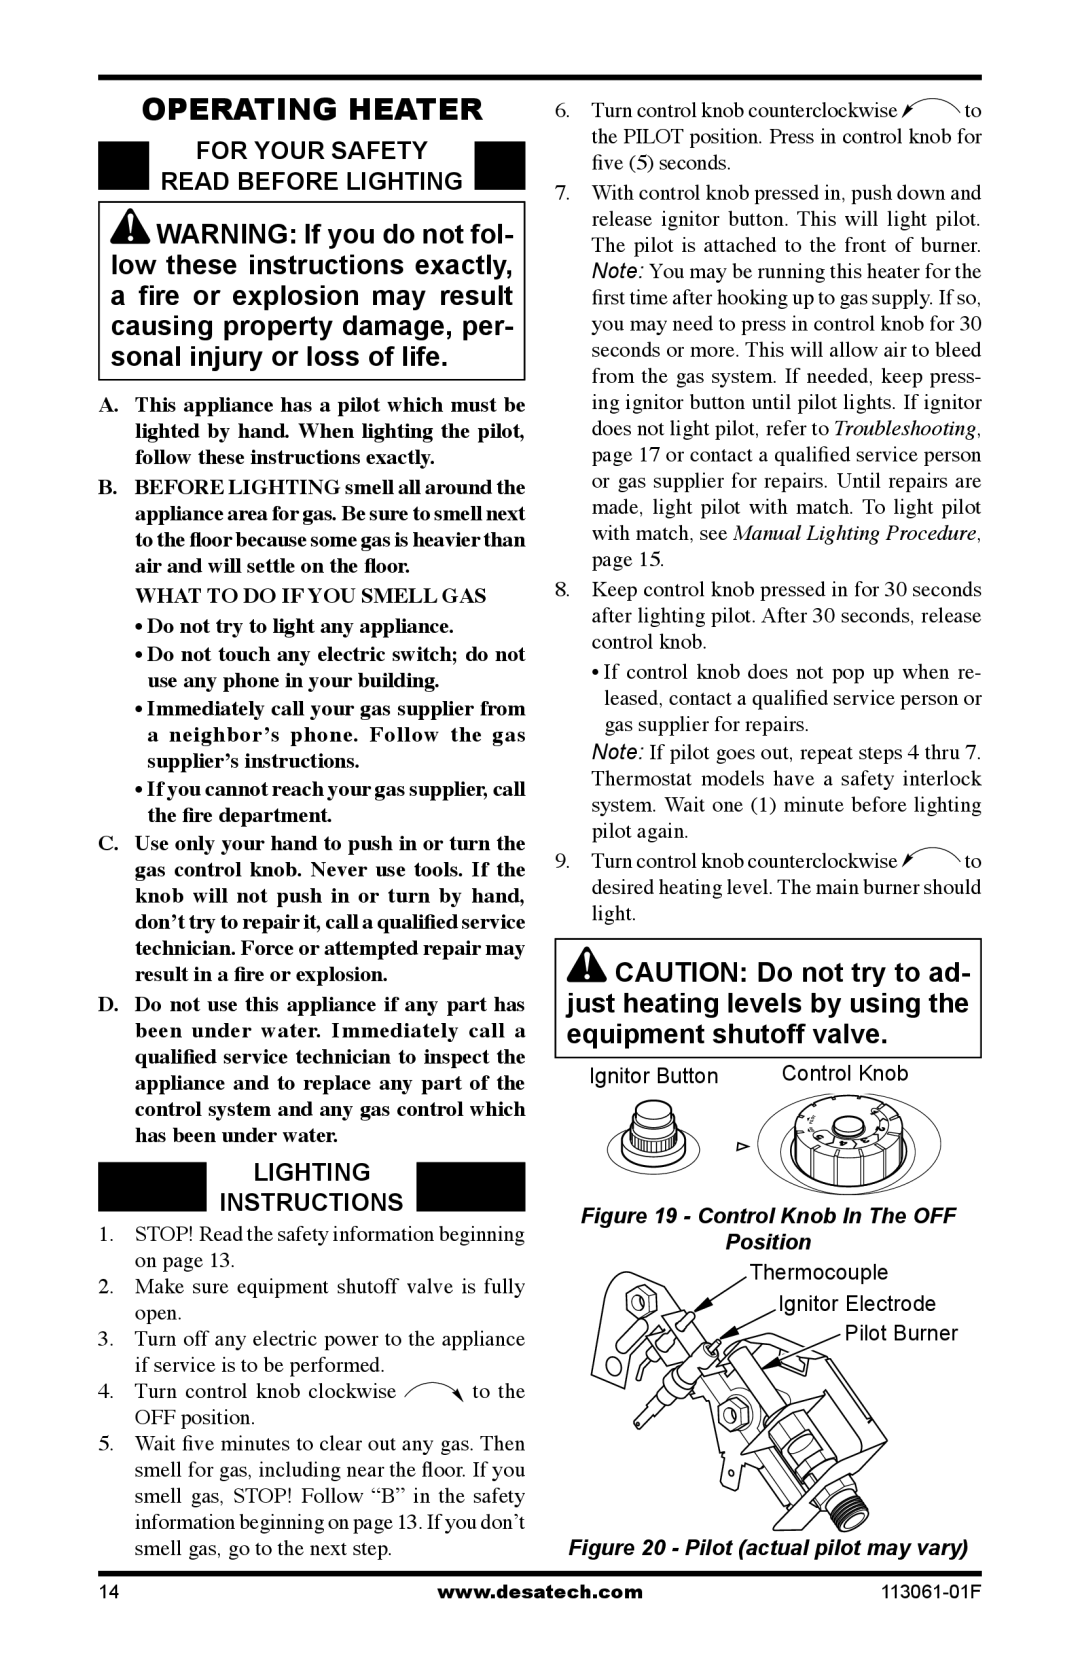
Ignitor Button

Control Knob


F


F


O

Figure 19 - Control Knob In The OFF

Position

Thermocouple

Ignitor Electrode

Pilot Burner

Figure 20 - Pilot (actual pilot may vary)

14

www.desatech.com

113061-01F

Page 14
Image 14
Desa VP20BTA Operating Heater, For Your Safety Read Before Lighting, Lighting Instructions, Ignitor Button Control Knob

VN20BTA, VN30BTA, VP20BTA, VP30BTA specifications

Desa VN30BTA, VP20BTA, VP30BTA, and VN20BTA are four advanced models from Desa that cater to diverse heating needs, incorporating innovative technologies and features aimed at enhancing performance and user experience.

The VN30BTA is renowned for its robust output and efficient heating capabilities. It features high thermal efficiency, enabling homeowners to enjoy optimal heat without excessive energy consumption. This model is equipped with advanced safety mechanisms, including automatic shut-off systems, ensuring user safety and peace of mind. Additionally, it has a stylish design that fits well in various home aesthetics.

Moving to the VP20BTA, this model is specifically designed for versatility and is capable of heating medium to large spaces efficiently. The VP20BTA has a user-friendly control interface, allowing for easy adjustments to temperature settings. Its compact form factor makes it ideal for those who have limited space but still desire a powerful heating solution. Furthermore, it leverages smart thermostat technology to maintain consistent temperatures while optimizing energy consumption.

The VP30BTA offers the highest heating output among this line, making it suitable for larger homes and commercial applications. This model incorporates cutting-edge infrared technology, which promotes even heat distribution. It also features a durable construction that ensures longevity and stability during operation. The VP30BTA is praised for its low emissions and eco-friendly design, appealing to environmentally conscious consumers.

Lastly, the VN20BTA serves as an entry-level option that combines affordability with reliability. Despite being the most budget-friendly model, it still maintains high standards of safety and efficiency. The VN20BTA is easy to install and operate, making it an excellent choice for those new to heating solutions. Its lightweight design and portability provide flexibility in usage, allowing users to move the unit as needed.

All these models showcase Desa's commitment to innovation, safety, and efficiency, making them solid choices for any heating requirement. Their features, from advanced safety systems to eco-friendly designs, reflect a comprehensive approach to modern heating solutions that meet the demands of various consumers. Whether for residential or commercial use, Desa's VN30BTA, VP20BTA, VP30BTA, and VN20BTA models stand out as reliable and effective heating options.