English
ASSEMBLY
Work Stop/Support
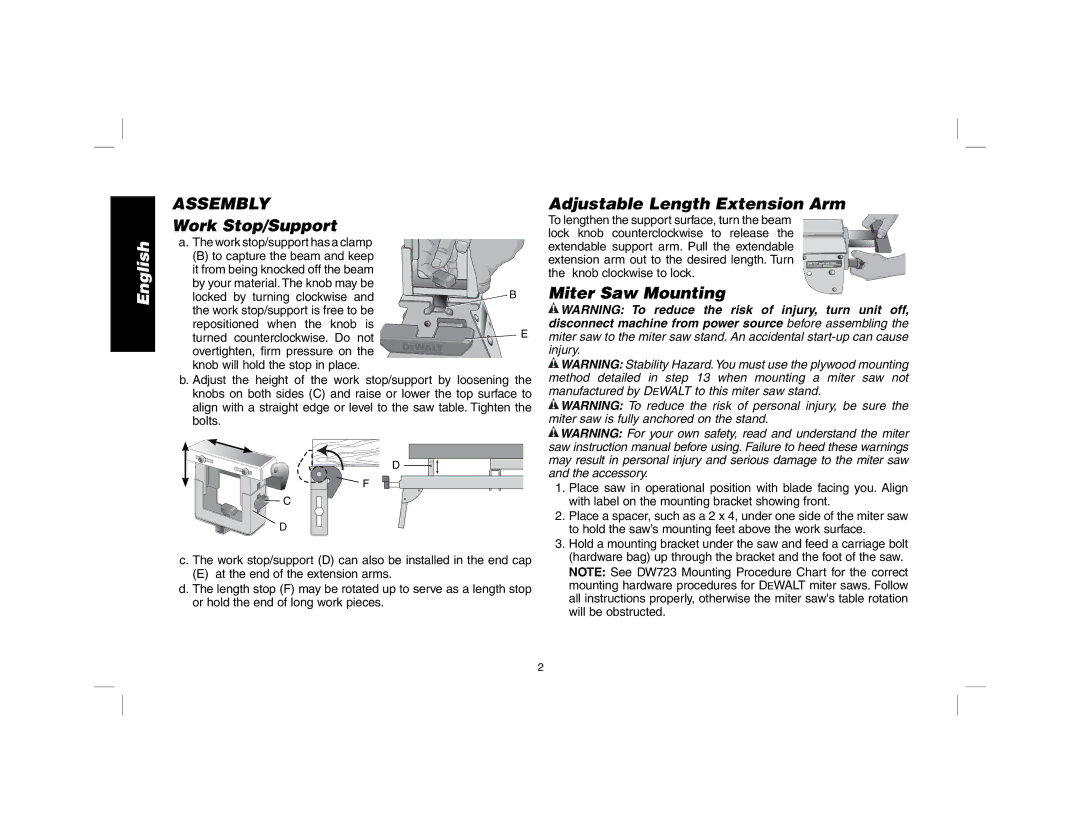
a. The work stop/support has a clamp |
|
(B) to capture the beam and keep |
|
it from being knocked off the beam |
|
by your material. The knob may be | B |
locked by turning clockwise and | |
the work stop/support is free to be |
|
repositioned when the knob is | E |
turned counterclockwise. Do not |
overtighten, firm pressure on the knob will hold the stop in place.
b. Adjust the height of the work stop/support by loosening the knobs on both sides (C) and raise or lower the top surface to align with a straight edge or level to the saw table. Tighten the bolts.
D
![]() F
F
![]() C
C
D
c. The work stop/support (D) can also be installed in the end cap
(E)at the end of the extension arms.
d.The length stop (F) may be rotated up to serve as a length stop or hold the end of long work pieces.
Adjustable Length Extension Arm
To lengthen the support surface, turn the beam![]()
![]()
![]() lock knob counterclockwise to release the
lock knob counterclockwise to release the ![]()
![]()
![]() extendable support arm. Pull the extendable
extendable support arm. Pull the extendable ![]()
![]()
![]() extension arm out to the desired length. Turn
extension arm out to the desired length. Turn ![]()
![]()
![]()
![]()
![]()
![]()
![]()
![]()
![]()
![]()
![]()
![]()
![]()
![]()
![]()
![]()
![]()
![]() the knob clockwise to lock.
the knob clockwise to lock.![]()
![]()
![]()
![]()
Miter Saw Mounting
![]() WARNING: To reduce the risk of injury, turn unit off, disconnect machine from power source before assembling the miter saw to the miter saw stand. An accidental
WARNING: To reduce the risk of injury, turn unit off, disconnect machine from power source before assembling the miter saw to the miter saw stand. An accidental
![]() WARNING: Stability Hazard.You must use the plywood mounting method detailed in step 13 when mounting a miter saw not manufactured by DEWALT to this miter saw stand.
WARNING: Stability Hazard.You must use the plywood mounting method detailed in step 13 when mounting a miter saw not manufactured by DEWALT to this miter saw stand.
![]() WARNING: To reduce the risk of personal injury, be sure the miter saw is fully anchored on the stand.
WARNING: To reduce the risk of personal injury, be sure the miter saw is fully anchored on the stand.
![]() WARNING: For your own safety, read and understand the miter saw instruction manual before using. Failure to heed these warnings may result in personal injury and serious damage to the miter saw and the accessory.
WARNING: For your own safety, read and understand the miter saw instruction manual before using. Failure to heed these warnings may result in personal injury and serious damage to the miter saw and the accessory.
1.Place saw in operational position with blade facing you. Align with label on the mounting bracket showing front.
2.Place a spacer, such as a 2 x 4, under one side of the miter saw to hold the saw’s mounting feet above the work surface.
3.Hold a mounting bracket under the saw and feed a carriage bolt (hardware bag) up through the bracket and the foot of the saw. NOTE: See DW723 Mounting Procedure Chart for the correct mounting hardware procedures for DEWALT miter saws. Follow all instructions properly, otherwise the miter saw's table rotation will be obstructed.
2