English

On-Off Switch (Fig. 29)

WARNING: To reduce the risk of injury, be sure the switch is in the OFF position before plugging machine in.

Push green button (H) in to turn this saw on and push down the red paddle to turn this saw off.

LOCK OFF FEATURE INSTRUCTIONS

A cover above the switch folds down for insertion of a padlock to lock the saw off. A padlock with a maximum diameter of 1/4" (6.35 mm) and minimum clearance of 3" (76.2 mm) is recommended.

FIG. 29

H

FIG. 31

FIG. 32

Guard Operating Feature (Fig. 30)

WARNING: To reduce the risk of injury, turn unit off and disconnect machine from power source before installing and removing accessories, before adjusting or changing set- ups or when making repairs. An accidental start-up can cause injury.

1.The guard(s) will lock in place when in the raised position.

2.This feature increases visability when measuring the blade to fence distance.

3.Push down on guard(s) and they will release to the operating position. NOTE: Pull on the anti-kickback assembly to ensure it is locked in place.

ALWAYS make sure both guards are in the down position in contact with the table before operating.

FIG. 30

OPERATING

RAISED

POSITION

POSITION

Rip Fence Operation (Fig. 31, 32)

RAIL LOCK LEVER (FIG. 31)

The rail lock lever (E) locks the fence in place preventing movement during cutting. To lock the rail lever, push it down and toward the rear of the saw. To unlock, pull it up and toward the front of the saw.

NOTE: When ripping, always lock the rail lock lever.

WORK SUPPORT EXTENSION/NARROW RIPPING FENCE

The table saw is equipped with a narrow ripping fence that also supports work that extends beyond the saw table.

To use the narrow ripping fence in the work support position, rotate it from its stored position as shown in Figure 32, and slide the pins into the lower sets of slots on both ends of the fence. To use the narrow ripping fence in the narrow ripping position, snap the pins into the upper sets of slots on both ends of the fence.

This feature will allow 2" (51 mm) of extra clearance to the blade. If more clearance is necessary, follow directions for making an auxiliary fence under Narrow Rip Auxiliary Fence in the Operation section.

NOTE: When not in use, the narrow ripping fence should be placed in its stored position.

E

D

NOTE: This fence will allow the guard to remain on the saw when completing narrow ripping. This fence will provide ample space for a push stick. If you prefer more clearance for push blocks or push sticks, refer to Narrow Rip Auxiliary Fence.

FINE ADJUSTMENT KNOB (FIG. 31)

The fine adjustment knob (D) allows smaller adjustments when setting the fence. Before adjusting, be sure the rail lock lever is in its up or unlocked position.

RIP SCALE POINTER

The rip scale pointer will need to be adjusted for proper performance of the rip fence if the user switches between thick and thin kerf blades. The rip scale pointer only reads correctly for position 1 (0 to 24.5"), however for position 1 with narrow rip fence in use add 2" (50 mm). See Adjusting the Rip Scale under Assembly.

Ripping (Fig. 33)

WARNING: Never touch the “free end” of the workpiece or a “free piece” that is cut off, while the power is ON and/or the saw blade is rotating. Piece may contact the blade resulting in a thrown workpiece and possible injury.

WARNING: A rip fence should ALWAYS be used for ripping operations to prevent loss of control and personal injury. NEVER perform a ripping operation freehand. ALWAYS lock the fence to the rail.

WARNING: When bevel ripping and whenever possible, place the fence on the side of the blade so that the blade is tilted away from the fence and hands.

WARNING: Keep hands clear of the blade.

WARNING: Use a push stick to feed the workpiece if there is 2–6" (51–152 mm) between the fence and the blade. Use a narrow ripping fence feature and push block to feed the workpiece if there is 2" (51 mm) or narrower between the fence and the blade.

1.Lock the rip fence by pressing the rail lock lever down. Remove the miter gauge.

2.Raise the blade so it is about 1/8" (3.2 mm) higher than the top of the workpiece.

3.Hold the workpiece flat on the table and against the fence. Keep the workpiece about 1" (25.4 mm) away from the blade.

10

Page 12
Image 12
DeWalt DWE7490X instruction manual On-Off Switch Fig, Guard Operating Feature Fig, Rip Fence Operation, Ripping Fig

DWE7490X specifications

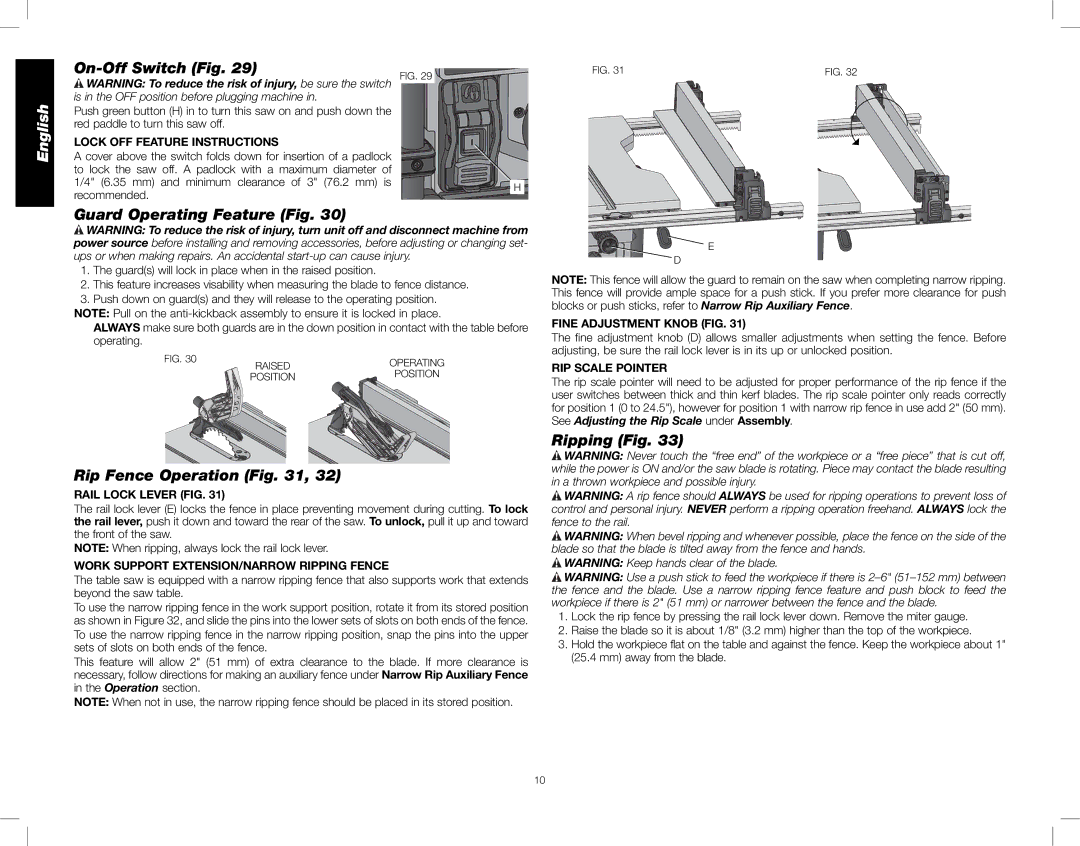
The DeWalt DWE7490X is a powerful and versatile job site table saw, designed for professionals and serious DIY enthusiasts alike. This table saw combines high performance with a range of features and technologies that make it an essential tool for a variety of woodworking projects.

At the heart of the DWE7490X is its robust 15-amp motor, which delivers an impressive 4800 RPM. This level of power ensures that users can easily cut through hardwoods and other dense materials without bogging the saw down. The saw's 10-inch blade provides optimal cutting capacity, making it efficient for a wide range of applications. One of its standout features is the rack and pinion fence system, which ensures accurate, smooth adjustments. The fence can be easily adjusted to various widths, allowing for precise cuts and increased productivity.

Another key characteristic of the DWE7490X is its patented portable design. The saw features a foldable stand that allows for easy setup and transport. Weighing just 90 pounds, it is lightweight enough for most users to move around construction sites without hassle. This portability is complemented by its onboard storage, which securely holds accessories such as the push stick, rip fence, and miter gauge when not in use.

In terms of safety, the DWE7490X is equipped with a blade guard and anti-kickback pawls, which help protect users by preventing unexpected accidents during operation. Additionally, the saw's large on/off switch is designed for easy operation, even with gloves on.

The DWE7490X also includes a versatile dust collection system that connects to a shop vacuum for improved cleanup. This helps maintain a cleaner work environment and enhances visibility while cutting.

With a cutting depth of 3-1/8 inches at 90 degrees and 2-1/4 inches at 45 degrees, users can count on the DWE7490X to handle a wide variety of woodworking tasks with ease. The combination of power, portability, and precision makes the DeWalt DWE7490X an outstanding tool for anyone serious about their woodworking projects. Whether tackling large sheets of plywood or intricate cuts in hard materials, this table saw is designed to perform.