11


.réassemblage le terminer pour moteur

.saleté de


.d’anneau


forme en joint le glisser et

à

brosse électrique/la l’accessoire de l’extrémité

à

bouchon le enlever et inférieur

moteur à brosse électrique/la

située rainure la dans d’anneau forme en joint le

compartiment le pivoter Faire

l’accessoire

Retourner

Insérer

.refermer


UD FORME EN JOINT

le

pour

inférieur


compartiment

le


pivoter Faire .insérées


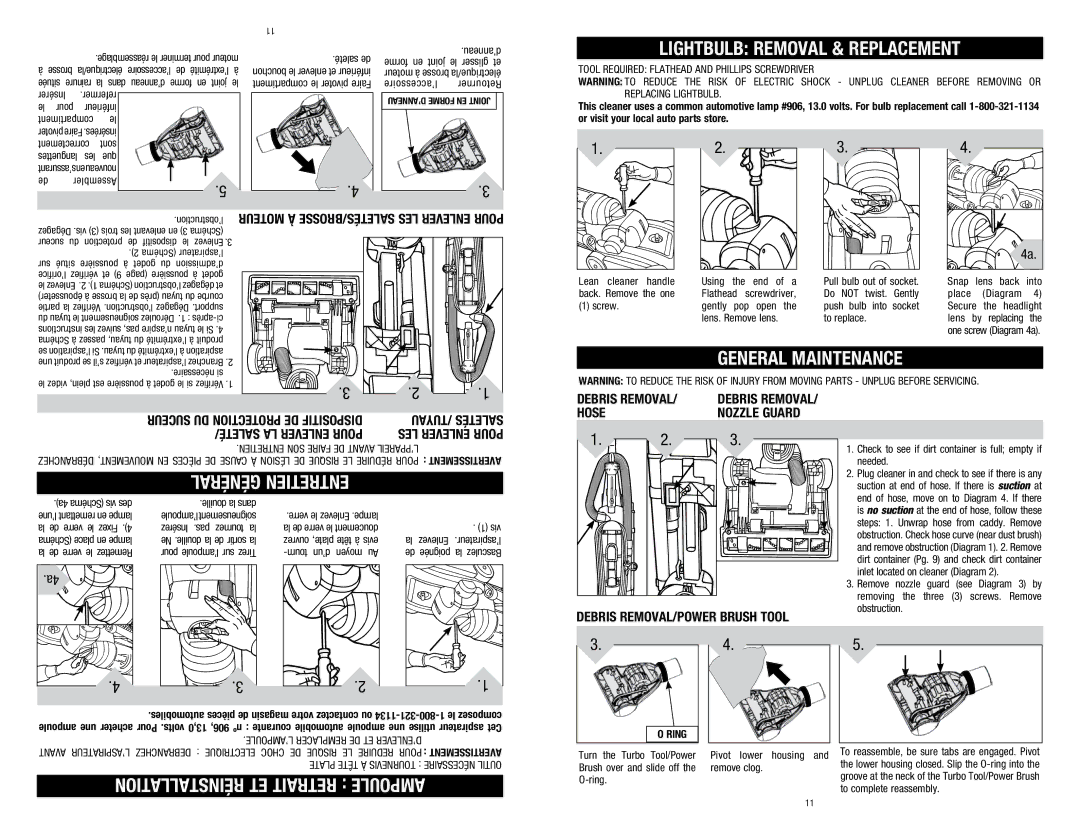
LIGHTBULB: REMOVAL & REPLACEMENT

TOOL REQUIRED: FLATHEAD AND PHILLIPS SCREWDRIVER

WARNING: TO REDUCE THE RISK OF ELECTRIC SHOCK - UNPLUG CLEANER BEFORE REMOVING OR REPLACING LIGHTBULB.

This cleaner uses a common automotive lamp #906, 13.0 volts. For bulb replacement call 1-800-321-1134 or visit your local auto parts store.

correctement

sont


languettes les

que


s’assurantennouveau


de

Assembler

.5

.4

.3


.l’obstruction

MOTEUR À SALETÉS/BROSSE LES ENLEVER POUR

Dégagez .vis (3) trois les enlevant en 3) (Schéma


suceur

du protection

de dispositif le Enlevez .3


.2) (Schéma l’aspirateur


sur situé poussière

à godet du d’admission


l’orifice vérifiez et 9) (page poussière à godet


le Enlevez .2 .1) (Schéma l’obstruction dégagez et


épousseter) à brosse la de (près tuyau du courbe


partie la Vérifiez .l’obstruction Dégagez .support


du tuyau le soigneusement Déroulez .1 : après-ci


instructions les suivez pas, n’aspire tuyau le Si .4


Schéma à passez tuyau, du l’extrémité à produit


1.

Lean cleaner handle back. Remove the one

(1) screw.

2.

Using the end of a Flathead screwdriver, gently pop open the lens. Remove lens.

3.

Pull bulb out of socket. Do NOT twist. Gently push bulb into socket to replace.

4.

4a.

Snap lens back into place (Diagram 4) Secure the headlight lens by replacing the one screw (Diagram 4a).

se l’aspiration Si .tuyau du l’extrémité à aspiration


une produit se s’il vérifiez et l’aspirateur Branchez .2


.nécessaire si


le videz plein, est poussière à godet le si Vérifiez .1

.3

.2

.1


SUCEUR DU PROTECTION DE DISPOSITIF

/TUYAU SALETÉS

SALETÉ/ LA ENLEVER POUR

LES ENLEVER POUR

.ENTRETIEN SONL’PPAREILFAIRE

DE AVANT 

DÉBRANCHEZ MOUVEMENT, EN PIÈCES DE CAUSE À LÉSION DE RISQUE LE RÉDUIRE POUR

: AVERTISSEMENT

GÉNÉRAL ENTRETIEN

GENERAL MAINTENANCE

WARNING: TO REDUCE THE RISK OF INJURY FROM MOVING PARTS - UNPLUG BEFORE SERVICING.

DEBRIS REMOVAL/

DEBRIS REMOVAL/

HOSE


NOZZLE GUARD

1.

2.

3.

1.

Check to see if dirt container is full; empty if


needed.

2.

Plug cleaner in and check to see if there is any


suction at end of hose. If there is suction at


end of hose, move on to Diagram 4. If there

.4a) (Schéma vis des l’une remettant en lampe la de verre le Fixez .4) (Schéma place en lampe la de verre le Remettez

.4a

.douille la dans l’ampoulesoigneusement Insérez .pas tournez la Ne .douille la de sortir la pour l’ampoule sur Tirez

.verre le Enlevez .lampe la de verre le doucement ouvrez plate, tête à evis tourn d’un moyen Au


. (1) vis

la

Enlevez

.l’aspirateur

de

poignée

la -Basculez

DEBRIS REMOVAL/POWER BRUSH TOOL

is no suction at the end of hose, follow these

steps: 1. Unwrap hose from caddy. Remove

obstruction. Check hose curve (near dust brush)

and remove obstruction (Diagram 1). 2. Remove

dirt container (Pg. 9) and check dirt container

inlet located on cleaner (Diagram 2).

3. Remove nozzle guard (see Diagram 3) by

removing the three (3) screws. Remove

obstruction.

.4

.2

.1

3.

4.5.

.automobiles pièces de magasin votre contactez ou 1134-321-800-1 le composez ampoule une acheter Pour .volts 13,0 906, nº : courante automobile ampoule une utilise aspirateur Cet .L’AMPOULE REMPLACER DE ET D’ENLEVER AVANT L’ASPIRATEUR DEBRANCHEZ : ELECTRIQUE CHOC DE RISQUE LE REDUIRE POUR : AVERTISSEMENT PLATE TÊTE À TOURNEVIS : NÉCESSAIRE OUTIL

RÉINSTALLATION ET RETRAIT : AMPOULE

O RING

Turn the Turbo Tool/Power

Brush over and slide off the

O-ring.

Pivot lower housing and

To reassemble, be sure tabs are engaged. Pivot

the lower housing closed. Slip the O-ring into the

remove clog.

groove at the neck of the Turbo Tool/Power Brush


to complete reassembly.

11

Page 11
Image 11
Dirt Devil 1-113225-000, M140005RED owner manual Lightbulb Removal & Replacement, Général Entretien GENERAL MAINTENANCE

M140005RED, 1-113225-000 specifications

The Dirt Devil 1-113225-000, M140005RED is a versatile and efficient vacuum cleaner designed to tackle a variety of cleaning tasks with ease. Known for its powerful suction and user-friendly features, this model is particularly well-suited for homeowners looking for effective performance without the hassle of complicated setups.

One of the standout features of the Dirt Devil M140005RED is its compact and lightweight design. Weighing in at just a few pounds, it is easy to maneuver around the house, whether you're cleaning carpets, hardwood floors, or upholstery. This makes it particularly appealing for quick clean-ups and for those who may find traditional vacuums cumbersome to use.

The vacuum is equipped with a robust, efficient motor that ensures powerful suction, allowing it to capture dirt, dust, and pet hair effortlessly. The advanced filtration system included in the Dirt Devil 1-113225-000 improves indoor air quality by trapping allergens and fine particles, making it a smart choice for allergy sufferers. This feature not only enhances cleaning performance but also contributes to a healthier home environment.

Another significant characteristic of this model is its multi-surface cleaning capability. It comes with a variety of attachments, including a crevice tool for tight spaces and an upholstery brush for furniture, enabling users to switch between different surfaces seamlessly. This versatility is complemented by its easy-to-empty dirt container, which simplifies the disposal of collected debris.

Durability and build quality are also essential aspects of the Dirt Devil M140005RED. Constructed with high-quality materials, this vacuum is designed to withstand regular use while maintaining its effectiveness over time. The vacuum’s user-friendly design includes intuitive controls, ensuring that even those less familiar with technology can operate it with confidence.

In summary, the Dirt Devil 1-113225-000, M140005RED blends powerful suction, lightweight portability, effective filtration, and multi-surface cleaning capabilities into a compact vacuum cleaner perfect for any household. Its blend of efficiency, ease of use, and performance makes it a worthy contender in the realm of home cleaning solutions, ensuring cleaner spaces with minimal effort.