3

Hole for drain water hose

FIG. 6

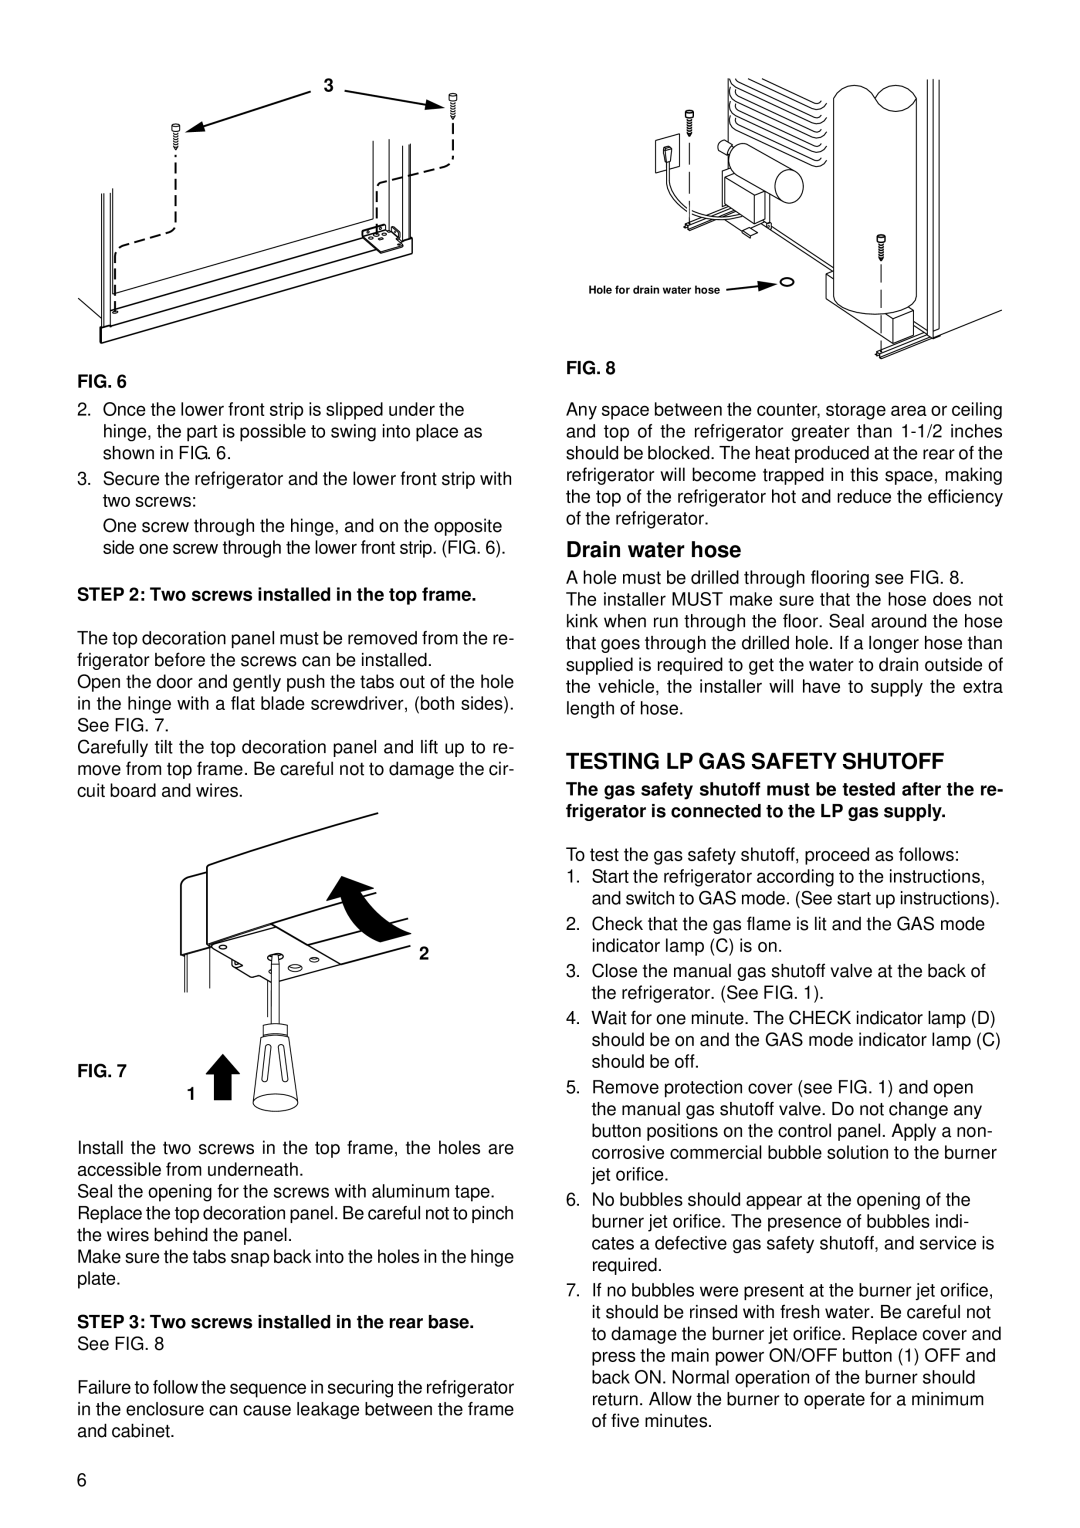
2.Once the lower front strip is slipped under the hinge, the part is possible to swing into place as shown in FIG. 6.

3.Secure the refrigerator and the lower front strip with two screws:

One screw through the hinge, and on the opposite side one screw through the lower front strip. (FIG. 6).

STEP 2: Two screws installed in the top frame.

The top decoration panel must be removed from the re- frigerator before the screws can be installed.

Open the door and gently push the tabs out of the hole in the hinge with a flat blade screwdriver, (both sides). See FIG. 7.

Carefully tilt the top decoration panel and lift up to re- move from top frame. Be careful not to damage the cir- cuit board and wires.

2

FIG. 7

1

Install the two screws in the top frame, the holes are accessible from underneath.

Seal the opening for the screws with aluminum tape. Replace the top decoration panel. Be careful not to pinch the wires behind the panel.

Make sure the tabs snap back into the holes in the hinge plate.

STEP 3: Two screws installed in the rear base. See FIG. 8

Failure to follow the sequence in securing the refrigerator in the enclosure can cause leakage between the frame and cabinet.

FIG. 8

Any space between the counter, storage area or ceiling and top of the refrigerator greater than 1-1/2 inches should be blocked. The heat produced at the rear of the refrigerator will become trapped in this space, making the top of the refrigerator hot and reduce the efficiency of the refrigerator.

Drain water hose

A hole must be drilled through flooring see FIG. 8. The installer MUST make sure that the hose does not kink when run through the floor. Seal around the hose that goes through the drilled hole. If a longer hose than supplied is required to get the water to drain outside of the vehicle, the installer will have to supply the extra length of hose.

TESTING LP GAS SAFETY SHUTOFF

The gas safety shutoff must be tested after the re- frigerator is connected to the LP gas supply.

To test the gas safety shutoff, proceed as follows:

1.Start the refrigerator according to the instructions, and switch to GAS mode. (See start up instructions).

2.Check that the gas flame is lit and the GAS mode indicator lamp (C) is on.

3.Close the manual gas shutoff valve at the back of the refrigerator. (See FIG. 1).

4.Wait for one minute. The CHECK indicator lamp (D) should be on and the GAS mode indicator lamp (C) should be off.

5.Remove protection cover (see FIG. 1) and open the manual gas shutoff valve. Do not change any button positions on the control panel. Apply a non- corrosive commercial bubble solution to the burner jet orifice.

6.No bubbles should appear at the opening of the burner jet orifice. The presence of bubbles indi- cates a defective gas safety shutoff, and service is required.

7.If no bubbles were present at the burner jet orifice, it should be rinsed with fresh water. Be careful not to damage the burner jet orifice. Replace cover and press the main power ON/OFF button (1) OFF and back ON. Normal operation of the burner should return. Allow the burner to operate for a minimum of five minutes.

6

Page 6
Image 6
Dometic RM3862 Drain water hose, Testing LP GAS Safety Shutoff, Two screws installed in the top frame

RM3862 specifications

The Dometic RM3862 is a highly regarded absorption refrigerator designed specifically for recreational vehicles, campervans, and boats. This model is part of the Dometic’s RM series, known for its reliable performance and energy efficiency, making it a preferred choice among travelers and outdoor enthusiasts.

One of the standout features of the Dometic RM3862 is its dual power source capability. It can operate on both 12V DC and 230V AC power, as well as utilizing gas, which provides users with flexibility depending on their energy availability. This versatility ensures that whether you're camping off-grid or plugged into a campsite's electrical supply, the RM3862 can meet your refrigeration needs.

The refrigerator has a generous capacity of 135 liters, providing ample space for food and beverages, making it ideal for long trips or families on the go. The interior is well-organized with adjustable shelves, ensuring optimal storage options for various sizes and shapes of items. The design includes a vegetable crisper and a dedicated bottle shelving, catering to the different needs of users.

Another notable characteristic of the Dometic RM3862 is its advanced absorption technology. This cooling method is particularly quiet, eliminating the noise often associated with compressor refrigerators. This feature enhances the comfort of the living space, especially for those who are sensitive to background noise while resting or sleeping.

In terms of design, the RM3862 sports a sleek and modern exterior, available in a variety of finishes to match the aesthetic of different vehicles. The door is reversible, allowing for flexible installation depending on your space needs. This adaptability is a significant advantage for RV owners looking to optimize their internal layout.

Energy efficiency is a key consideration in the Dometic RM3862’s design. It operates with a low power consumption, ensuring users can run their refrigerator without excessive drain on their battery systems, which is especially important for boondocking and extended stays away from traditional power sources.

In summary, the Dometic RM3862 is a reliable, versatile, and efficient absorption refrigerator, ideal for mobile living environments. With its dual power capabilities, ample storage capacity, user-friendly design, and quiet operation, it meets the varied needs of adventurers who value convenience and functionality in their refrigeration solution. Whether on a weekend getaway or an extended road trip, the RM3862 is a dependable companion that helps users enjoy their food and drinks wherever they travel.