Installation/Operating Instructions
220V Access Electric Projection Screen by Draper
These Installation/Operating Instructions are available in the official language of the country where you purchase the product. Please contact your distributor to request a copy.
Vous pourriez demander les instructions d’installation et d’opération traduises dans la langue officielle du pays ou vous achetez le produit. Veuillez demander à votre distributeur.
Die Gebrauchsanweisung für Installation und Konstruktion sind in der offiziellen Sprache des Landes, indem Sie das Produkt gekauft haben, vorhanden. Fragen Sie die jeweilige
Caution
➀Read instructions through completely before proceeding; keep them for future reference. Follow instructions carefully. Installation contrary to
instructions invalidates warranty. Care in mounting and correct operation will mean long and satisfactory service from your Draper screen.
➁Allow enough access to remove front cover should fabric become damaged or should other service be required.
➂Screen should be installed level (using a carpenter’s level).
➃Nothing should be fastened to screen dowel or viewing surface
➄Operating switch(es) is packed separately in screen carton. Do not discard with packing material.
➅Screen operates on 220V AC, 50 Hz., 1ph. current.
NOTE: Screen has been thoroughly inspected and tested at factory and found to be operating properly prior to shipment.
Hanging Screen
When locating viewing surface and checking clearance for screen operation, remember surface is centered in the length of the case. Regardless of mounting method used, the following points apply:
➀Mounting brackets are packed separately in carton. Engage each bracket with top of housing as shown below and tighten set screws. A bracket should be within 46 cm of each end of screen case. Brackets can be
removed and case mounted with lag screws through top of case (holes drilled on site).
➁Screen should be positively and securely supported so that vibration or
even abusive pulling on viewing surface will not weaken installation.
➂Installer must insure that fasteners used are of adequate strength and suitable for the mounting surface chosen. Supporting hardware (chains, cables, rods, etc.) must be essentially vertical.
➃Entire bottom of case must be readily accessible after installation is complete.
Typical
InstallationCase dimensions on page 3.
➄Front, back and top of case must be
➅ If case is painted on location, removal of roller/fabric assembly is recommended prior to painting. If not removed, slot on bottom of case should be shielded to protect viewing surface from paint splatters or overspray.
➆ Do not seal unit in ceiling until electrical connections have been made and screen has been operated successfully.
Electrical Connections
Screen operates on 220V AC, 50 Hz., 1 ph current.
Junction box is located just above the bottom access panel at left end of screen (standard, right end may be specified).
Remove the bottom access panel for access to the junction box cover. (See Bottom Access Panel Removal instructions below). Remove four (4) hex head screws that secure the cover to the junction box to expose the terminal strip per wiring diagram on page 4.
If optional low voltage control or video interface control is specified and factory installed, please refer to wiring diagram on page 3.
Screen is shipped with internal wiring complete and control switch(es) fully boxed. Wire to connect screen to switch(es) and switch(es) to power supply should be furnished by installer. Connections should be made in accordance with attached wiring diagram, and wiring should comply with national and local electrical codes.
All operating switches should be “off” before power is connected.
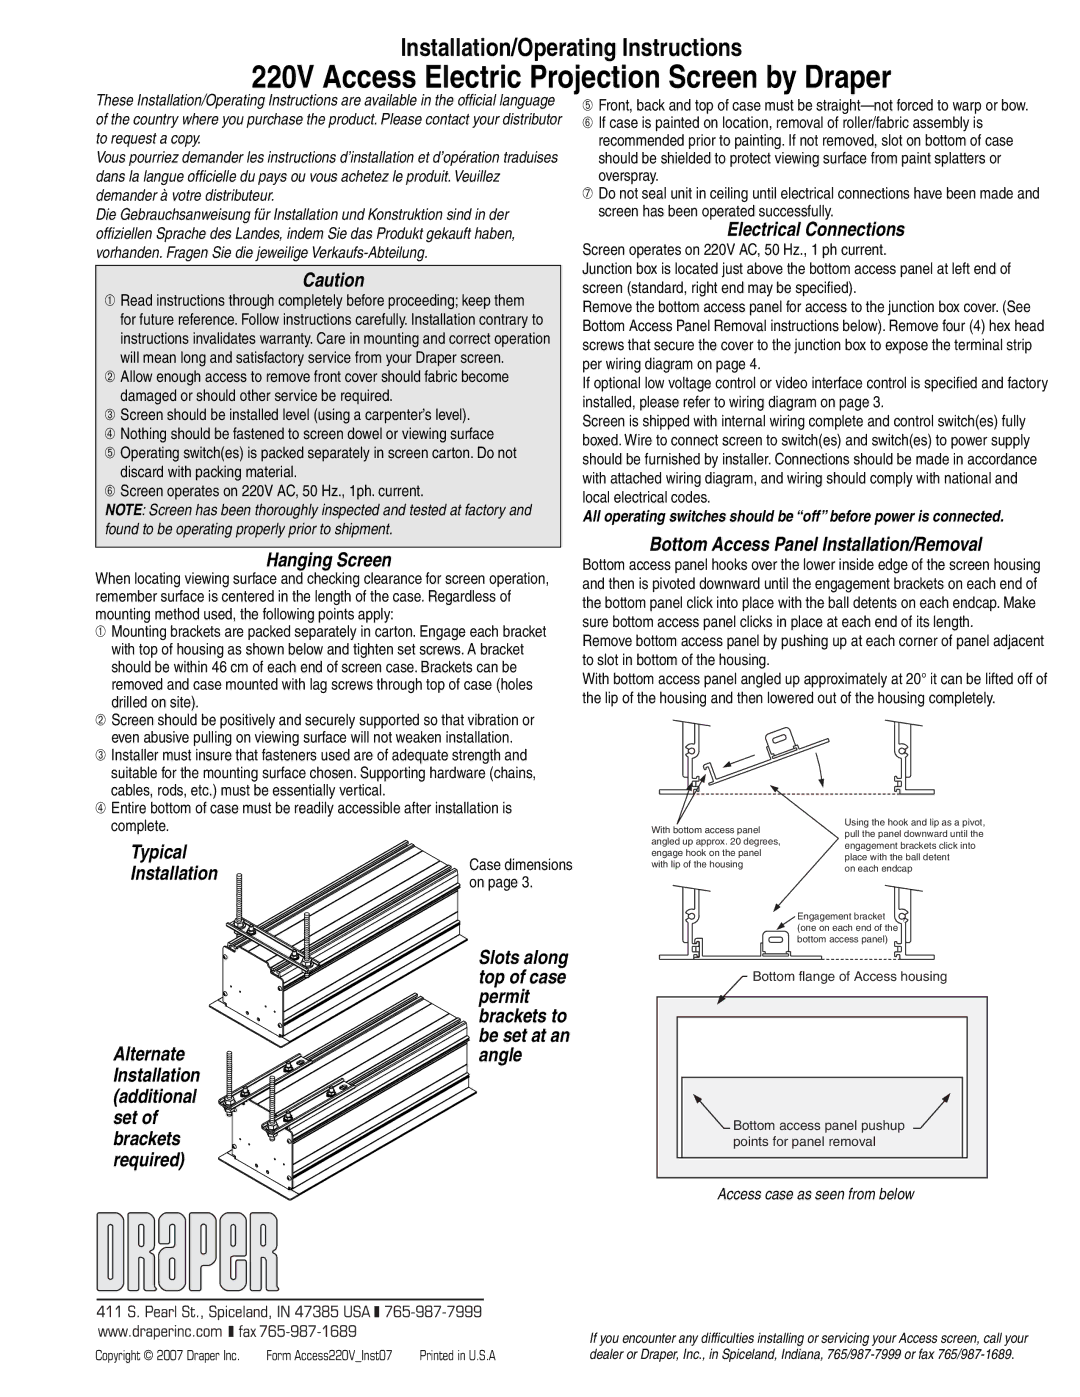
Bottom Access Panel Installation/Removal
Bottom access panel hooks over the lower inside edge of the screen housing and then is pivoted downward until the engagement brackets on each end of the bottom panel click into place with the ball detents on each endcap. Make sure bottom access panel clicks in place at each end of its length.
Remove bottom access panel by pushing up at each corner of panel adjacent to slot in bottom of the housing.
With bottom access panel angled up approximately at 20° it can be lifted off of the lip of the housing and then lowered out of the housing completely.
With bottom access panel | Using the hook and lip as a pivot, | |
pull the panel downward until the | ||
angled up approx. 20 degrees, | ||
engagement brackets click into | ||
engage hook on the panel | ||
place with the ball detent | ||
with lip of the housing | ||
on each endcap | ||
|
Engagement bracket (one on each end of the bottom access panel)
Alternate Installation (additional set of brackets required)
Slots along top of case permit brackets to be set at an angle
Bottom flange of Access housing
Bottom access panel pushup |
points for panel removal |
Access case as seen from below
|
|
|
| If you encounter any difficulties installing or servicing your Access screen, call your |
|
|
|
| |
Copyright © 2007 Draper Inc. | Form Access220V_Inst07 | Printed in U.S.A | dealer or Draper, Inc., in Spiceland, Indiana, | |