3Insert the cassette and press firmly until the cassette clicks into place. See Figure 5.
Figure 5
4Close the label cassette cover.
![]() Each time you change the label cassette, you will be prompted to choose the label width.
Each time you change the label cassette, you will be prompted to choose the label width.
To remove the label cassette
1Lift the label cartridge door on the back of the printer.
2Remove the label cassette.
3Insert a new label cassette as described above.
4Select the new label width when prompted by the label maker.
Using the Label Maker for the First Time
The first time you turn on the power, you are asked to select the language and label width settings. These selections remain set until you change them.
You can change these selections using the ![]() key.
key.
To set up the label maker
1Press ![]() to turn on the label maker.
to turn on the label maker.
2Select the language and press ![]()
![]() .
.
3Select the width of the label cassette currently in the label maker and press ![]()
![]() .
.
You are now ready to print your first label.
To print a label
1 | Enter text to create a simple label. |
| ||
2 | Press | . | Split backing | |
3 | Press the cutter button to cut | |||
| ||||
the label.
4Remove the backing from the
label to expose the adhesive, | Figure 6 |
and then attach the label. |
|
See Figure 6. |
|
Congratulations! You printed your first label. Continue reading to learn more about the options available for creating labels.
Getting to Know the Label Maker
Become familiar with the location of the function keys on your label maker. Refer to Figure 1 on page 4. The following sections describe each feature in detail.
Power
The ![]() key turns the label maker on and off. After two minutes of inactivity, the label maker is switched off automatically.
key turns the label maker on and off. After two minutes of inactivity, the label maker is switched off automatically.
When the label maker is turned off, the current label text and formatting are remembered and will be displayed when power to the label maker is turned back on.
When the batteries are removed and the optional power adapter is disconnected, the current label text and formatting are lost.
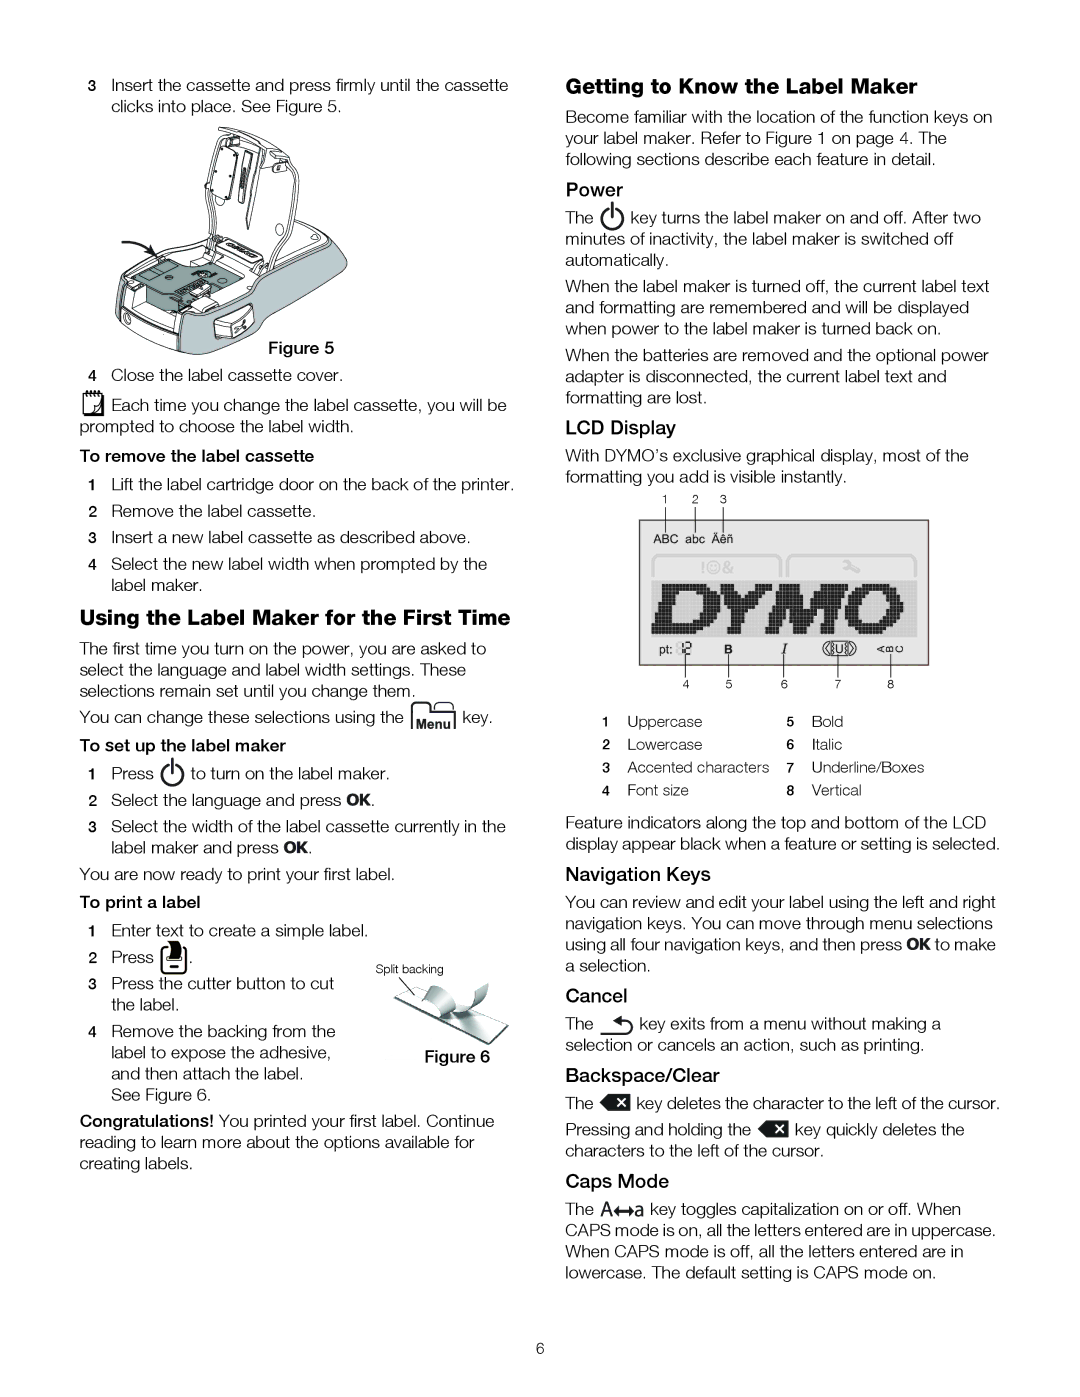
LCD Display
With DYMO’s exclusive graphical display, most of the formatting you add is visible instantly.
1 2 3
|
|
|
|
|
|
|
|
|
|
|
|
|
|
|
|
|
|
|
|
|
|
|
|
|
|
|
|
|
|
|
|
|
|
|
|
|
|
|
|
|
|
|
|
|
|
|
|
|
|
|
|
|
|
|
|
|
|
|
|
|
|
|
|
|
|
|
|
|
|
|
|
|
|
|
|
|
|
|
|
|
|
|
|
|
|
|
|
|
|
|
|
|
|
|
|
|
|
|
|
|
|
|
|
|
|
|
|
|
|
|
|
|
|
|
|
|
|
|
|
| 4 |
| 5 | 6 | 7 |
| 8 | |||||||
1 | Uppercase |
|
| 5 | Bold |
|
| |||||||
2 | Lowercase |
|
| 6 | Italic |
|
| |||||||
3 | Accented characters | 7 | Underline/Boxes | |||||||||||
4 | Font size |
|
| 8 | Vertical |
|
| |||||||
Feature indicators along the top and bottom of the LCD display appear black when a feature or setting is selected.
Navigation Keys
You can review and edit your label using the left and right navigation keys. You can move through menu selections using all four navigation keys, and then press ![]()
![]() to make
to make
aselection.
Cancel
The ![]() key exits from a menu without making a selection or cancels an action, such as printing.
key exits from a menu without making a selection or cancels an action, such as printing.
Backspace/Clear
The ![]() key deletes the character to the left of the cursor.
key deletes the character to the left of the cursor.
Pressing and holding the ![]() key quickly deletes the characters to the left of the cursor.
key quickly deletes the characters to the left of the cursor.
Caps Mode
The ![]()
![]()
![]() key toggles capitalization on or off. When CAPS mode is on, all the letters entered are in uppercase. When CAPS mode is off, all the letters entered are in lowercase. The default setting is CAPS mode on.
key toggles capitalization on or off. When CAPS mode is on, all the letters entered are in uppercase. When CAPS mode is off, all the letters entered are in lowercase. The default setting is CAPS mode on.
6