R200 OWNERS MANUAL

Up to 10 hours of operation on a 9-volt alkaline battery

QUICK SETUP AND USE

To get your system into operation quickly, use the following instructions. Review the rest of the manual for additional setup and operational de- tails.

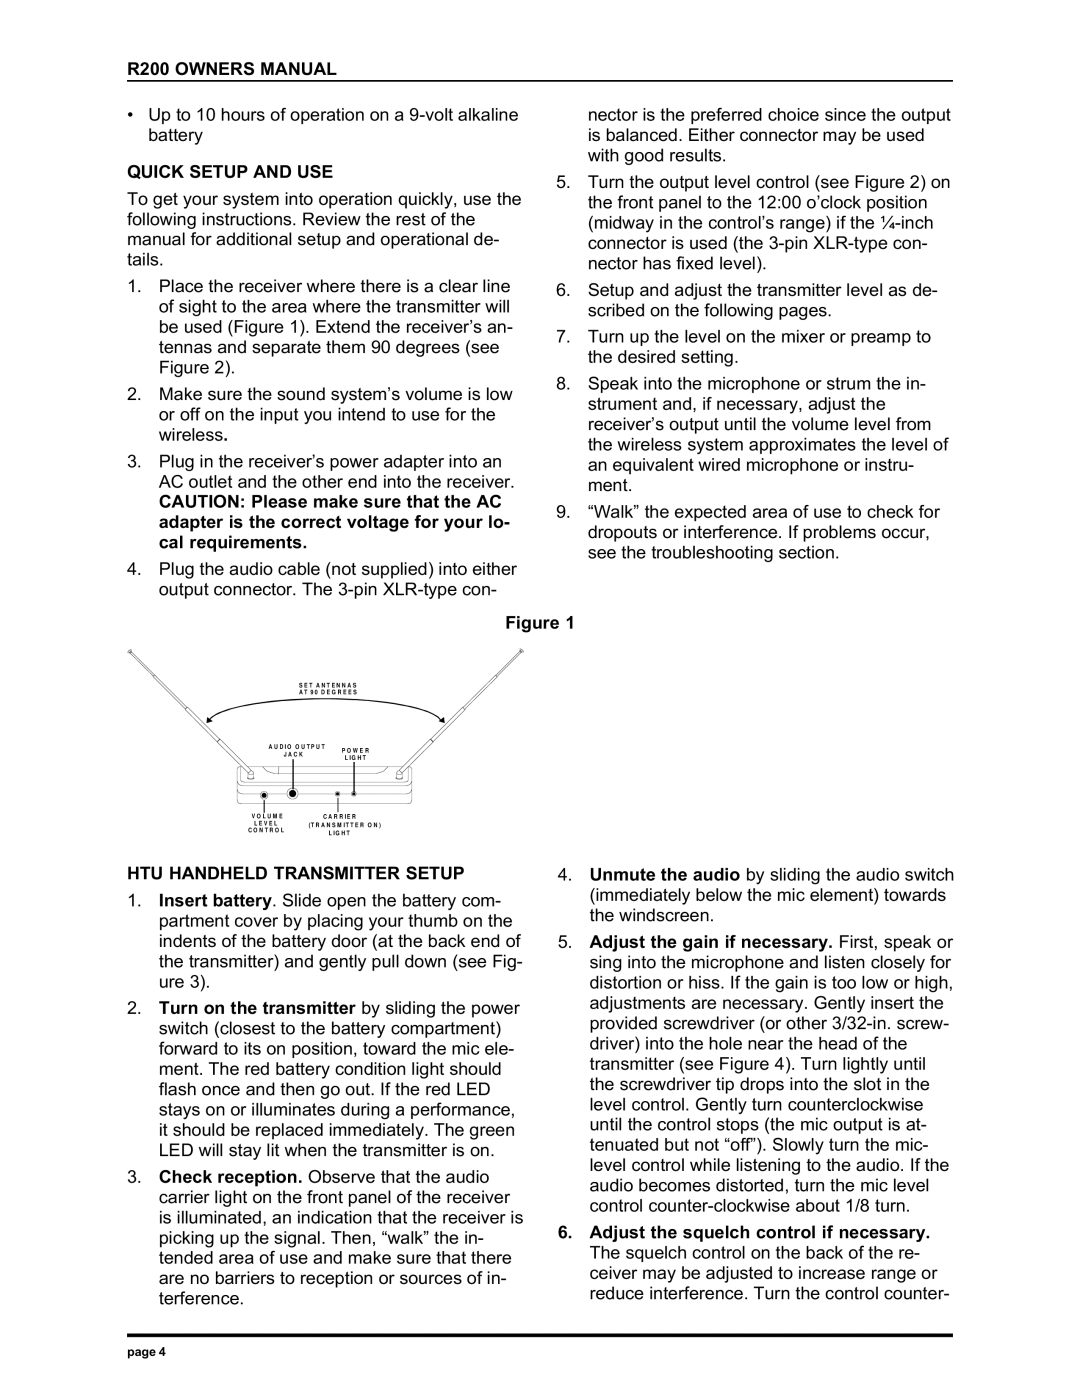
1.Place the receiver where there is a clear line of sight to the area where the transmitter will be used (Figure 1). Extend the receiver’s an- tennas and separate them 90 degrees (see Figure 2).

2.Make sure the sound system’s volume is low or off on the input you intend to use for the wireless.

3.Plug in the receiver’s power adapter into an AC outlet and the other end into the receiver. CAUTION: Please make sure that the AC adapter is the correct voltage for your lo- cal requirements.

4.Plug the audio cable (not supplied) into either output connector. The 3-pin XLR-type con-

nector is the preferred choice since the output is balanced. Either connector may be used with good results.

5.Turn the output level control (see Figure 2) on the front panel to the 12:00 o’clock position (midway in the control’s range) if the ¼-inch connector is used (the 3-pin XLR-type con- nector has fixed level).

6.Setup and adjust the transmitter level as de- scribed on the following pages.

7.Turn up the level on the mixer or preamp to the desired setting.

8.Speak into the microphone or strum the in- strument and, if necessary, adjust the receiver’s output until the volume level from the wireless system approximates the level of an equivalent wired microphone or instru- ment.

9.“Walk” the expected area of use to check for dropouts or interference. If problems occur, see the troubleshooting section.

Figure 1

S E T A N T E N N A S

A T 9 0 D E G R E E S

A U D I O O U T P U T

P O W E R

J A C K

L IG H T


V O L U M E

C A R R IE R

L E V E L

( T R A N S M I T T E R O N )

C O N T R O L

L IG H T


HTU HANDHELD TRANSMITTER SETUP

1.Insert battery. Slide open the battery com- partment cover by placing your thumb on the indents of the battery door (at the back end of the transmitter) and gently pull down (see Fig- ure 3).

2.Turn on the transmitter by sliding the power switch (closest to the battery compartment) forward to its on position, toward the mic ele- ment. The red battery condition light should flash once and then go out. If the red LED stays on or illuminates during a performance, it should be replaced immediately. The green LED will stay lit when the transmitter is on.

3.Check reception. Observe that the audio carrier light on the front panel of the receiver is illuminated, an indication that the receiver is picking up the signal. Then, “walk” the in- tended area of use and make sure that there are no barriers to reception or sources of in- terference.

4.Unmute the audio by sliding the audio switch (immediately below the mic element) towards the windscreen.

5.Adjust the gain if necessary. First, speak or sing into the microphone and listen closely for distortion or hiss. If the gain is too low or high, adjustments are necessary. Gently insert the provided screwdriver (or other 3/32-in. screw- driver) into the hole near the head of the transmitter (see Figure 4). Turn lightly until the screwdriver tip drops into the slot in the level control. Gently turn counterclockwise until the control stops (the mic output is at- tenuated but not “off”). Slowly turn the mic- level control while listening to the audio. If the audio becomes distorted, turn the mic level control counter-clockwise about 1/8 turn.

6.Adjust the squelch control if necessary. The squelch control on the back of the re- ceiver may be adjusted to increase range or reduce interference. Turn the control counter-

page 4

Page 4
Image 4
Electro-Voice R200 manual Quick Setup and USE, HTU Handheld Transmitter Setup

R200 specifications

The Electro-Voice R200 is a dynamic microphone renowned for its superior sound quality and versatility in various applications, including live performances, studio recordings, and broadcasting. Designed to meet the needs of both professionals and enthusiasts, the R200 seamlessly combines cutting-edge technology with robust construction.

One of the standout features of the R200 is its excellent frequency response. The microphone is engineered to capture a wide range of frequencies, ensuring that both low and high sounds are reproduced with clarity and detail. This makes it ideal for vocals and instruments, delivering a rich and balanced audio experience.

Another key characteristic of the R200 is its cardioid polar pattern. This design effectively rejects ambient noise from the sides and rear, allowing for isolated sound capture. This is particularly beneficial in live settings where stage noise can interfere with vocal clarity. The cardioid pattern also helps to minimize feedback, giving performers and sound engineers greater control over the mix.

In terms of construction, the R200 is built to withstand the rigors of frequent use. Its durable metal chassis and protective grille make it resilient against drops and impacts. This rugged build quality ensures that the microphone can endure the demands of touring and regular gigging, making it a reliable choice for musicians and speakers alike.

The R200 also features a high-output neodymium dynamic element that enhances its sensitivity and overall performance. This technology allows the microphone to capture sound with remarkable accuracy while maintaining low noise levels. The result is a cleaner, more articulate sound that stands out in any mix.

Additionally, the R200 comes with a built-in pop filter that reduces plosive sounds, ensuring clear vocal articulation. This feature is particularly useful for studio applications where clarity is paramount. The microphone’s versatility is further enhanced by its compatibility with various audio interfaces and mixers, allowing it to be integrated easily into any audio setup.

In conclusion, the Electro-Voice R200 is a top-tier microphone designed for those who demand quality and reliability. With its exceptional sound characteristics, durable build, and advanced technologies, it is a valuable asset for any audio professional or enthusiast. Whether in the studio or on stage, the R200 ensures clear and powerful sound reproduction, making it a standout choice in the dynamic microphone market.