Electrolux 316488521 Outside rear exhaust, Step For recessed bottom cabinet only, Recirculating

Models: EI36WC40GS 316488521 EI30WC40GS

1 19
Download 19 pages 9.36 Kb
Page 11
Image 11

Installing the hood

11


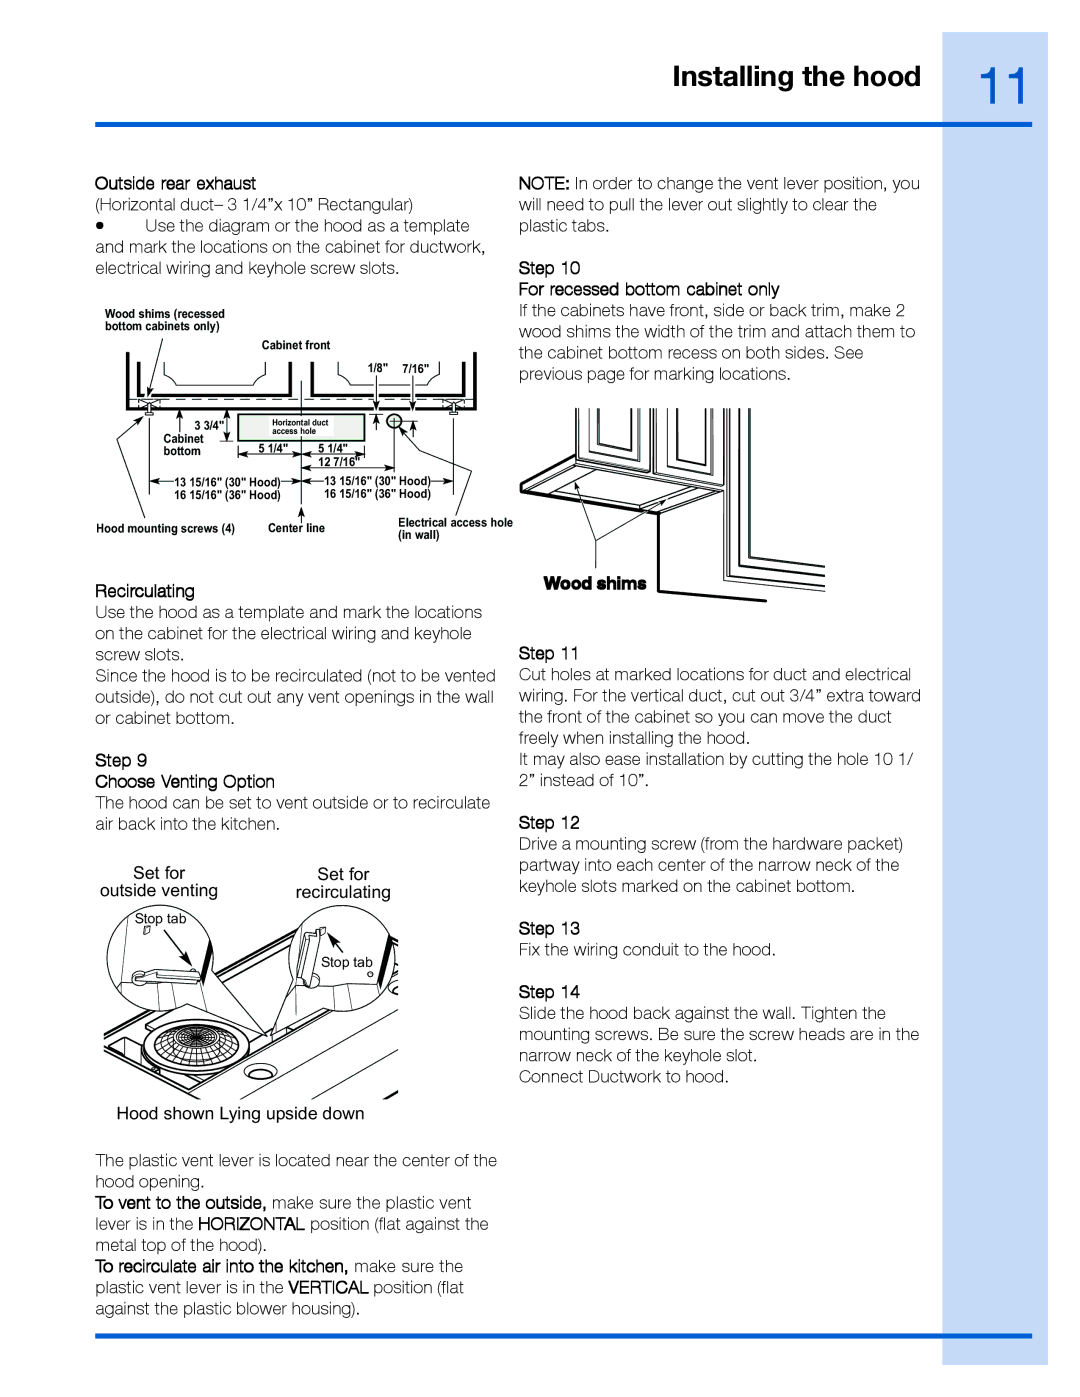
Outside rear exhaust

(Horizontal duct– 3 1/4”x 10” Rectangular)

Use the diagram or the hood as a template and mark the locations on the cabinet for ductwork, electrical wiring and keyhole screw slots.

Wood shims (recessed bottom cabinets only)

Cabinet front

1/8" 7/16"

NOTE: In order to change the vent lever position, you will need to pull the lever out slightly to clear the plastic tabs.

Step 10

For recessed bottom cabinet only

If the cabinets have front, side or back trim, make 2 wood shims the width of the trim and attach them to the cabinet bottom recess on both sides. See previous page for marking locations.

3

3/4"

Horizontal duct

access hole


Cabinet


5 1/4"

5 1/4"

bottom


12 7/16"

13 15/16" (30" Hood)

13 15/16" (30" Hood)

16 15/16" (36" Hood)

16 15/16" (36" Hood)

Hood mounting screws (4)

Center line

Electrical access hole

(in wall)


Recirculating

Use the hood as a template and mark the locations on the cabinet for the electrical wiring and keyhole screw slots.

Since the hood is to be recirculated (not to be vented outside), do not cut out any vent openings in the wall or cabinet bottom.

Step 9

Choose Venting Option

The hood can be set to vent outside or to recirculate air back into the kitchen.

Set for

Set for

outside venting

recirculating

Wood shims

Step 11

Cut holes at marked locations for duct and electrical wiring. For the vertical duct, cut out 3/4” extra toward the front of the cabinet so you can move the duct freely when installing the hood.

It may also ease installation by cutting the hole 10 1/ 2” instead of 10”.

Step 12

Drive a mounting screw (from the hardware packet) partway into each center of the narrow neck of the keyhole slots marked on the cabinet bottom.

Stop tab

Stop tab

Step 13

Fix the wiring conduit to the hood.

Step 14

Slide the hood back against the wall. Tighten the mounting screws. Be sure the screw heads are in the narrow neck of the keyhole slot.

Connect Ductwork to hood.

Hood shown Lying upside down

The plastic vent lever is located near the center of the hood opening.

To vent to the outside, make sure the plastic vent lever is in the HORIZONTAL position (flat against the metal top of the hood).

To recirculate air into the kitchen, make sure the plastic vent lever is in the VERTICAL position (flat against the plastic blower housing).

Page 11
Image 11
Electrolux 316488521 manual Outside rear exhaust, Step For recessed bottom cabinet only, Recirculating, Wood shims Step

EI36WC40GS, 316488521, EI30WC40GS specifications

Electrolux has long been recognized as a leader in the home appliance sector, and the Electrolux EI30WC40GS and EI36WC40GS wall ovens represent a continuation of that tradition with their advanced features and innovative technologies. Both models are designed to enhance cooking experiences while providing impressive functionality and versatile options to suit various culinary needs.

One of the standout features of the Electrolux EI30WC40GS and EI36WC40GS is their sophisticated cooking technology. Both models come equipped with True Convection, ensuring even cooking results by utilizing an additional heating element and fan to circulate hot air throughout the oven cavity. This is essential for achieving perfectly baked goods and evenly roasted meals.

The ovens are designed with an intuitive Touch Screen Control Panel, allowing users to easily select cooking modes, temperatures, and timer functions. This user-friendly interface makes it simple to navigate through various cooking options, ensuring that even novice cooks can achieve professional results with ease. The ovens also feature a built-in temperature probe, allowing users to monitor the internal temperature of their dishes for precise cooking without the need to open the oven door.

Another notable characteristic is the spacious interior capacity of the EI30WC40GS and EI36WC40GS models. With ample space, these ovens can accommodate large roasts, multiple baking sheets, or even several racks of cookies simultaneously. This spacious design is complemented by a variety of rack configurations that make it easy to arrange dishes to achieve optimal cooking results.

Safety is also a key consideration with these models. They include features such as auto shut-off and control lock, ensuring that the ovens remain safe to use, especially in homes with children. Additionally, the self-cleaning function reduces the hassle of upkeep by breaking down food residues at high temperatures, leaving the oven ready for the next cooking challenge.

The sleek stainless steel finish of the Electrolux EI30WC40GS and EI36WC40GS adds a modern touch to any kitchen, enhancing aesthetic appeal while ensuring durability. Both models present a blend of style and functionality, making them excellent choices for those serious about cooking.

In summary, the Electrolux EI30WC40GS and EI36WC40GS wall ovens excel in combining innovative cooking technologies with practical features. Their spacious interiors, intuitive controls, safety options, and stylish design make them an ideal addition to modern kitchens, catering to both everyday cooking and special occasions.