R E N O W N S I 50

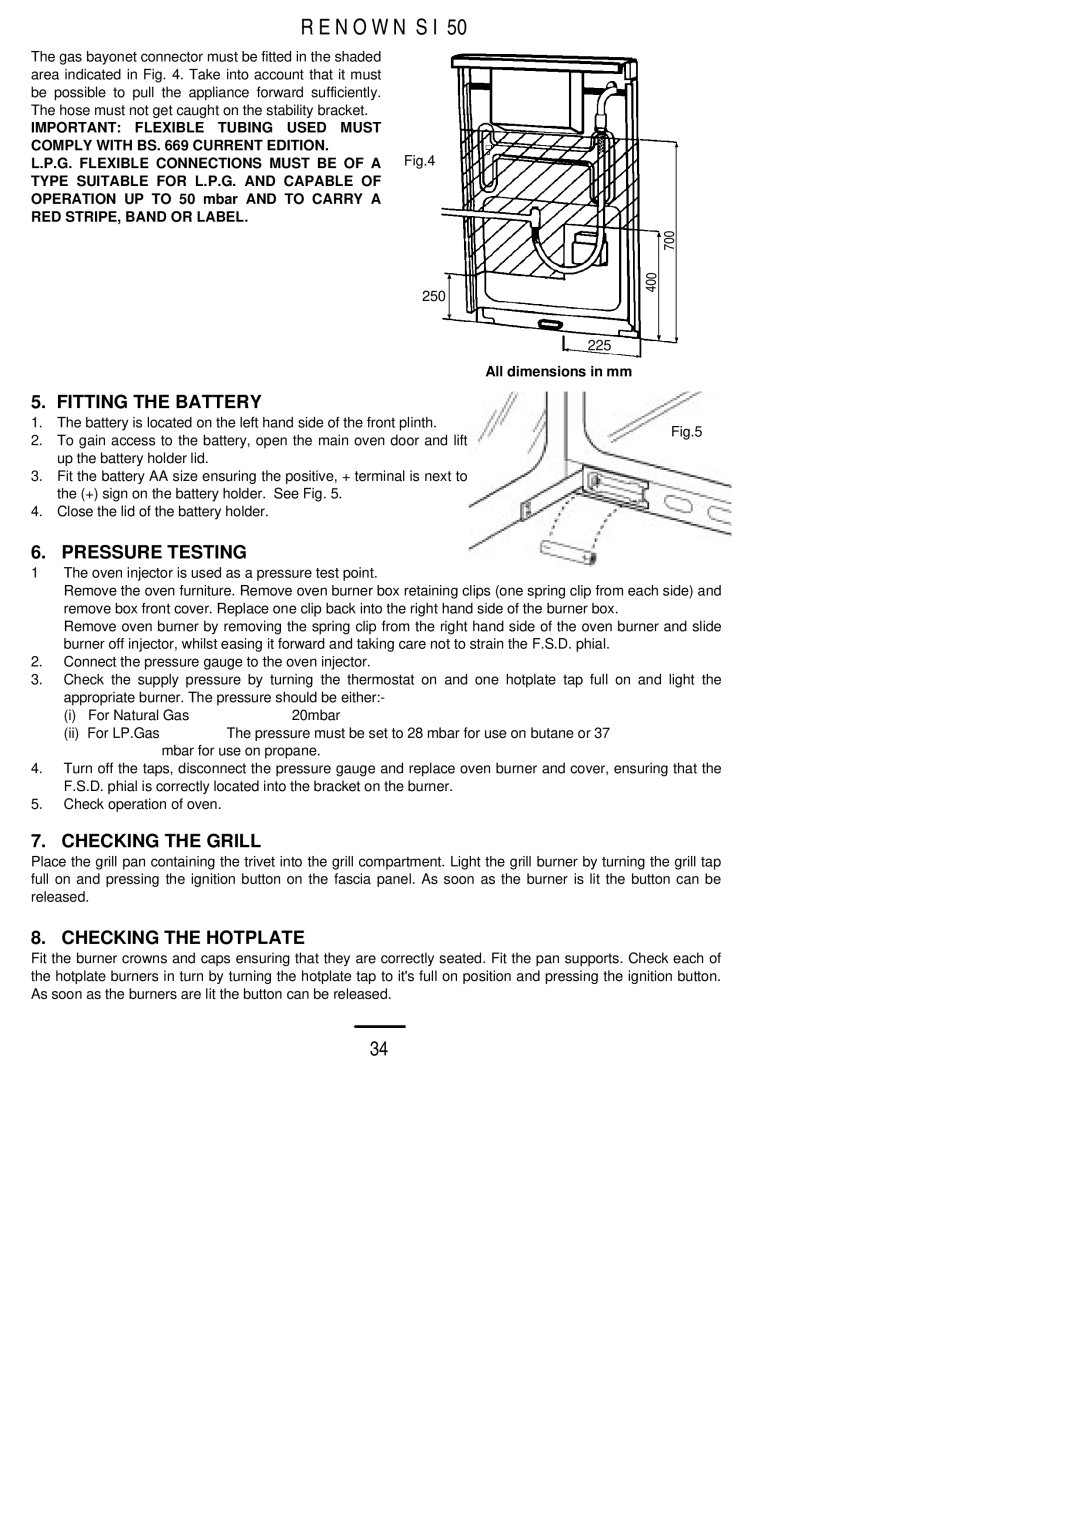
The gas bayonet connector must be fitted in the shaded area indicated in Fig. 4. Take into account that it must be possible to pull the appliance forward sufficiently. The hose must not get caught on the stability bracket.

IMPORTANT: FLEXIBLE TUBING USED MUST COMPLY WITH BS. 669 CURRENT EDITION.

L.P.G. FLEXIBLE CONNECTIONS MUST BE OF A TYPE SUITABLE FOR L.P.G. AND CAPABLE OF OPERATION UP TO 50 mbar AND TO CARRY A RED STRIPE, BAND OR LABEL.

Fig.4

700

250

225

All dimensions in mm

5. FITTING THE BATTERY

1. The battery is located on the left hand side of the front plinth.

Fig.5

2. To gain access to the battery, open the main oven door and lift up the battery holder lid.

3. Fit the battery AA size ensuring the positive, + terminal is next to the (+) sign on the battery holder. See Fig. 5.

4. Close the lid of the battery holder.

6. PRESSURE TESTING

1The oven injector is used as a pressure test point.

Remove the oven furniture. Remove oven burner box retaining clips (one spring clip from each side) and remove box front cover. Replace one clip back into the right hand side of the burner box.

Remove oven burner by removing the spring clip from the right hand side of the oven burner and slide burner off injector, whilst easing it forward and taking care not to strain the F.S.D. phial.

2.Connect the pressure gauge to the oven injector.

3.Check the supply pressure by turning the thermostat on and one hotplate tap full on and light the appropriate burner. The pressure should be either:-

(i) For Natural Gas

20mbar

(ii) For LP.Gas

The pressure must be set to 28 mbar for use on butane or 37

mbar for use on propane.

4.Turn off the taps, disconnect the pressure gauge and replace oven burner and cover, ensuring that the F.S.D. phial is correctly located into the bracket on the burner.

5.Check operation of oven.

7. CHECKING THE GRILL

Place the grill pan containing the trivet into the grill compartment. Light the grill burner by turning the grill tap full on and pressing the ignition button on the fascia panel. As soon as the burner is lit the button can be released.

8. CHECKING THE HOTPLATE

Fit the burner crowns and caps ensuring that they are correctly seated. Fit the pan supports. Check each of the hotplate burners in turn by turning the hotplate tap to it's full on position and pressing the ignition button. As soon as the burners are lit the button can be released.

34

Page 34
Image 34
Electrolux S 50 installation instructions Fitting the Battery, Pressure Testing, Checking the Grill, Checking the Hotplate

S 50 specifications

The Electrolux S 50 is a prominent vacuum cleaner that has gained recognition for its innovative design and advanced features aimed at enhancing cleaning efficiency. This vacuum cleaner is engineered to deliver powerful suction while maintaining user-friendly operation, making it a popular choice for households and commercial spaces alike.

One of the standout characteristics of the Electrolux S 50 is its robust suction power. Equipped with a highly efficient motor, it provides consistent performance on various surfaces, from carpets to hard floors. The adjustable suction settings allow users to tailor the cleaning intensity to suit different types of debris and flooring types, ensuring optimal cleaning without damaging delicate surfaces.

Another notable feature is the vacuum's comprehensive filtration system. The Electrolux S 50 utilizes a multi-layer filtration technology that captures dust particles, allergens, and fine debris. This is particularly beneficial for individuals with allergies or respiratory issues, as the advanced filtration helps improve indoor air quality by preventing dust from being released back into the environment.

The design of the Electrolux S 50 prioritizes ease of use. Its lightweight construction allows for effortless maneuverability, making it easy to carry around the home or office. The ergonomic handle provides comfort during prolonged cleaning tasks, while the extended reach of the power cord reduces the need to frequently change outlets. Additionally, the vacuum features a compact design that aids in easy storage, a significant advantage for those with limited space.

Flexibility is another hallmark of the Electrolux S 50. It comes with a variety of attachments, including a crevice tool, upholstery brush, and dusting brush, enabling users to access hard-to-reach areas and clean various surfaces effectively. This versatility ensures that the vacuum can handle different cleaning tasks, from tight corners to upholstered furniture.

The Electrolux S 50 also incorporates energy-efficient technology, making it an environmentally friendly choice. With lower power consumption without compromising performance, users can enjoy effective cleaning while being mindful of their energy usage.

Overall, the Electrolux S 50 stands out for its powerful suction, advanced filtration, user-friendly design, and versatility. Whether for detailed cleaning at home or maintaining cleanliness in commercial spaces, this vacuum cleaner proves to be a reliable and effective cleaning companion.