INSTALLATION INSTRUCTIONS

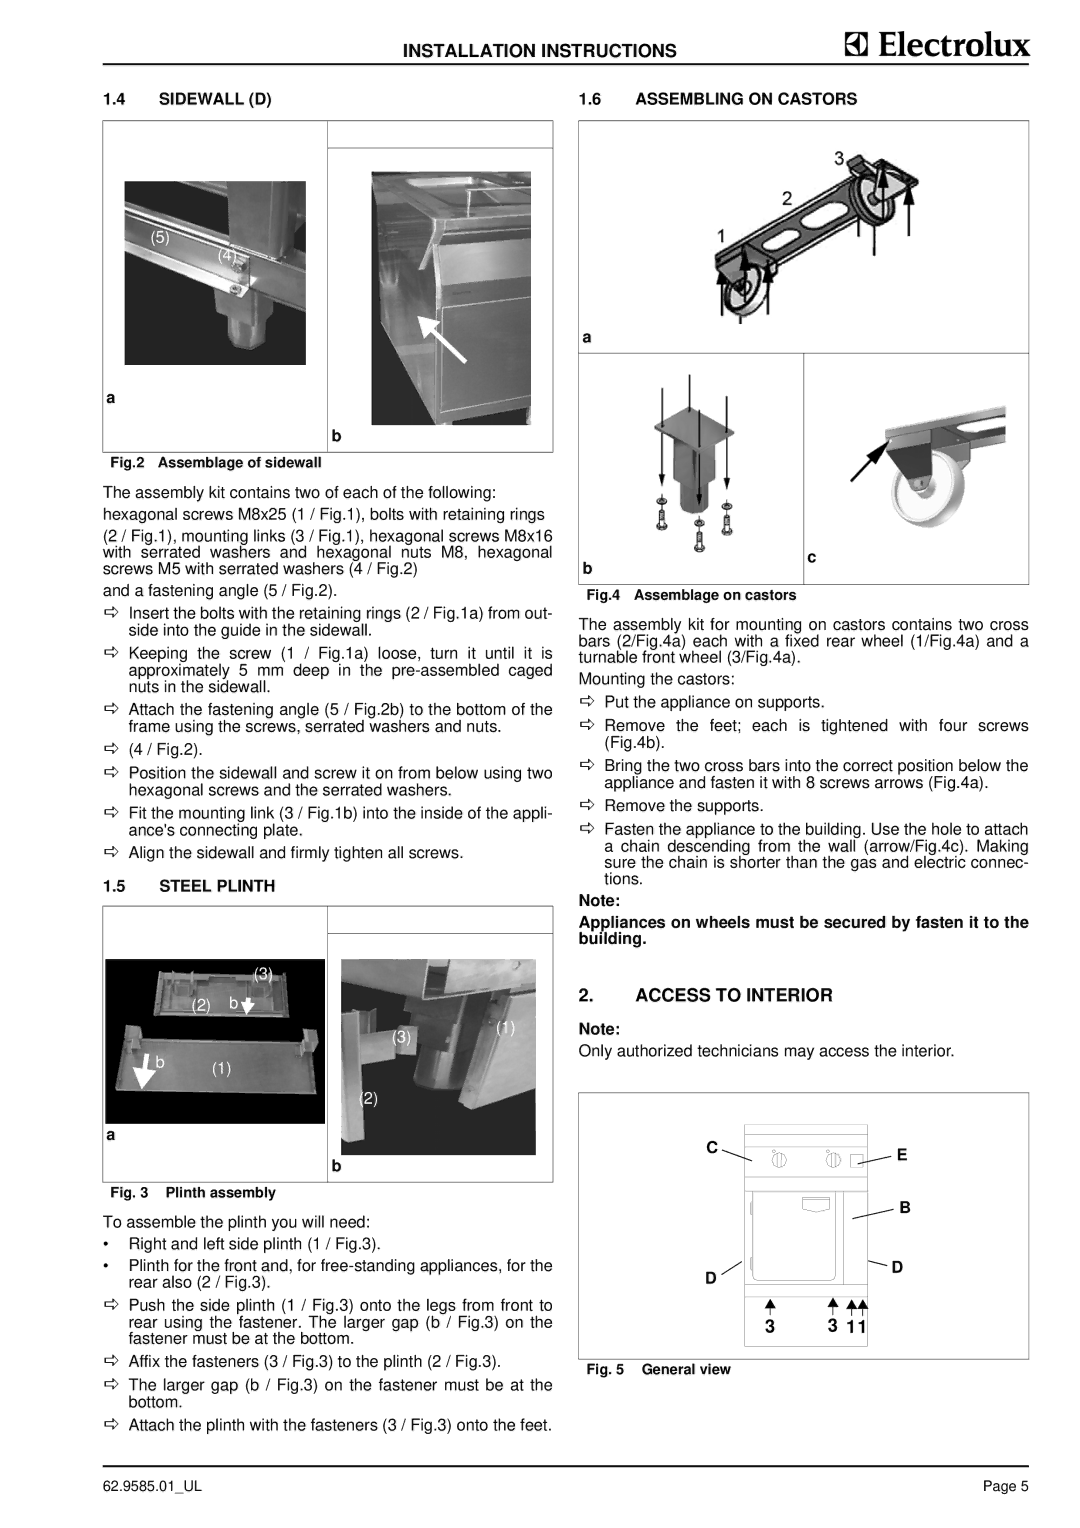
1.4 SIDEWALL (D)

1.6 ASSEMBLING ON CASTORS

(5)

(4)

a

b

Fig.2 Assemblage of sidewall

The assembly kit contains two of each of the following: hexagonal screws M8x25 (1 / Fig.1), bolts with retaining rings

(2 / Fig.1), mounting links (3 / Fig.1), hexagonal screws M8x16 with serrated washers and hexagonal nuts M8, hexagonal screws M5 with serrated washers (4 / Fig.2)

and a fastening angle (5 / Fig.2).

DInsert the bolts with the retaining rings (2 / Fig.1a) from out- side into the guide in the sidewall.

DKeeping the screw (1 / Fig.1a) loose, turn it until it is approximately 5 mm deep in the pre-assembled caged nuts in the sidewall.

DAttach the fastening angle (5 / Fig.2b) to the bottom of the frame using the screws, serrated washers and nuts.

D(4 / Fig.2).

DPosition the sidewall and screw it on from below using two hexagonal screws and the serrated washers.

DFit the mounting link (3 / Fig.1b) into the inside of the appli- ance's connecting plate.

DAlign the sidewall and firmly tighten all screws.

1.5STEEL PLINTH

a

b

c


Fig.4 Assemblage on castors

The assembly kit for mounting on castors contains two cross bars (2/Fig.4a) each with a fixed rear wheel (1/Fig.4a) and a turnable front wheel (3/Fig.4a).

Mounting the castors:

DPut the appliance on supports.

DRemove the feet; each is tightened with four screws (Fig.4b).

DBring the two cross bars into the correct position below the appliance and fasten it with 8 screws arrows (Fig.4a).

DRemove the supports.

DFasten the appliance to the building. Use the hole to attach a chain descending from the wall (arrow/Fig.4c). Making sure the chain is shorter than the gas and electric connec- tions.

Note:

Appliances on wheels must be secured by fasten it to the building.

(3)


(2) b

b

(1)


a

(3)(1)

(2)

b

2.ACCESS TO INTERIOR

Note:

Only authorized technicians may access the interior.

CE

Fig. 3 Plinth assembly

To assemble the plinth you will need:

Right and left side plinth (1 / Fig.3).

Plinth for the front and, for free-standing appliances, for the rear also (2 / Fig.3).

DPush the side plinth (1 / Fig.3) onto the legs from front to rear using the fastener. The larger gap (b / Fig.3) on the fastener must be at the bottom.

DAffix the fasteners (3 / Fig.3) to the plinth (2 / Fig.3).

DThe larger gap (b / Fig.3) on the fastener must be at the bottom.

DAttach the plinth with the fasteners (3 / Fig.3) onto the feet.

B

D


D


3

3

11


Fig. 5 General view

62.9585.01_UL

Page 5

Page 7
Image 7
Electrolux WFWROAOOOO, WFXUOAOOOO, WFWUOFOOOO, WFXROAOOOO Access to Interior, Sidewall D Assembling on Castors, Steel Plinth

9CHG584097, WFXROFOOOO, WFWUOFOOOO, 584094, 9CHG584093 specifications

The Electrolux WFWROFOOOO and its associated models, including 584096, 9CHG584095, 9CHG584094, and 584100, are a testament to innovation and efficiency in modern laundry care. Designed with a keen understanding of consumer needs, these washers bring together advanced technologies and features aimed at providing superior cleaning performance while keeping energy consumption low.

One of the standout features of these washer models is their cutting-edge SmartBoost technology. This innovative system pre-mixes water and detergent before the wash cycle begins, ensuring that every fabric receives optimal cleaning power. This feature not only enhances the removal of stains but also promotes a more thorough and even wash, reducing the chances of detergent residue left on clothes.

The Electrolux WFWROFOOOO series is notable for its energy efficiency. With an ENERGY STAR certification, these machines are designed to consume less water and electricity compared to traditional washers. This eco-friendly approach not only benefits the environment but also translates to savings on utility bills for the consumer.

Another impressive characteristic of these washers is their capacity. With large drum sizes, they are capable of handling large loads, which makes laundry chores more efficient. This is particularly beneficial for families or individuals who require frequent washing, as it reduces the number of cycles needed to manage weekly laundry.

These models are equipped with various wash cycle options, tailored to suit different fabric types and cleaning needs. From delicate cycles for fragile items to heavy-duty cycles for tough stains, users can select the perfect setting for every load. Additionally, features like steam cleaning and sanitize cycles enhance the performance of these machines, ensuring optimal hygiene and cleanliness.

The Electrolux WFWROFOOOO series also emphasizes user convenience. Intuitive controls, along with the ability to customize settings, make operation straightforward and hassle-free. Many models include a delay start option, allowing users to schedule their laundry for times that best fit their lifestyle.

In summary, the Electrolux WFWROFOOOO, 584096, 9CHG584095, 9CHG584094, and 584100 represent a blend of modern technology, energy efficiency, and user-friendly features. With their commitment to superior cleaning performance and innovative functionalities, these washers have set a new standard in laundry care, making them an excellent choice for consumers seeking reliability and excellence.