BYPASSING & ISOLATING

(continued)


RETURN TO SERVICE


This procedure explains how to return the automatic

Solenoid interlock prevents you from closing

transfer switch (ATS) to service after inspection and

the isolation contacts until the ATS is in the

maintenance. Observe the Bypass Switch Position indica-

same position as the Bypass Switch.

tor and lights). Refer to Figures 3–7, 3–8, 3–9, and 3–10.

3. Observe which Bypass Switch Position indicator is


1. Slide the transfer switch (ATS) into the enclosure

black (NORMAL or EMERGENCY) at the Bypass

Switch Handle. This indicates the source connected

(isolation contacts facing inward) until its crank pins

to the load.


engage the latch plates on both sides. Next push in


4. Observe which Transfer Switch Connected To light is

side rail carriage. Then close enclosure door.

on (Normal or Emergency) on the door. This is the


position of the Transfer Switch. If it is not in the same

Close the enclosure door to prevent personal

position as the Bypass Handle change the position of

the Transfer Switch as follows:

injury in case of electrical system fault.

To change the position of transfer switch


Operate to NORMAL

OperatetoEMERGENCY

Align position indicator. Do not leave

Turn Transfer Control

Turn Transfer Control

switch to Retransfer

switch to Transfer Test

the handle in an intermediate position.

Delay Bypass.

(hold 15 seconds).*


position

Connected To Normal

Connected To Emergency


light should come on.

light should comes on.


window

CONN

* If Feature 2B time delay is used, there will be a delay


TEST


before transfer to Emergency.

ISOLATE


NOTE: With Normal available, the automatic


transfer switch will not stay in the emergency


position unless Feature 3A time delay is used


unfold

(at least 30 seconds).


crank


Do not close the isolation contacts unless


the Transfer Switch (ATS) and Bypass

clockwise – draws in the Transfer Switch

Switch are in the same position!


Figure 3–8. Isolation Handle.

5. When the transfer switch is in the same position as


the Bypass Switch

handle, continue turning the


2. Turn the Isolation Handle clockwise (approx. 7

turns) until the window shows TEST. The ATS can be

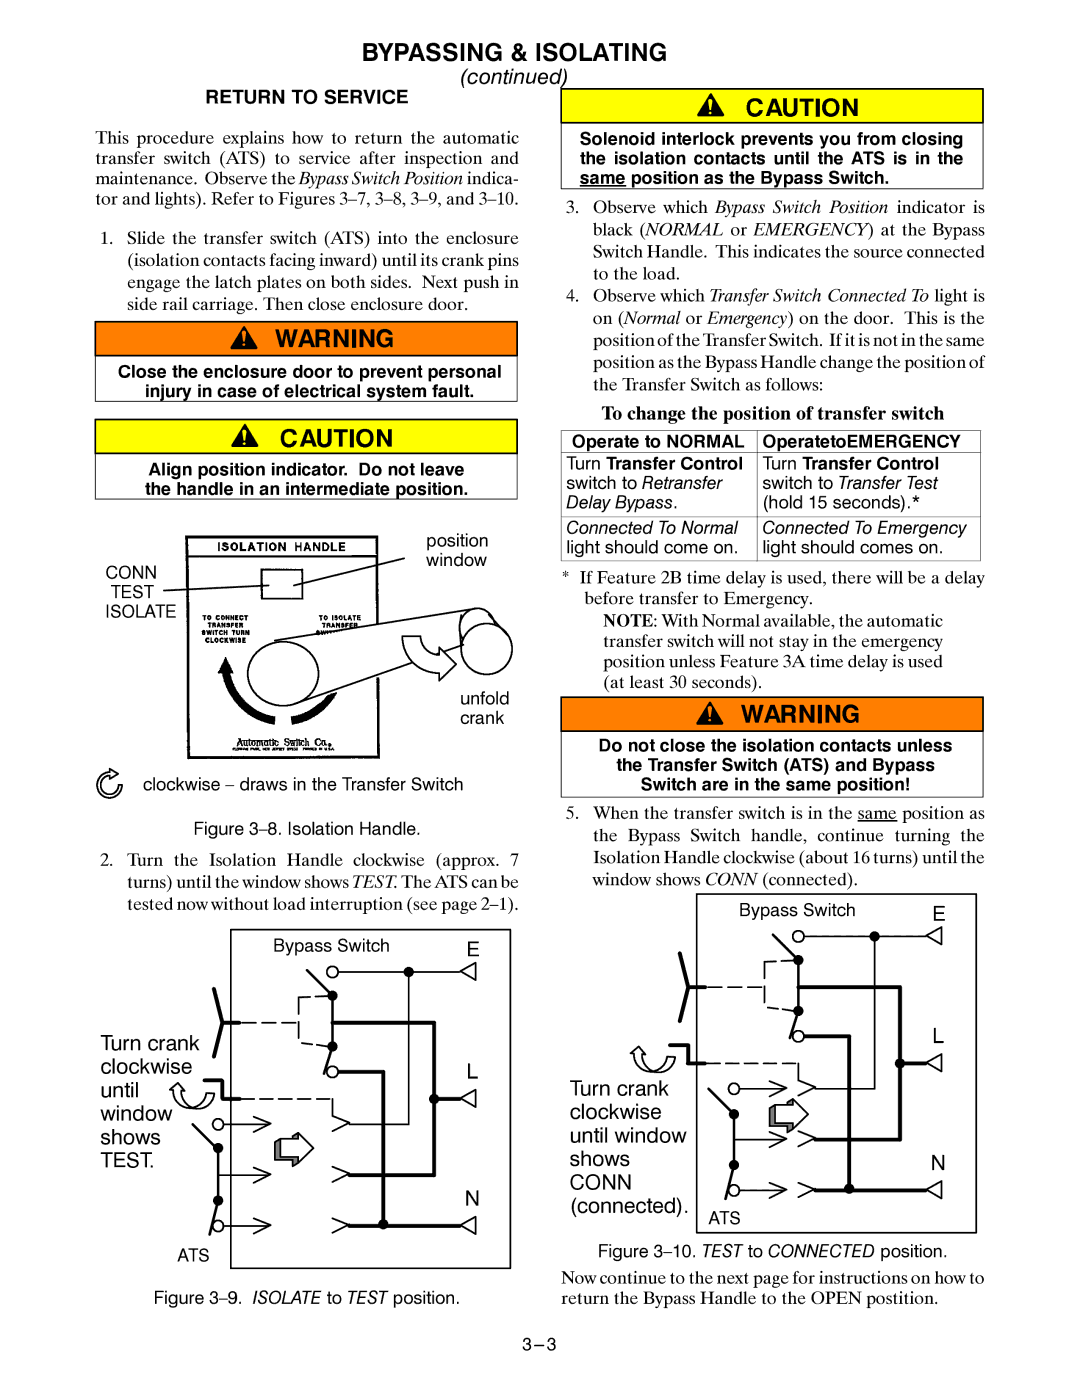
Isolation Handle clockwise (about 16 turns) until the window shows CONN (connected).

tested now without load interruption (see page 2–1).

Bypass Switch

E

Turn crank


clockwise

L

until


window


shows


TEST.


N

Turn crank clockwise until window shows

CONN (connected).

Bypass Switch

E


L


N

ATS


ATS

Figure 3–9. ISOLATE to TEST position.

Figure 3–10. TEST to CONNECTED position.

Now continue to the next page for instructions on how to return the Bypass Handle to the OPEN postition.

3---3

Page 10
Image 10
Emerson 7ACTB manual Turn crank Clockwise Until Window Shows, Turn crank clockwise until window shows Conn connected

7ACTB specifications

The Emerson 7ACTB is an advanced electronic device designed to optimize and streamline temperature and pressure monitoring in various industrial applications. Leveraging state-of-the-art technologies, the 7ACTB stands out for its precision, reliability, and ease of use.

One of the main features of the Emerson 7ACTB is its dual-channel capability, allowing simultaneous monitoring of two separate points. This flexibility makes it particularly useful in processes where multiple temperature or pressure readings are necessary for effective control and management. The device is equipped with high-resolution sensors that ensure accurate readings, minimizing the risk of errors that can lead to inefficiencies or safety concerns.

The 7ACTB utilizes cutting-edge communication protocols, including Modbus and HART, which facilitate easy integration with existing control systems. This enhances connectivity and ensures seamless data transfer between the device and central monitoring systems, allowing operators to make quick and informed decisions.

In terms of display, the Emerson 7ACTB features an intuitive user interface with a high-definition LCD screen that presents real-time data clearly and concisely. The menu navigation is straightforward, making it accessible for personnel with varying levels of technical expertise. Users can easily configure settings, calibrate the sensors, and review historical data logs, which are crucial for auditing purposes and troubleshooting.

Another significant characteristic of the Emerson 7ACTB is its robust construction, designed to withstand harsh industrial environments. Its housing is built with durable materials that offer protection against dust, moisture, and extreme temperatures, ensuring the device operates effectively in challenging conditions.

Furthermore, the device boasts advanced diagnostic capabilities, enabling proactive maintenance checks. This feature allows users to identify potential issues before they escalate, reducing downtime and maintenance costs.

The Emerson 7ACTB also adheres to rigorous safety and regulatory standards, making it compliant with industry requirements. Its reliability and performance have made it a preferred choice among engineers and operators looking to enhance process efficiency while maintaining safety and compliance.

In summary, the Emerson 7ACTB combines precision measurement, advanced technology, and robust design, making it an essential tool for effective temperature and pressure monitoring in various industrial settings.