Installing Glass Globe
![]()
![]() 1. Install three candelabra base bulbs in sockets.
1. Install three candelabra base bulbs in sockets.
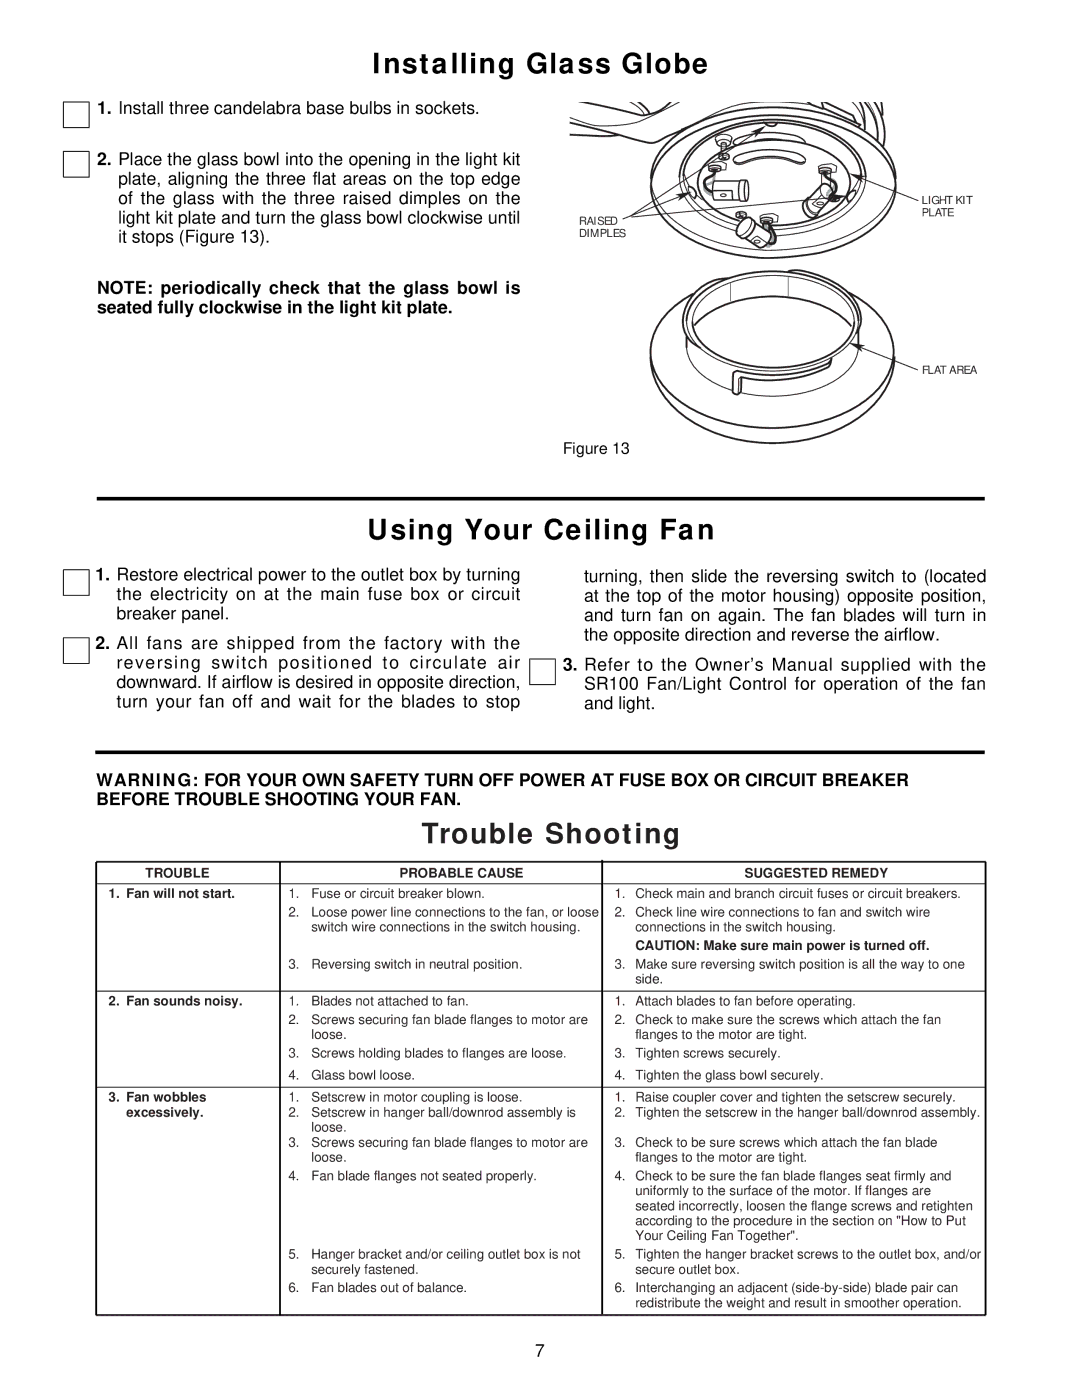
2.Place the glass bowl into the opening in the light kit plate, aligning the three flat areas on the top edge of the glass with the three raised dimples on the light kit plate and turn the glass bowl clockwise until it stops (Figure 13).
NOTE: periodically check that the glass bowl is seated fully clockwise in the light kit plate.
RAISED DIMPLES
![]()
![]()
![]() LIGHT KIT PLATE
LIGHT KIT PLATE
![]() FLAT AREA
FLAT AREA
Figure 13
Using Your Ceiling Fan
1.Restore electrical power to the outlet box by turning the electricity on at the main fuse box or circuit breaker panel.
2.All fans are shipped from the factory with the reversing switch positioned to circulate air downward. If airflow is desired in opposite direction, turn your fan off and wait for the blades to stop
turning, then slide the reversing switch to (located at the top of the motor housing) opposite position, and turn fan on again. The fan blades will turn in the opposite direction and reverse the airflow.
3.Refer to the Owner’s Manual supplied with the SR100 Fan/Light Control for operation of the fan and light.
WARNING: FOR YOUR OWN SAFETY TURN OFF POWER AT FUSE BOX OR CIRCUIT BREAKER BEFORE TROUBLE SHOOTING YOUR FAN.
Trouble Shooting
TROUBLE |
| PROBABLE CAUSE |
| SUGGESTED REMEDY |
|
|
|
|
|
1. Fan will not start. | 1. | Fuse or circuit breaker blown. | 1. | Check main and branch circuit fuses or circuit breakers. |
| 2. | Loose power line connections to the fan, or loose | 2. | Check line wire connections to fan and switch wire |
|
| switch wire connections in the switch housing. |
| connections in the switch housing. |
|
|
|
| CAUTION: Make sure main power is turned off. |
| 3. | Reversing switch in neutral position. | 3. | Make sure reversing switch position is all the way to one |
|
|
|
| side. |
|
|
|
|
|
2. Fan sounds noisy. | 1. | Blades not attached to fan. | 1. | Attach blades to fan before operating. |
| 2. | Screws securing fan blade flanges to motor are | 2. | Check to make sure the screws which attach the fan |
|
| loose. |
| flanges to the motor are tight. |
| 3. | Screws holding blades to flanges are loose. | 3. | Tighten screws securely. |
| 4. | Glass bowl loose. | 4. | Tighten the glass bowl securely. |
|
|
|
|
|
3. Fan wobbles | 1. | Setscrew in motor coupling is loose. | 1. | Raise coupler cover and tighten the setscrew securely. |
excessively. | 2. | Setscrew in hanger ball/downrod assembly is | 2. | Tighten the setscrew in the hanger ball/downrod assembly. |
|
| loose. |
|
|
| 3. | Screws securing fan blade flanges to motor are | 3. | Check to be sure screws which attach the fan blade |
|
| loose. |
| flanges to the motor are tight. |
| 4. | Fan blade flanges not seated properly. | 4. | Check to be sure the fan blade flanges seat firmly and |
|
|
|
| uniformly to the surface of the motor. If flanges are |
|
|
|
| seated incorrectly, loosen the flange screws and retighten |
|
|
|
| according to the procedure in the section on "How to Put |
|
|
|
| Your Ceiling Fan Together". |
| 5. | Hanger bracket and/or ceiling outlet box is not | 5. | Tighten the hanger bracket screws to the outlet box, and/or |
|
| securely fastened. |
| secure outlet box. |
| 6. | Fan blades out of balance. | 6. | Interchanging an adjacent |
|
|
|
| redistribute the weight and result in smoother operation. |
|
|
|
|
|
7
