CH 01
AUTO SET UP

PREPARATION FOR USE

1 Check contents

Make sure the package contains all of the accessories listed in "as below".

SUPPLIED ACCESSORIES

ACCESSORIES

PART NO.

Coaxial Cable

WPZ0901TM002

Remote Control Unit

NA301UD/NA351UD

Batteries

AA x 2

2Situate VCR

VCR to AV TV connection using AUDIO/VIDEO Cables

Using Optional AUDIO/ VIDEO Output Jacks

With this connection, you can get better pictures and sounds when playing back a tape if your TV has A/V Input jacks. Please refer to your TV’s owner’s manual.

Using AUDIO/VIDEO Input Jacks

You can use the A/V input jacks on the front or the back of the VCR.

To use the input jacks on the back of the VCR, select "L1" position by pressing [0], [0], [1] on the remote

control or [CHANNEL () ].

To use the input jacks on the front of the VCR, select "L2" position by pressing [0], [0], [2] on the remote

Place the VCR in a stable, horizontal surface.

3 Connect VCR to TV

VCR to TV Connection

1. Disconnect the AC power cord of the TV from the AC

outlet.

2. Disconnect the antenna or cable from the TV.

3. Connect the antenna or cable to the ANT. IN jack of

the VCR.

4. Connect the VCR to the TV using the coaxial cable.

5. Plug the AC power cords of the VCR and TV into the

control or [CHANNEL () ].

[Playing VCR]

AUDIO

OUT IN

Audio/Video

VIDEOcables (not supplied)

IN

L R

“L1” or “L2” is found before the lowest memorized channel. (Example: CH2)

[TV A/V]

AC outlets.

[VHF/UHF

[Indoor antenna]

[Back of the VCR]

combination antenna]


[Back of the


UHF/VHF combination TV]


OR

ANT

Coaxial cable


IN

(supplied)


[Cable

box or satellite box] OR


UHF/VHF

OUT


From Cable or


Satellite Company


AUDIO

VIDEO

SETTING THE CH3/CH4 SWITCH

If your TV does not have A/V terminals:

When the VCR is in the Playback mode or when the VCR is in the VCR mode, your TV will receive signals from the VCR on either channel 3 or 4. To use the VCR with your TV, set the selector switch to CH3 or CH4

(which is located in the back of


your VCR), whichever is not


used for normal broadcasts in

CH3 CH4

OUT

CH3 CH4

your area. Then set your TV to


the same channel.


[Back of the VCR]

PREPARATION

FOR USE

SETUP


SETUP

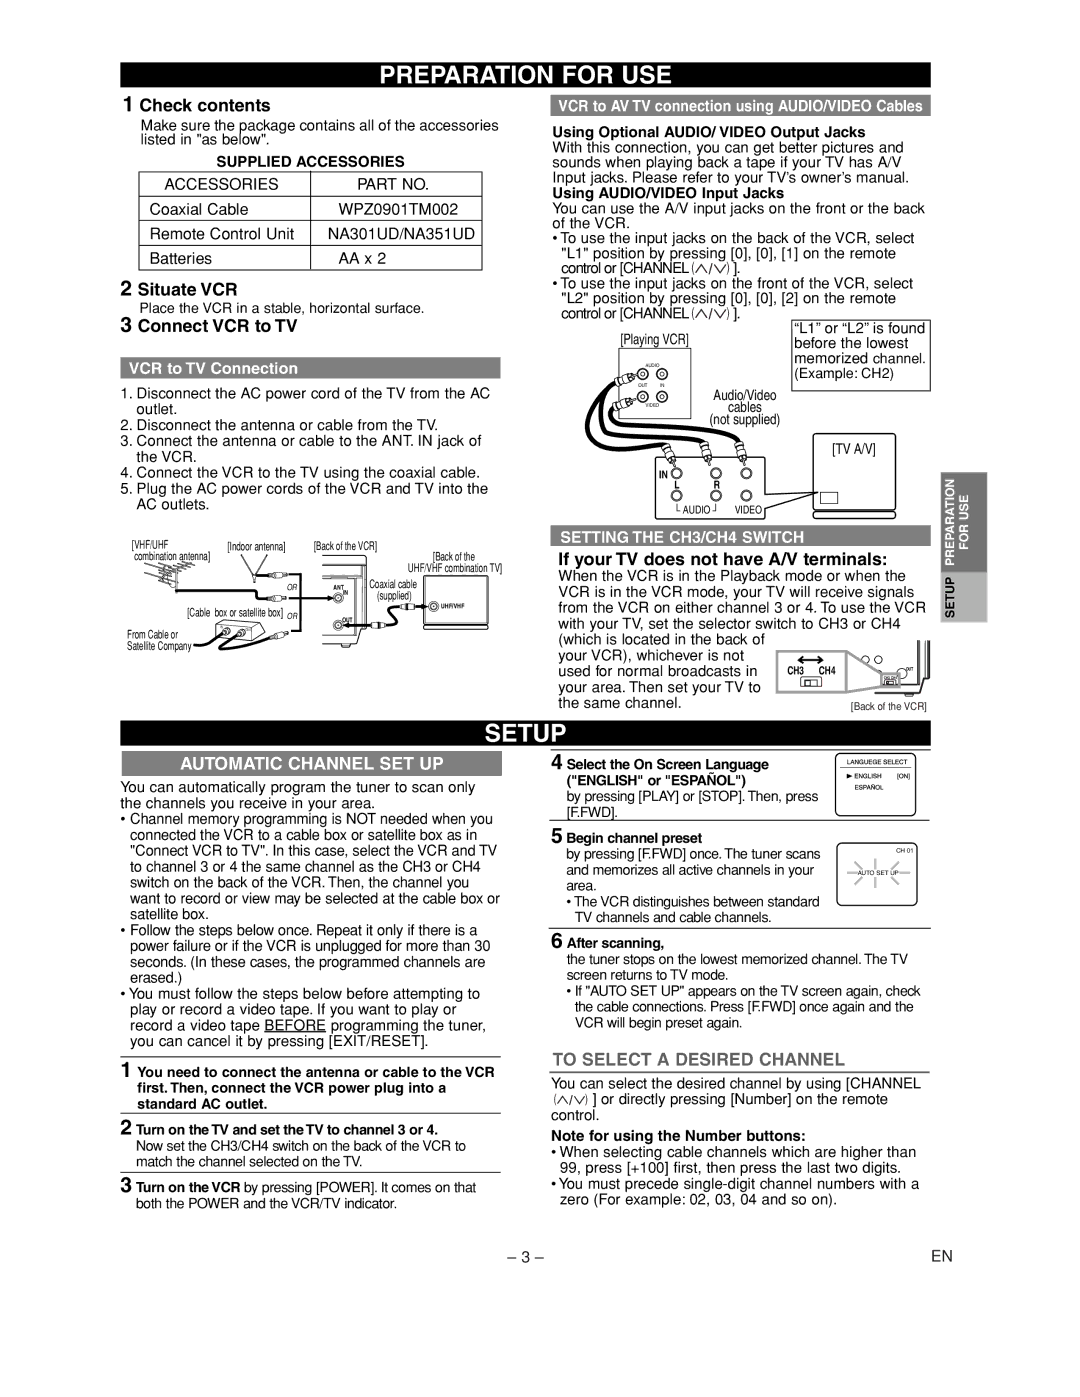
AUTOMATIC CHANNEL SET UP

You can automatically program the tuner to scan only the channels you receive in your area.

Channel memory programming is NOT needed when you connected the VCR to a cable box or satellite box as in "Connect VCR to TV". In this case, select the VCR and TV to channel 3 or 4 the same channel as the CH3 or CH4 switch on the back of the VCR. Then, the channel you want to record or view may be selected at the cable box or satellite box.

Follow the steps below once. Repeat it only if there is a power failure or if the VCR is unplugged for more than 30 seconds. (In these cases, the programmed channels are erased.)

You must follow the steps below before attempting to play or record a video tape. If you want to play or record a video tape BEFORE programming the tuner, you can cancel it by pressing [EXIT/RESET].

1 You need to connect the antenna or cable to the VCR first. Then, connect the VCR power plug into a standard AC outlet.

2 Turn on the TV and set the TV to channel 3 or 4. Now set the CH3/CH4 switch on the back of the VCR to match the channel selected on the TV.

3 Turn on the VCR by pressing [POWER]. It comes on that both the POWER and the VCR/TV indicator.

4 Select the On Screen Language ("ENGLISH" or "ESPAÑOL")

by pressing [PLAY] or [STOP]. Then, press [F.FWD].

5 Begin channel preset

by pressing [F.FWD] once. The tuner scans and memorizes all active channels in your area.

The VCR distinguishes between standard TV channels and cable channels.

6 After scanning,

the tuner stops on the lowest memorized channel. The TV screen returns to TV mode.

If "AUTO SET UP" appears on the TV screen again, check the cable connections. Press [F.FWD] once again and the VCR will begin preset again.

TO SELECT A DESIRED CHANNEL

You can select the desired channel by using [CHANNEL

() ] or directly pressing [Number] on the remote control.

Note for using the Number buttons:

When selecting cable channels which are higher than 99, press [+100] first, then press the last two digits.

You must precede single-digit channel numbers with a zero (For example: 02, 03, 04 and so on).

– 3 –

EN

Page 3
Image 3
Emerson EWV402M owner manual Automatic Channel SET UP, To Select a Desired Channel

EWV402M specifications

The Emerson EWV402M is a cutting-edge weather station that caters to both amateur meteorologists and serious weather enthusiasts. This sophisticated device brings a plethora of advanced features, ensuring users have access to precise and real-time weather data right from their own backyards.

One of the standout features of the EWV402M is its comprehensive array of sensors. This weather station offers accurate measurements of temperature, humidity, wind speed, and direction, as well as rainfall and barometric pressure. These sensors work together to provide a holistic view of local weather conditions, allowing users to monitor changes and trends effectively.

The EWV402M utilizes wireless technology to transmit data, giving users the freedom to place the sensor array in an optimal location for accurate readings without the constraints of long cables. This wireless capability enhances data collection by allowing the station to communicate with the base unit, which displays all collected data in real-time.

Another remarkable technology integrated into the Emerson EWV402M is its user-friendly LCD display. The display is designed to be easily readable, showcasing essential weather parameters at a glance. Users can quickly assess current conditions, as well as historical data, thanks to the built-in memory that records past weather patterns.

In addition to its functionality, the EWV402M also boasts a robust and weather-resistant design, ensuring durability and longevity. The sensor components are built to withstand harsh environmental conditions, making this weather station a reliable choice for outdoor use.

The device is equipped with smart alerts, which notify users of severe weather conditions, enhancing safety for household members. Users can customize alert thresholds for various parameters, ensuring they receive timely warnings.

Moreover, the EWV402M is designed with energy efficiency in mind. It utilizes low-power technology to extend battery life, which is particularly advantageous for outdoor installations.

In summary, the Emerson EWV402M weather station combines advanced sensor technology, wireless capabilities, and a user-friendly interface to deliver an all-encompassing weather tracking experience. Its durability and smart alert features further enhance its functionality, making it an essential tool for anyone keen on monitoring their local weather. Whether for study, preparation, or simply curiosity, the EWV402M provides a reliable source of real-time meteorological data.