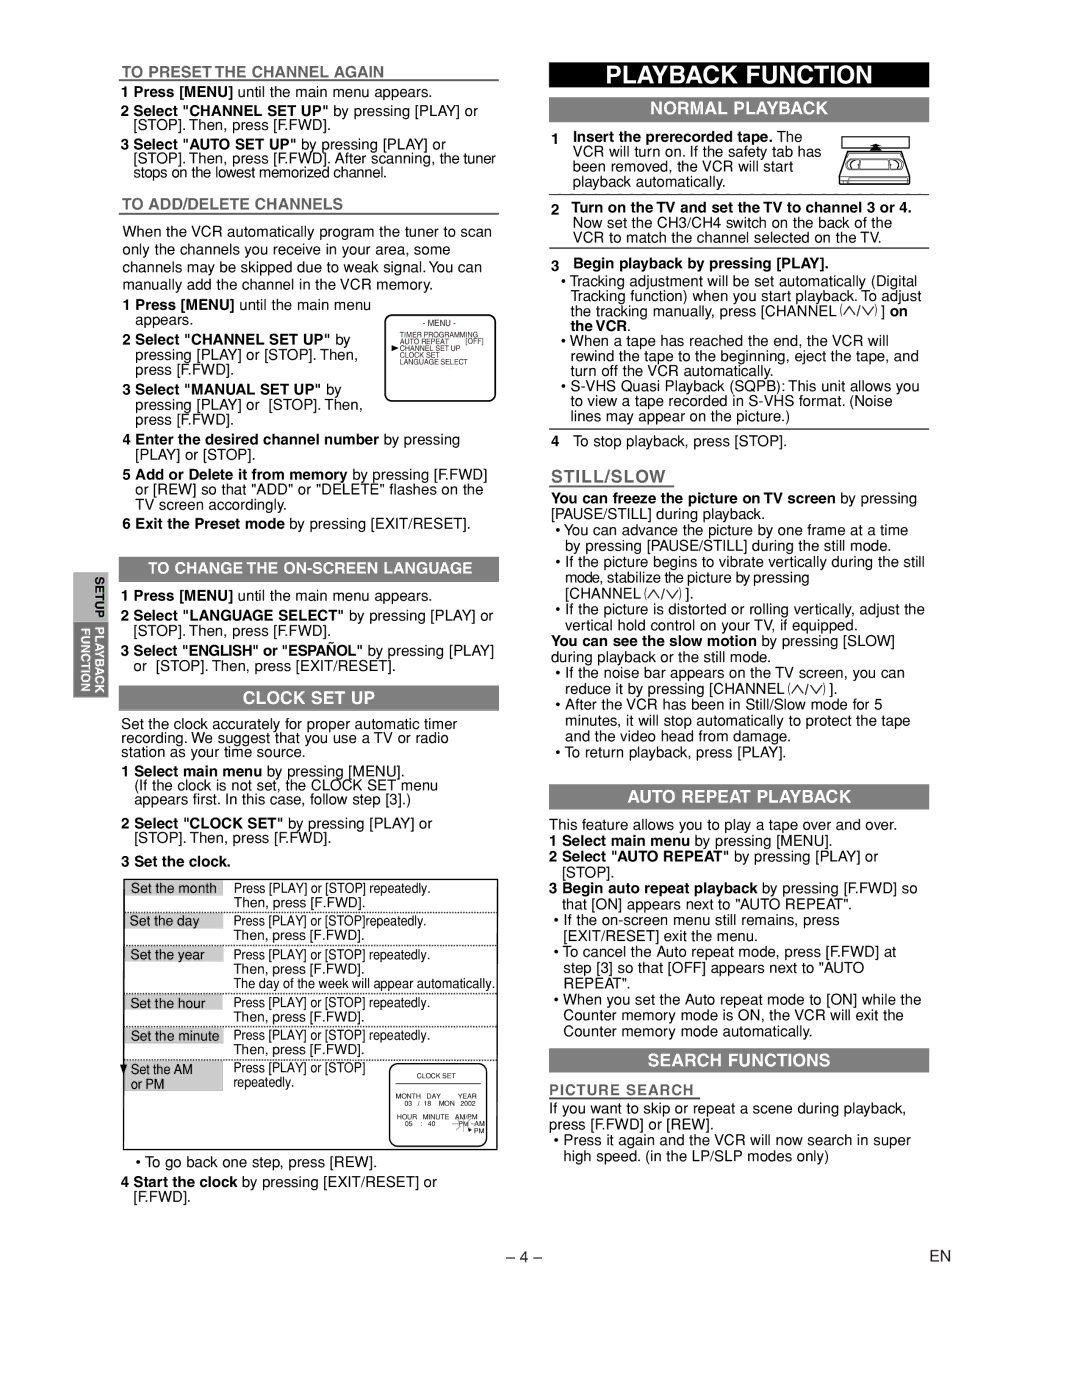
TO PRESET THE CHANNEL AGAIN

1 Press [MENU] until the main menu appears.

2 Select "CHANNEL SET UP" by pressing [PLAY] or [STOP]. Then, press [F.FWD].

3 Select "AUTO SET UP" by pressing [PLAY] or [STOP]. Then, press [F.FWD]. After scanning, the tuner stops on the lowest memorized channel.

TO ADD/DELETE CHANNELS

When the VCR automatically program the tuner to scan only the channels you receive in your area, some channels may be skipped due to weak signal. You can manually add the channel in the VCR memory.

PLAYBACK FUNCTION

NORMAL PLAYBACK

1 Insert the prerecorded tape. The VCR will turn on. If the safety tab has been removed, the VCR will start playback automatically.

2

Turn on the TV and set the TV to channel 3 or 4.


Now set the CH3/CH4 switch on the back of the


VCR to match the channel selected on the TV.

3

Begin playback by pressing [PLAY].


• Tracking adjustment will be set automatically (Digital


Tracking function) when you start playback. To adjust

1 Press [MENU] until the main menu appears.

2 Select "CHANNEL SET UP" by

pressing [PLAY] or [STOP]. Then, press [F.FWD].

3 Select "MANUAL SET UP" by pressing [PLAY] or [STOP]. Then, press [F.FWD].

- MENU -

TIMER PROGRAMMING

AUTO REPEAT [OFF] CHANNEL SET UP

CLOCK SET LANGUAGE SELECT

the tracking manually, press [CHANNEL (

) ] on

the VCR.


• When a tape has reached the end, the VCR will

rewind the tape to the beginning, eject the tape, and

turn off the VCR automatically.


S-VHS Quasi Playback (SQPB): This unit allows you

to view a tape recorded in S-VHS format. (Noise

lines may appear on the picture.)


4 Enter the desired channel number by pressing

[PLAY] or [STOP].

5 Add or Delete it from memory by pressing [F.FWD]

or [REW] so that "ADD" or "DELETE" flashes on the TV screen accordingly.

6 Exit the Preset mode by pressing [EXIT/RESET].


TO CHANGE THE ON-SCREEN LANGUAGE

SETUP


1 Press [MENU] until the main menu appears.


2 Select "LANGUAGE SELECT" by pressing [PLAY] or

PLAYBACK FUNCTION


[STOP]. Then, press [F.FWD].


3 Select "ENGLISH" or "ESPAÑOL" by pressing [PLAY]


or [STOP]. Then, press [EXIT/RESET].

CLOCK SET UP

Set the clock accurately for proper automatic timer recording. We suggest that you use a TV or radio station as your time source.

1

Select main menu by pressing [MENU].


(If the clock is not set, the CLOCK SET menu


appears first. In this case, follow step [3].)

2

Select "CLOCK SET" by pressing [PLAY] or


[STOP]. Then, press [F.FWD].

3

Set the clock.


Set the month


Press [PLAY] or [STOP] repeatedly.


Then, press [F.FWD].


Set the day


Press [PLAY] or [STOP]repeatedly.


Then, press [F.FWD].

4 To stop playback, press [STOP].

STILL/SLOW

You can freeze the picture on TV screen by pressing [PAUSE/STILL] during playback.

You can advance the picture by one frame at a time by pressing [PAUSE/STILL] during the still mode.

If the picture begins to vibrate vertically during the still mode, stabilize the picture by pressing

[CHANNEL () ].

If the picture is distorted or rolling vertically, adjust the vertical hold control on your TV, if equipped.

You can see the slow motion by pressing [SLOW] during playback or the still mode.

If the noise bar appears on the TV screen, you can

reduce it by pressing [CHANNEL () ].

After the VCR has been in Still/Slow mode for 5 minutes, it will stop automatically to protect the tape and the video head from damage.

To return playback, press [PLAY].

AUTO REPEAT PLAYBACK

This feature allows you to play a tape over and over.

1 Select main menu by pressing [MENU].

2 Select "AUTO REPEAT" by pressing [PLAY] or [STOP].

3 Begin auto repeat playback by pressing [F.FWD] so that [ON] appears next to "AUTO REPEAT".

• If the on-screen menu still remains, press

[EXIT/RESET] exit the menu.

Set the year

Set the hour

Set the minute

Set the AM

Press [PLAY] or [STOP] repeatedly. Then, press [F.FWD].

The day of the week will appear automatically.

Press [PLAY] or [STOP] repeatedly. Then, press [F.FWD].

Press [PLAY] or [STOP] repeatedly. Then, press [F.FWD].

Press [PLAY] or [STOP]

• To cancel the Auto repeat mode, press [F.FWD] at

step [3] so that [OFF] appears next to "AUTO

REPEAT".

• When you set the Auto repeat mode to [ON] while the

Counter memory mode is ON, the VCR will exit the

Counter memory mode automatically.

SEARCH FUNCTIONS

or PM

repeatedly.

CLOCK SET

PICTURE SEARCH

MONTH DAY YEAR 03 / 18 MON 2002

HOUR

MINUTE

AM/PM

05

: 40

PM AM


PM

• To go back one step, press [REW].

4 Start the clock by pressing [EXIT/RESET] or [F.FWD].

If you want to skip or repeat a scene during playback, press [F.FWD] or [REW].

Press it again and the VCR will now search in super high speed. (in the LP/SLP modes only)

– 4 –

EN

Page 4
Image 4
Emerson EWV402M owner manual Playback Function, Normal Playback, Clock SET UP, Auto Repeat Playback, Search Functions

EWV402M specifications

The Emerson EWV402M is a cutting-edge weather station that caters to both amateur meteorologists and serious weather enthusiasts. This sophisticated device brings a plethora of advanced features, ensuring users have access to precise and real-time weather data right from their own backyards.

One of the standout features of the EWV402M is its comprehensive array of sensors. This weather station offers accurate measurements of temperature, humidity, wind speed, and direction, as well as rainfall and barometric pressure. These sensors work together to provide a holistic view of local weather conditions, allowing users to monitor changes and trends effectively.

The EWV402M utilizes wireless technology to transmit data, giving users the freedom to place the sensor array in an optimal location for accurate readings without the constraints of long cables. This wireless capability enhances data collection by allowing the station to communicate with the base unit, which displays all collected data in real-time.

Another remarkable technology integrated into the Emerson EWV402M is its user-friendly LCD display. The display is designed to be easily readable, showcasing essential weather parameters at a glance. Users can quickly assess current conditions, as well as historical data, thanks to the built-in memory that records past weather patterns.

In addition to its functionality, the EWV402M also boasts a robust and weather-resistant design, ensuring durability and longevity. The sensor components are built to withstand harsh environmental conditions, making this weather station a reliable choice for outdoor use.

The device is equipped with smart alerts, which notify users of severe weather conditions, enhancing safety for household members. Users can customize alert thresholds for various parameters, ensuring they receive timely warnings.

Moreover, the EWV402M is designed with energy efficiency in mind. It utilizes low-power technology to extend battery life, which is particularly advantageous for outdoor installations.

In summary, the Emerson EWV402M weather station combines advanced sensor technology, wireless capabilities, and a user-friendly interface to deliver an all-encompassing weather tracking experience. Its durability and smart alert features further enhance its functionality, making it an essential tool for anyone keen on monitoring their local weather. Whether for study, preparation, or simply curiosity, the EWV402M provides a reliable source of real-time meteorological data.