INSTALLATION INSTRUCTIONS (continued)
Figure 5
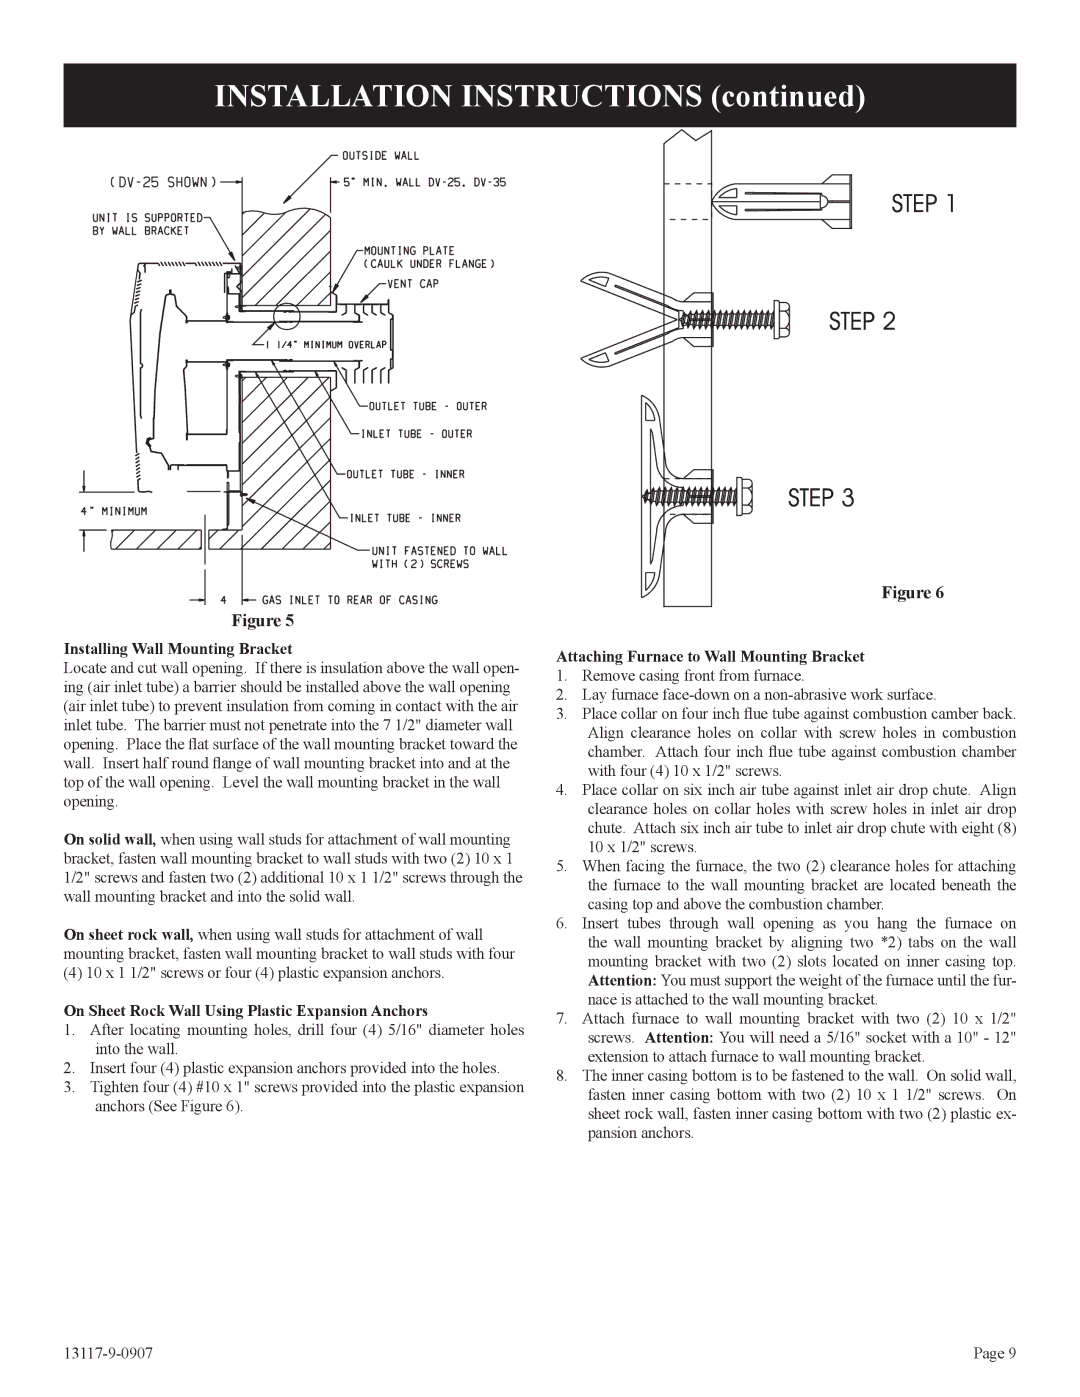
Installing Wall Mounting Bracket
Locate and cut wall opening. If there is insulation above the wall open- ing (air inlet tube) a barrier should be installed above the wall opening (air inlet tube) to prevent insulation from coming in contact with the air inlet tube. The barrier must not penetrate into the 7 1/2" diameter wall opening. Place the flat surface of the wall mounting bracket toward the wall. Insert half round flange of wall mounting bracket into and at the top of the wall opening. Level the wall mounting bracket in the wall opening.
On solid wall, when using wall studs for attachment of wall mounting bracket, fasten wall mounting bracket to wall studs with two (2) 10 x 1 1/2" screws and fasten two (2) additional 10 x 1 1/2" screws through the wall mounting bracket and into the solid wall.
On sheet rock wall, when using wall studs for attachment of wall mounting bracket, fasten wall mounting bracket to wall studs with four
(4) 10 x 1 1/2" screws or four (4) plastic expansion anchors.
On Sheet Rock Wall Using Plastic Expansion Anchors
1.After locating mounting holes, drill four (4) 5/16" diameter holes into the wall.
2.Insert four (4) plastic expansion anchors provided into the holes.
3.Tighten four (4) #10 x 1" screws provided into the plastic expansion anchors (See Figure 6).
Figure 6
Attaching Furnace to Wall Mounting Bracket
1.Remove casing front from furnace.
2.Lay furnace
3.Place collar on four inch flue tube against combustion camber back. Align clearance holes on collar with screw holes in combustion chamber. Attach four inch flue tube against combustion chamber with four (4) 10 x 1/2" screws.
4.Place collar on six inch air tube against inlet air drop chute. Align clearance holes on collar holes with screw holes in inlet air drop chute. Attach six inch air tube to inlet air drop chute with eight (8) 10 x 1/2" screws.
5.When facing the furnace, the two (2) clearance holes for attaching the furnace to the wall mounting bracket are located beneath the casing top and above the combustion chamber.
6.Insert tubes through wall opening as you hang the furnace on the wall mounting bracket by aligning two *2) tabs on the wall mounting bracket with two (2) slots located on inner casing top. Attention: You must support the weight of the furnace until the fur- nace is attached to the wall mounting bracket.
7.Attach furnace to wall mounting bracket with two (2) 10 x 1/2" screws. Attention: You will need a 5/16" socket with a 10" - 12" extension to attach furnace to wall mounting bracket.
8.The inner casing bottom is to be fastened to the wall. On solid wall, fasten inner casing bottom with two (2) 10 x 1 1/2" screws. On sheet rock wall, fasten inner casing bottom with two (2) plastic ex- pansion anchors.
Page 9 |