![]() CAUTION (DW421 and 423 only): Never operate this tool unless the dust collector is in place. Sanding dust exhaust may create a breathing hazard.
CAUTION (DW421 and 423 only): Never operate this tool unless the dust collector is in place. Sanding dust exhaust may create a breathing hazard.
Operation
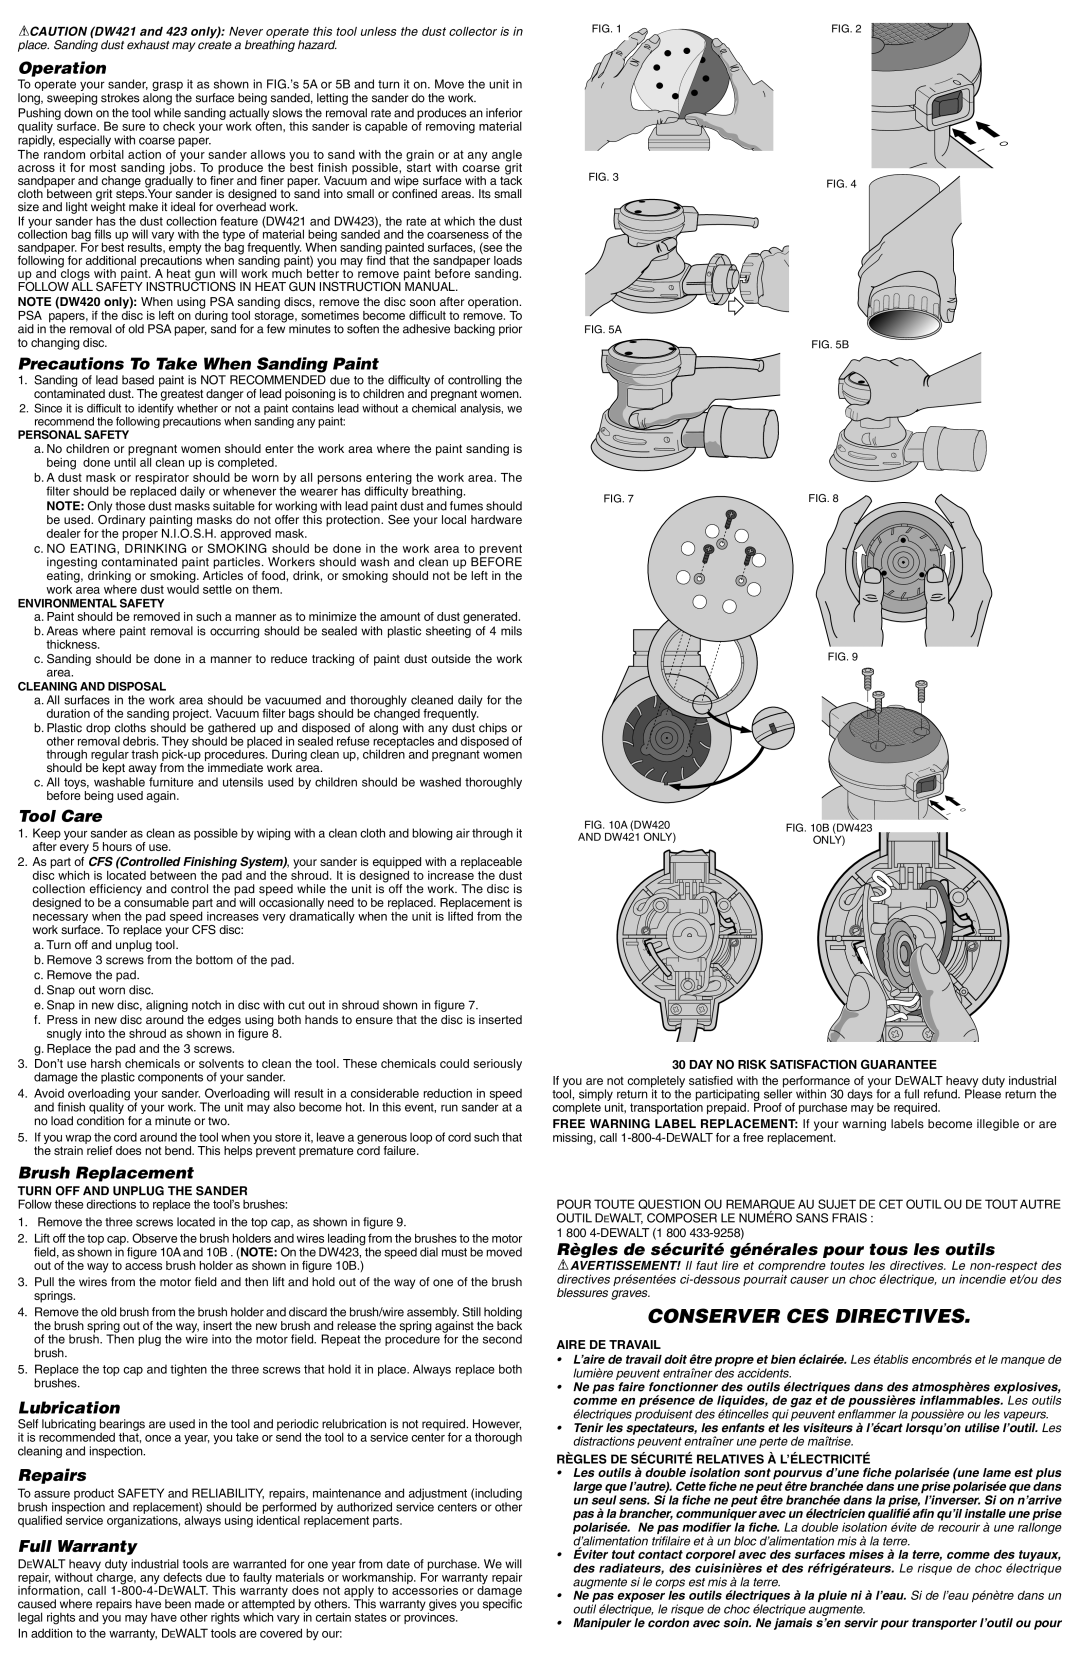
To operate your sander, grasp it as shown in FIG.’s 5A or 5B and turn it on. Move the unit in long, sweeping strokes along the surface being sanded, letting the sander do the work. Pushing down on the tool while sanding actually slows the removal rate and produces an inferior quality surface. Be sure to check your work often, this sander is capable of removing material rapidly, especially with coarse paper.
The random orbital action of your sander allows you to sand with the grain or at any angle across it for most sanding jobs. To produce the best finish possible, start with coarse grit sandpaper and change gradually to finer and finer paper. Vacuum and wipe surface with a tack cloth between grit steps.Your sander is designed to sand into small or confined areas. Its small size and light weight make it ideal for overhead work.
If your sander has the dust collection feature (DW421 and DW423), the rate at which the dust collection bag fills up will vary with the type of material being sanded and the coarseness of the sandpaper. For best results, empty the bag frequently. When sanding painted surfaces, (see the following for additional precautions when sanding paint) you may find that the sandpaper loads up and clogs with paint. A heat gun will work much better to remove paint before sanding.
FOLLOW ALL SAFETY INSTRUCTIONS IN HEAT GUN INSTRUCTION MANUAL.
NOTE (DW420 only): When using PSA sanding discs, remove the disc soon after operation. PSA papers, if the disc is left on during tool storage, sometimes become difficult to remove. To aid in the removal of old PSA paper, sand for a few minutes to soften the adhesive backing prior to changing disc.
Precautions To Take When Sanding Paint
1.Sanding of lead based paint is NOT RECOMMENDED due to the difficulty of controlling the contaminated dust. The greatest danger of lead poisoning is to children and pregnant women.
2.Since it is difficult to identify whether or not a paint contains lead without a chemical analysis, we recommend the following precautions when sanding any paint:
PERSONAL SAFETY
a. No children or pregnant women should enter the work area where the paint sanding is being done until all clean up is completed.
b. A dust mask or respirator should be worn by all persons entering the work area. The filter should be replaced daily or whenever the wearer has difficulty breathing.
NOTE: Only those dust masks suitable for working with lead paint dust and fumes should be used. Ordinary painting masks do not offer this protection. See your local hardware dealer for the proper N.I.O.S.H. approved mask.
c. NO EATING, DRINKING or SMOKING should be done in the work area to prevent ingesting contaminated paint particles. Workers should wash and clean up BEFORE eating, drinking or smoking. Articles of food, drink, or smoking should not be left in the work area where dust would settle on them.
ENVIRONMENTAL SAFETY
a. Paint should be removed in such a manner as to minimize the amount of dust generated. b. Areas where paint removal is occurring should be sealed with plastic sheeting of 4 mils
thickness.
c. Sanding should be done in a manner to reduce tracking of paint dust outside the work area.
CLEANING AND DISPOSAL
a. All surfaces in the work area should be vacuumed and thoroughly cleaned daily for the duration of the sanding project. Vacuum filter bags should be changed frequently.
b. Plastic drop cloths should be gathered up and disposed of along with any dust chips or other removal debris. They should be placed in sealed refuse receptacles and disposed of through regular trash
c. All toys, washable furniture and utensils used by children should be washed thoroughly before being used again.
Tool Care
1. Keep your sander as clean as possible by wiping with a clean cloth and blowing air through it |
after every 5 hours of use. |
2. As part of CFS (Controlled Finishing System), your sander is equipped with a replaceable |
disc which is located between the pad and the shroud. It is designed to increase the dust |
collection efficiency and control the pad speed while the unit is off the work. The disc is |
designed to be a consumable part and will occasionally need to be replaced. Replacement is |
necessary when the pad speed increases very dramatically when the unit is lifted from the |
work surface. To replace your CFS disc: |
a. Turn off and unplug tool. |
b. Remove 3 screws from the bottom of the pad. |
c. Remove the pad. |
d. Snap out worn disc. |
e. Snap in new disc, aligning notch in disc with cut out in shroud shown in figure 7. |
f. Press in new disc around the edges using both hands to ensure that the disc is inserted |
snugly into the shroud as shown in figure 8. |
g. Replace the pad and the 3 screws. |
FIG. 1
FIG. 3
FIG. 5A
FIG. 7
FIG. 10A (DW420
AND DW421 ONLY)
FIG. 2
O
I
O
I
FIG. 4
FIG. 5B
FIG. 8
FIG. 9
O
I
O
I
FIG. 10B (DW423
ONLY)
3. | Don’t use harsh chemicals or solvents to clean the tool. These chemicals could seriously |
| damage the plastic components of your sander. |
4. | Avoid overloading your sander. Overloading will result in a considerable reduction in speed |
| and finish quality of your work. The unit may also become hot. In this event, run sander at a |
| no load condition for a minute or two. |
5. | If you wrap the cord around the tool when you store it, leave a generous loop of cord such that |
| the strain relief does not bend. This helps prevent premature cord failure. |
Brush Replacement
TURN OFF AND UNPLUG THE SANDER
Follow these directions to replace the tool’s brushes:
1.Remove the three screws located in the top cap, as shown in figure 9.
2.Lift off the top cap. Observe the brush holders and wires leading from the brushes to the motor field, as shown in figure 10A and 10B . (NOTE: On the DW423, the speed dial must be moved out of the way to access brush holder as shown in figure 10B.)
3.Pull the wires from the motor field and then lift and hold out of the way of one of the brush springs.
4.Remove the old brush from the brush holder and discard the brush/wire assembly. Still holding the brush spring out of the way, insert the new brush and release the spring against the back of the brush. Then plug the wire into the motor field. Repeat the procedure for the second brush.
5.Replace the top cap and tighten the three screws that hold it in place. Always replace both brushes.
Lubrication
Self lubricating bearings are used in the tool and periodic relubrication is not required. However, it is recommended that, once a year, you take or send the tool to a service center for a thorough cleaning and inspection.
Repairs
To assure product SAFETY and RELIABILITY, repairs, maintenance and adjustment (including brush inspection and replacement) should be performed by authorized service centers or other qualified service organizations, always using identical replacement parts.
Full Warranty
DEWALT heavy duty industrial tools are warranted for one year from date of purchase. We will repair, without charge, any defects due to faulty materials or workmanship. For warranty repair information, call
In addition to the warranty, DEWALT tools are covered by our:
30 DAY NO RISK SATISFACTION GUARANTEE
If you are not completely satisfied with the performance of your DEWALT heavy duty industrial tool, simply return it to the participating seller within 30 days for a full refund. Please return the complete unit, transportation prepaid. Proof of purchase may be required.
FREE WARNING LABEL REPLACEMENT: If your warning labels become illegible or are missing, call
POUR TOUTE QUESTION OU REMARQUE AU SUJET DE CET OUTIL OU DE TOUT AUTRE OUTIL DEWALT, COMPOSER LE NUMÉRO SANS FRAIS :
1 800
Règles de sécurité générales pour tous les outils
![]() AVERTISSEMENT! Il faut lire et comprendre toutes les directives. Le
AVERTISSEMENT! Il faut lire et comprendre toutes les directives. Le
CONSERVER CES DIRECTIVES.
AIRE DE TRAVAIL
•L’aire de travail doit être propre et bien éclairée. Les établis encombrés et le manque de lumière peuvent entraîner des accidents.
•Ne pas faire fonctionner des outils électriques dans des atmosphères explosives, comme en présence de liquides, de gaz et de poussières inflammables. Les outils électriques produisent des étincelles qui peuvent enflammer la poussière ou les vapeurs.
•Tenir les spectateurs, les enfants et les visiteurs à l’écart lorsqu’on utilise l’outil. Les distractions peuvent entraîner une perte de maîtrise.
RÈGLES DE SÉCURITÉ RELATIVES À L’ÉLECTRICITÉ
•Les outils à double isolation sont pourvus d’une fiche polarisée (une lame est plus large que l’autre). Cette fiche ne peut être branchée dans une prise polarisée que dans un seul sens. Si la fiche ne peut être branchée dans la prise, l’inverser. Si on n’arrive pas à la brancher, communiquer avec un électricien qualifié afin qu’il installe une prise polarisée. Ne pas modifier la fiche. La double isolation évite de recourir à une rallonge d’alimentation trifilaire et à un bloc d’alimentation mis à la terre.
•Éviter tout contact corporel avec des surfaces mises à la terre, comme des tuyaux, des radiateurs, des cuisinières et des réfrigérateurs. Le risque de choc électrique augmente si le corps est mis à la terre.
•Ne pas exposer les outils électriques à la pluie ni à l’eau. Si de l’eau pénètre dans un outil électrique, le risque de choc électrique augmente.
•Manipuler le cordon avec soin. Ne jamais s’en servir pour transporter l’outil ou pour