D E S C R I P T I O N A N D F U N C T I O N S O F P A R T S
I
|
| B |
|
| |||
A |
|
| D | E | |||
| C |
|
|
| |||
|
|
|
|
|
|
|
|
|
|
|
|
|
|
|
|
|
|
|
|
|
|
|
|
F
J
H
G
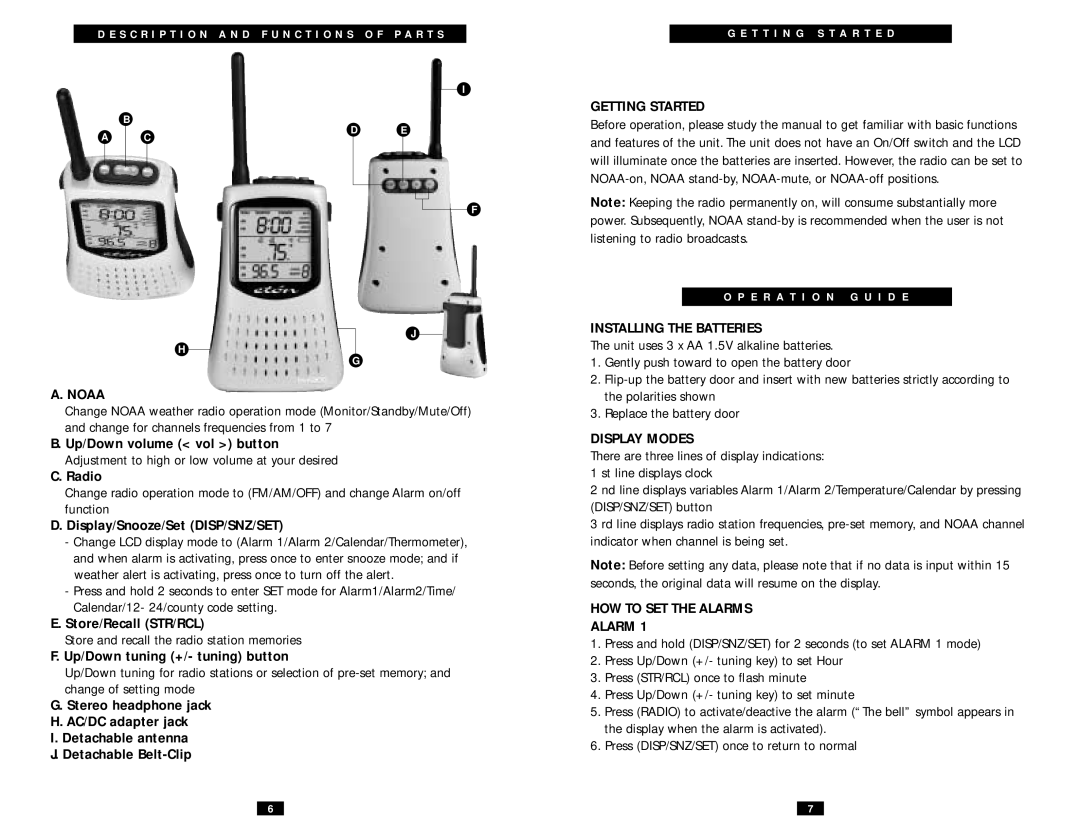
A. NOAA
Change NOAA weather radio operation mode (Monitor/Standby/Mute/Off) and change for channels frequencies from 1 to 7
B. Up/Down volume (< vol >) button Adjustment to high or low volume at your desired
C.Radio
Change radio operation mode to (FM/AM/OFF) and change Alarm on/off function
D.Display/Snooze/Set (DISP/SNZ/SET)
-Change LCD display mode to (Alarm 1/Alarm 2/Calendar/Thermometer), and when alarm is activating, press once to enter snooze mode; and if weather alert is activating, press once to turn off the alert.
-Press and hold 2 seconds to enter SET mode for Alarm1/Alarm2/Time/ Calendar/12- 24/county code setting.
E.Store/Recall (STR/RCL)
Store and recall the radio station memories
F.Up/Down tuning (+/- tuning) button
Up/Down tuning for radio stations or selection of
G.Stereo headphone jack
H.AC/DC adapter jack
I.Detachable antenna
J.Detachable
G E T T I N G S T A R T E D
GETTING STARTED
Before operation, please study the manual to get familiar with basic functions and features of the unit. The unit does not have an On/Off switch and the LCD will illuminate once the batteries are inserted. However, the radio can be set to
Note: Keeping the radio permanently on, will consume substantially more power. Subsequently, NOAA
O P E R A T I O N G U I D E
INSTALLING THE BATTERIES
The unit uses 3 x AA 1.5V alkaline batteries.
1.Gently push toward to open the battery door
2.
3.Replace the battery door
DISPLAY MODES
There are three lines of display indications:
1 st line displays clock
2 nd line displays variables Alarm 1/Alarm 2/Temperature/Calendar by pressing (DISP/SNZ/SET) button
3 rd line displays radio station frequencies,
Note: Before setting any data, please note that if no data is input within 15 seconds, the original data will resume on the display.
HOW TO SET THE ALARMS
ALARM 1
1.Press and hold (DISP/SNZ/SET) for 2 seconds (to set ALARM 1 mode)
2.Press Up/Down (+/- tuning key) to set Hour
3.Press (STR/RCL) once to flash minute
4.Press Up/Down (+/- tuning key) to set minute
5.Press (RADIO) to activate/deactive the alarm (“The bell” symbol appears in the display when the alarm is activated).
6.Press (DISP/SNZ/SET) once to return to normal
6 |
| 7 |
