QUICK START GUIDE
AS1000 Series
THANK YOU FOR PURCHASING YOUR NEW EUREKA VACUUM!
Please take a few moments to read this Quick Start Guide. It is designed to help you assemble your vacuum easily.
To view our “How to Assemble” demo, visit www.eureka.com/airspeed/assembly
If you have questions about your new vacuum, please contact our customer service helpline at
Helpline Hours:
8 a.m. to 7:30 p.m. (CST), Monday - Friday
10 a.m. to 6:30 p.m. (CST), Saturday - Sunday
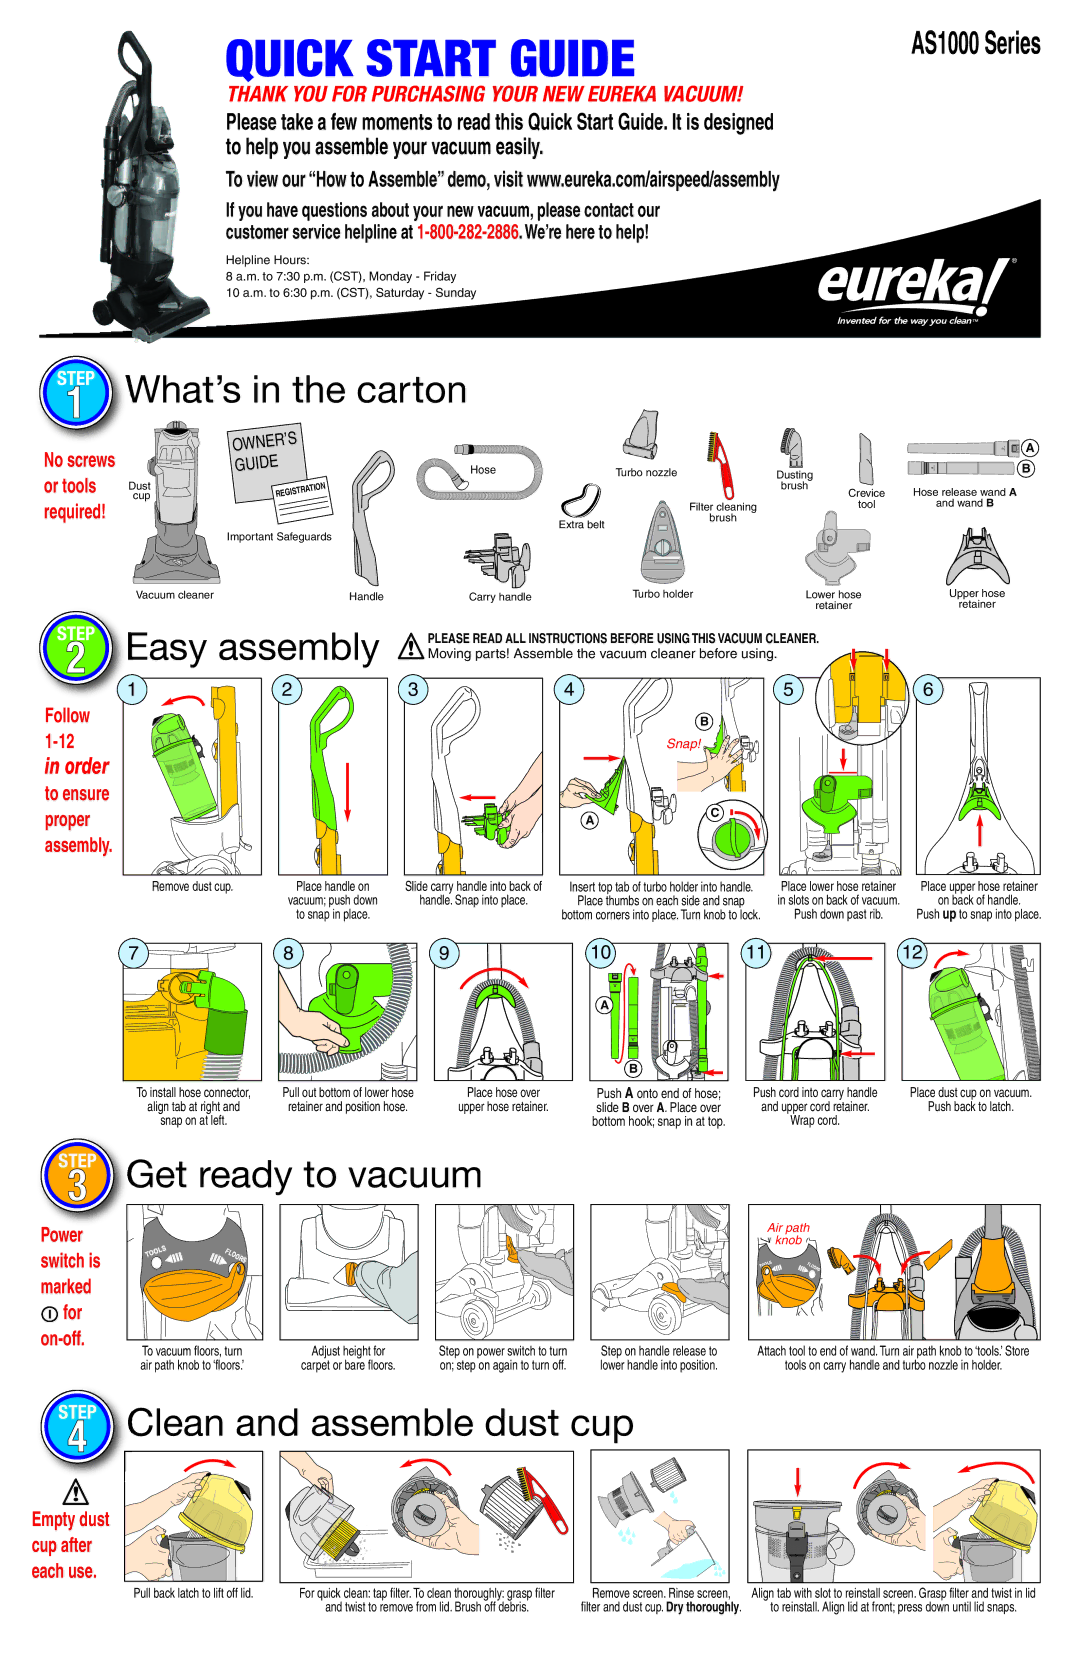
STEP
1
No screws or tools required!
 What’s in the carton
|
| R’S |
| NE | |
| OW |
|
| GUIDE | |
Dust |
| TION |
cup |
| REGISTRA |
|
| |
Important Safeguards
|
|
|
| WAND 1 | A |
Hose |
| Turbo nozzle | Dusting | WAND 2 | B |
|
| ||||
|
|
|
| ||
|
|
| brush | Hose release wand A |
|
|
|
| Crevice |
| |
|
| Filter cleaning | tool | and wand B |
|
| Extra belt | brush |
|
|
|
|
|
|
|
|
Vacuum cleaner | Handle |
STEP2 Easy assembly
Carry handle | Turbo holder | Lower hose | Upper hose |
|
| retainer | retainer |
PLEASE READ ALL INSTRUCTIONS BEFORE USING THIS VACUUM CLEANER. ! Moving parts! Assemble the vacuum cleaner before using.
1 | 2 |
Follow
in order
to ensure proper assembly.
Remove dust cup. | Place handle on |
| vacuum; push down |
| to snap in place. |
3
Slide carry handle into back of
handle. Snap into place.
4 |
|
| B |
| Snap! |
A | C |
|
Insert top tab of turbo holder into handle. Place thumbs on each side and snap bottom corners into place. Turn knob to lock.
5 |
Place lower hose retainer in slots on back of vacuum.
Push down past rib.
6 |
Place upper hose retainer
on back of handle.
Push up to snap into place.
7 |
To install hose connector,
align tab at right and
snap on at left.
8 |
Pull out bottom of lower hose retainer and position hose.
9
Place hose over
upper hose retainer.
10 |
1 |
A |
2 |
B |
Push A onto end of hose; slide B over A. Place over bottom hook; snap in at top.
11 |
Push cord into carry handle and upper cord retainer.
Wrap cord.
12 |
Place dust cup on vacuum.
Push back to latch.
STEP
3
Power switch is marked
Ifor
Get ready to vacuum
| LS | F |
|
O |
| ||
TO |
| L |
|
| O | ||
|
|
| O |
|
|
| R |
|
|
| S |
To vacuum floors, turn | Adjust height for | Step on power switch to turn |
air path knob to ‘floors.’ | carpet or bare floors. | on; step on again to turn off. |
Step on handle release to lower handle into position.
Air path | |
| knob |
LS | FL |
OO | |
T | OO |
| RS |
Attach tool to end of wand. Turn air path knob to ‘tools.’ Store
tools on carry handle and turbo nozzle in holder.
STEP
4
!
Empty dust cup after each use.
Clean and assemble dust cup
Pull back latch to lift off lid. | For quick clean: tap filter. To clean thoroughly: grasp filter | Remove screen. Rinse screen, | Align tab with slot to reinstall screen. Grasp filter and twist in lid |
| and twist to remove from lid. Brush off debris. | filter and dust cup. Dry thoroughly. | to reinstall. Align lid at front; press down until lid snaps. |